Disks with an uninstalled file system are indicated RAW(translated from English " raw», « raw"). This means that the data standard unknown, the stored information does not have a clear specification. If in Windows one of the disks or partitions is recognized as RAW, it means that the installed drivers was not recognized file system name. In normal mode this name should be FAT or NTFS.
When you try to enter such a section, you will see next error.
Or a message that the disk is not formatted.
If you go to Administration Control panels, choose Computer management, can see state this disk.


In this case, the system reports that the logical drive OK, But unknown format.
Reasons There can be several occurrences of an unknown RAW format:
- file system structure broken(partial destruction of boot sectors);
- disk not formatted(file system not installed);
- No access.
This may be a consequence of the following actions:
- incorrect installation(reinstallation), OS recovery;
- faulty hard drive sectors (you may have recently noticed a long response time when trying to open a particular directory);
- unstable work Power supply or mains voltage fluctuations;
- poor contact of cables and cables connecting the hard drive to the power supply and motherboard;
- viruses.
Checking for errors
If the disk has not suffered serious damage, and most of the file system structures have survived, you can fix the error using standard system tools. In this case, the section should not be systemic.
Let's launch command interpreter with rights administrator.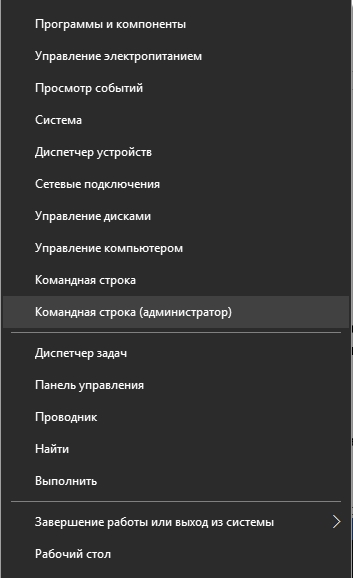
There is a system utility Checkingdisk, designed specifically for checking the hard drive.
To call it in the console, enter chkdsk (drive letter): /f

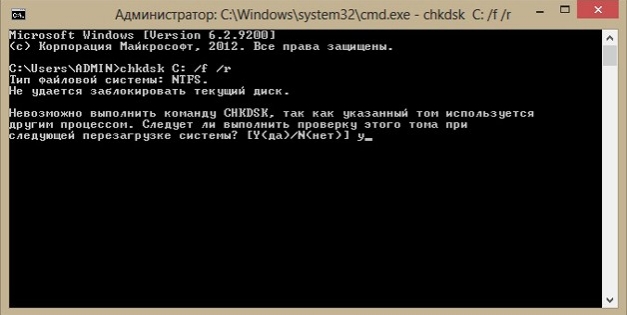
Confirm checking the specified volume by entering a character Y– the search and elimination of errors will begin. Upon completion reboot. Scanning can take a lot of time, depending on the size of the disk that needs to be fixed. Wait for it to complete, because there is a high probability of a successful recovery this way.
Using Formatting
Carrying out the procedure formatting, Please note that all data will be lost. If the information stored on it was not important to you, to start reformatting, go to as shown earlier. 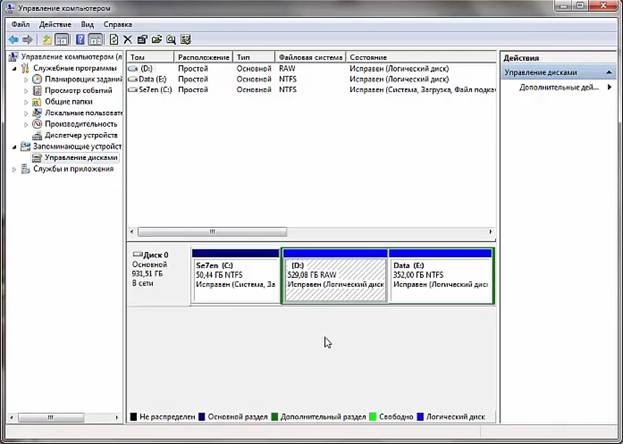
Right-click on the disk and select. 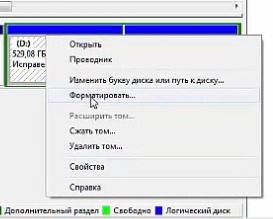
If a lot of necessary data is stored there, then proceed to formatting The last thing you should do is try to restore them using other available means.
Using DMDE to recover without data loss
One of the tools is a free program DMDE. Download it from the official website. After installation and launch select physical device that contains a RAW section, check the box below Show sections and press OK.
The required disk can be found at crossed out icon or type RAW, select it and click Open volume.
View contents, if it opens, make sure that the selection was made correctly.
Then click the button Restore And Yes to confirm the recovery of the boot sector from the copy. 
Using the TestDisk utility
Another free program that can restore partitions in case of data corruption is TestDisk. It works more effectively than the previous one, but you will have to tinker with it a little more.
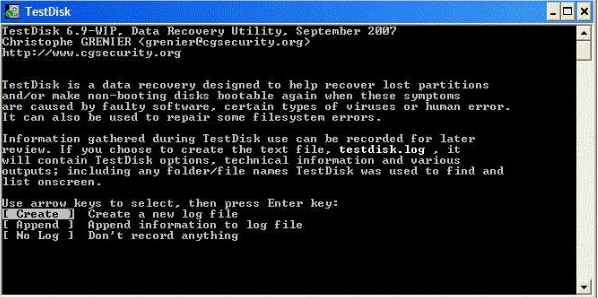
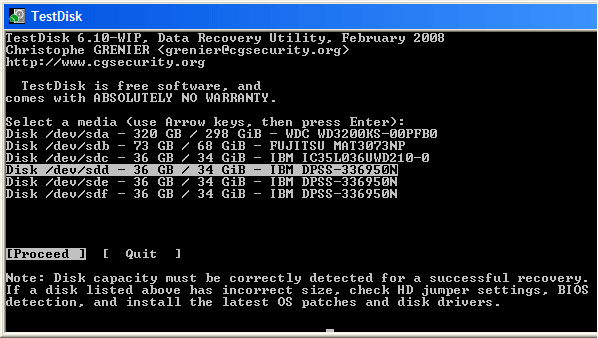
After pressing " Create"(creating a new log file) select drive with ROW format.

The disk is selected using cursor keyboards.
Select Analyze and button Enter for confirmation. 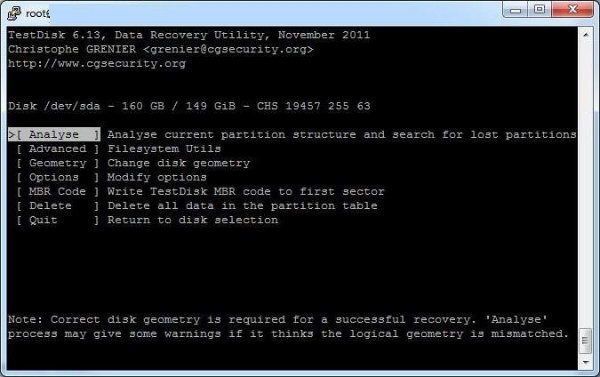
Wait for the analysis to complete - the program will find several disks, including the one that contains information in RAW format. To identify it is possible, knowing the volume. 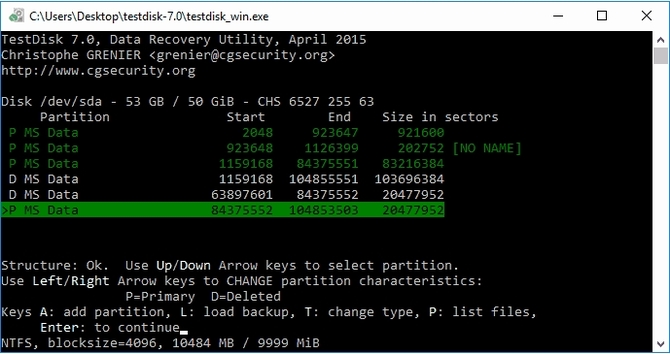
Select P to enter the mode viewing. Once you are sure that this is the drive you need, click Write for recovery and Y to confirm this action. 
After recovery is complete reboot and check if the recovery was successful.
Raw format on the system partition
 If you are restoring a system partition, you should take into account that after returning the disk to the original format of the OS file system will stop loading- required restore loader.
For recovery, you can use the same utilities that were discussed above. We recommend for these purposes, connect the hard drive to another device and perform this procedure from it, or use a special boot disk containing, for example, Minitool Partition Wizard, Active Partition Recovery Boot Disk or similar specialized facilities.
Today, sometimes there are situations when a user turns on a laptop or computer, and instead of some logical partition, a disk with an incomprehensible RAW format is displayed. Let's try to find out what it is.
Also in this review we will look at the simplest ways to convert this format into a normal form.
What is RAW format?
If we are talking about a format of this type, then you need to clearly understand that in the usual sense it is not even a format. RAW is a modified file system type. When trying to access such a partition, two types of problems may arise. Firstly, the volume may not appear at all in the file manager. Secondly, even if the volume is visible, there are no files in it, so the system will offer immediate formatting, since the file system is not compatible with the OS. How to correct the situation in this case? You need to choose the right approach. Formatting a partition and destroying all displayed information will not lead to anything good. Why can HDD formats change?
Reasons for changing the disk format
Before starting to solve the problem itself, it is necessary to clarify the possible reasons for the change in the partition structure. Experts believe that the RAW format of hard drives may appear as a result of the influence of certain viruses that purposefully change the file system. This can happen if there is a sudden power outage while performing any operations that require direct access to the partition. After this, in some cases the disk may be visible even with the files and folders on it. But it becomes impossible to perform operations to change the volume label, format it using standard tools, or resize it. This happens because the file system changes. Fatal errors appear in the partition table. However, there are several universal solutions that can fix the problem associated with the RAW format of hard drives. Next, we will look in detail at how to correct the situation.
RAW format: correction technique
Next, we will look at the main aspects that relate to correcting the situation associated with the RAW format. As it has probably already become clear to you, HDD recovery as the main task uses a solution that allows you to bring the partition’s file system into a form that would be perceived by the operating system, namely NTFS or FAT32. It is worth noting that in most cases, even rolling back the system to a previous state will not bring the desired result, so you should not do this. It will be a waste of time. First, you can try to make folders and files appear. In some cases, they can be copied to another location, for example, to removable media. How can you make files visible? In this case, RAW format processing is carried out using a rather interesting utility called Mini Tool Power Data Recovery. This program belongs to the class of shareware software. After installation, the application must run a module called Lost Partition Recovery. In it you need to select the desired partition and click Full Scan. This will run a full scan. When the process is complete, the program window will display a list of all available files. All you have to do is mark the required data, and then click on the Save button. The application will automatically prompt you to select the location where you would like to save the files. Specify it and start the process. After completing this operation, you can safely begin formatting the partition. If this procedure is not available, you can immediately proceed to the next step.
System recovery
Now let's look at how you can convert RAW to NTFS using only the native tools of the Windows operating system. First of all, you need to launch the command line using the Win+R key combination. It is worth noting that hard drive recovery can only be performed in this way. A standard partition check in a Windows environment will not bring any results. Now it all comes down to writing the following command on the command line: chkdsk “drive letter”. Then you just need to press enter. All that remains is to wait for the process to complete, during which the file system will be restored. Then you need to reboot. It is worth noting that this method is perfect for system drives in those file systems that previously had an NTFS structure. However, when using this technique, you will need to boot your laptop or computer terminal from a recovery or boot disk.
How to fix a disk format using the TestDisk utility
Let's look at another way to fix the problem associated with the RAW format of hard drives. The TestDisk utility for restoring the original format is best suited for this purpose. The main advantage of this application is that it does not require installation. The program is released as a portable version. The main disadvantage of the utility is that it does not have a Russified interface and works in DOS mode. So, let's start restoring the hard drive. First of all, at the first stage of working with the program, you need to select the Create item, which is responsible for creating a new log file. Then you should press the enter key. After this, use the arrows to select the desired partition or disk. As a result, the application will automatically detect the partition table type. You can change it manually, but this is not recommended. Next, you need to use the analysis line “Analyse”, and after that a quick search – “Quick Search”. After completing each action, you must press the Enter key. When the lost section is found, you will need to use the Save Structure or Write option. If the desired section is not displayed in the list of search results, you need to use deep scanning. After this, it is necessary to perform all the operations just described to preserve the structure. After this, you will need to restart your laptop or computer. As a result, the problem should disappear.
Application of Ontrack Easy Recovery
Let's look at another program with which you can convert the RAW format of hard drives. This is very easy to do with Ontrack Easy Recovery. The application works similarly to the TestDisk program. However, most users are attracted to this program because it has a convenient and beautiful interface. It is worth noting that many experts consider this software product to be an indispensable tool for recovering large disk partitions. The only drawback of this program is that it is paid. However, for our person this is not a problem. After all, on the Internet you can always find key generators, activation keys and patches.
Conclusion
What's the result? In this review, we looked at ways to change the RAW format of hard drives. It should already be clear to you how you can fix the RAW format to readable format. As for the choice of method, it must be based on each specific situation. Let's assume that if formatting is possible on your own, then you can display the files and simply copy them to another location. You can also try to restore the partition to its original state using the scan command, which is a built-in operating system tool. However, if the volume is large, this process can take quite a long time. On the other hand, to simplify these steps, you can use third-party utilities. Some of these utilities were discussed above. Some users may not like the DOS interface of the TestDisk program. If you do not like this method, you can use a similar application, Ontrack Easy Recovery, which has a full graphical shell. Many may argue that this method requires certain costs, but here everyone decides for himself what is more important to him: information or money...
A number of users may be unable to access their hard drive (or flash drive). In the operating system, such devices receive the “Raw” status, and their file structure becomes inaccessible to the user. In this article, I will examine this dysfunction in detail, tell you what to do in a situation where the file system is RAW, as well as how to return NTFS, FAT32, what tools will help us with this, and how to use them.
To understand that this is a RAW file system and how to return the NTFS, FAT32 format, you need to determine the meaning of the term “RAW” itself. Translated from Shakespeare’s language, the lexeme “Raw” means “raw”, “raw material”. Accordingly, in our case, this term refers to disks that are either not yet formatted, or the data structure on them is damaged (errors in the MBR partition table and MFT file table, viruses, PC hardware problems, and so on.).

Simply put, RAW disks are disks that are not recognized by Windows for various reasons. Typically, in this case, Windows recommends formatting such a disk, which should not be done, since the data on the disk will be lost as a result of formatting.
Reasons why a disk from NTFS and FAT32 becomes RAW
The reasons for the appearance of RAW disks instead of the usual NTFS and FAT32 file systems are as follows:
- Sudden shutdown of such disks (loss of voltage in the network, physical disconnection by the user, problems with the power supply, etc.), as a result of which the integrity and structure of the data on the disk is disrupted;
- Problems with cables connecting the motherboard and hard drive;
- The operation of virus programs that violate the integrity of the bootloader, partition table, file structure, and so on;
- Bad sectors on the hard drive, as a result of which the system structure on the hard drive is damaged;
- Error in installing or updating the operating system;
- Errors when working with various hard disk partition managers;
- Not a tight connection between the flash drive and the USB connector of the PC (in the case of a flash drive);
- Problems with the computer motherboard and so on.
How to return NTFS, FAT32 from RAW
- Just try restarting your computer, the problem may be random;
- Check the tightness of the cable connections to the hard drive, try using a different connector for connecting the hard drive on the motherboard, as well as a different USB connector on the computer when connecting an external flash drive;
- Use the built-in CHKDSK() utility. Launch a command prompt as administrator and type
chkdsk X: /f (where X is the RAW drive letter)
The “f” parameter means correcting errors on the disk, that is, the CHKDSK utility not only looks for problems, but also fixes them.

I also note that this command is relevant, first of all, for those disks that were formatted in the NTFS file system. Moreover, if you cannot boot the operating system, then boot using a bootable system disk or flash drive (you can use various “Live CD” builds), select “System Restore” there, go to “Advanced options” and then to “Command Prompt” , and there type the above command.
If you cannot access the command line from your PC, then it is recommended to connect your hard drive to another computer and check your disk for errors from it.
- Use the capabilities of another system utility, sfc, created to check the integrity of system files. Also run the command line as administrator and write in it:
sfc /scannow
and press enter.

- If you have access to the operating system, then it is worth checking your computer for viruses using special anti-virus programs (for example, Web CureIt! or Malware-AntiMalware);
- If there is no important information on the problem disk (or it is not significant), then the problem disk (or flash drive) can be formatted. Click on the “Start” key and type diskmgmt.msc in the search bar, the Disk Control Panel will appear. Right-click on the raw disk and select “Format” from the menu that appears.
If you have a RAW file system, return NTFS, FAT32 - using third-party programs
If you want to restore the NFTS and FAT32 file system, then you should use the functionality of special programs that will help us with this. I suggest programs such as Recuva and TestDisk.
Recuva
One of the popular programs for recovering lost files is Recuva. Download, install and run this product, select the option to restore all files, indicate the problem disk, enable the in-depth analysis option and click on “Start”.
After the scan is completed, the program will display a list of found files, mark them with checkboxes and click on “Recover”.

TestDisk
The second program that can help with the issue of the RAW file system is TestDisk.
- Download and install this program, run it as administrator.
- Select the “Create” command and press enter, select the raw disk with the cursor and press “Enter”.
- After selecting the desired type of partition table, click on enter, then select “Analyze” and “Quick Search” (a quick search for problematic partitions will be carried out).
- After TestDisk finds the problematic volumes, click on “Write” to record the structure of the found partition.
How to change the file system of a flash drive [video]
Above I analyzed the problem when the file system is RAW. The most optimal tool for returning NTFS, FAT32 is to use the CHKDSK system command, as well as special programs that can restore the file structure of the problem disk. If none of the tips I suggested turned out to be effective for you, then I recommend contacting a service center - perhaps your hard drive has problems not of a software, but of a hardware nature, and it needs a thorough repair.
In contact with
One of the problems that users of Windows 10, 8 and Windows 7 face is the hard drive (HDD and SSD) or disk partition with the RAW file system. This is usually accompanied by the messages “To use the disk, first format it” and “The volume file system is not recognized,” and when you try to check such a disk using standard Windows tools, you will see the message “CHKDSK is not valid for RAW disks.”
The RAW disk format is a kind of “lack of format,” or rather a file system on the disk: this happens with new or faulty hard drives, and in situations where for no reason the disk has become a RAW format - more often due to system failures , improper shutdown of the computer or power problems, while in the latter case the information on the disk usually remains intact.
This instruction provides details on how to fix a disk with a RAW file system in different situations: when there is data on it, the system needs to be restored to the previous file system from RAW, or when any important data on the HDD or SSD is missing and formatting disk is not a problem.

Checking the disk for errors and fixing file system errors
This option is the first thing to try in all cases where a RAW partition or disk appears. It does not always work, but it is safe and applicable both in cases where a problem has arisen with a disk or data partition, and in cases where the RAW disk is a system disk with Windows and the OS does not boot.
In case the operating system is running, just follow these steps
- Run Command Prompt as an administrator (in Windows 10 and 8 this is easiest to do through the Win+X menu, which can also be called by right-clicking the Start button).
- Enter the command chkdsk d: /f and press Enter (in this command, d: is the letter of the RAW drive that needs to be corrected).
After this, two scenarios are possible: if the disk has become RAW due to a simple file system failure, the scan will begin and, with a high probability, you will see your disk in the desired format (usually NTFS) when it is completed. If the matter is more serious, the command will display “CHKDSK is not valid for RAW disks.” This means that this method is not suitable for you to restore the disk.

In situations where the operating system does not start, you can use a Windows 10, 8 or Windows 7 recovery disk or a distribution kit with the operating system, for example, a bootable USB flash drive (I will give an example for the second case):
- We boot from the distribution kit (its bitness must match the bitness of the installed OS).
- Next, either on the screen after selecting the language at the bottom left, select “System Restore” and then open the Command Prompt, or simply press Shift+F10 to open it (on some laptops Shift+Fn+F10).
- On the command line we use the commands in order
- diskpart
- list volume(as a result of executing this command, we look at what letter the problematic disk, or, more precisely, partition, is currently located under, since this letter may differ from the one that was in the working system).
- exit
- chkdsk d: /f(where d: is the letter of the problem drive, which we found out in step 5).
Here the possible scenarios are the same as those described earlier: either everything will be fixed and after a reboot the system will start as usual, or you will see a message stating that you cannot use chkdsk with a RAW disk, then look at the following methods.
Easily format a disk or RAW partition when there is no important data on it
The first case is the simplest: it is suitable in situations where you see the RAW file system on a newly purchased disk (this is normal) or if an existing disk or partition on it has this file system, but does not have important data, that is, restore the previous one No disk format required.
In such a scenario, we can simply format this disk or partition using standard Windows tools (in fact, we can simply agree to the formatting suggestion in Explorer “To use the disk, first format it)
If for some reason you cannot format the disk in this way, try also by right-clicking on the RAW partition (disk), first “Delete volume”, and then click on the area of the disk that is not allocated and “Create a simple volume”. The Volume Creation Wizard will prompt you to specify a drive letter and format it with the desired file system.
Note: All methods for recovering a RAW partition or disk use the partition structure shown in the screenshot below: a GPT system disk with Windows 10, an EFI boot partition, a recovery environment, a system partition, and an E: partition that is defined as having a RAW file system (this information , I assume, will help to better understand the steps outlined below).
Recovering an NTFS partition from RAW to DMDE
It’s much more unpleasant if the disk that became RAW contained important data and you need to not only format it, but return the partition with this data.
In this situation, first I recommend trying a free program for data recovery and lost partitions (and not only for this) DMDE, the official website of which is dmde.ru(This guide uses the Windows version of the GUI program.)
The process of restoring a partition from RAW in a program will generally consist of the following steps:
Note: in my experiments, when fixing a RAW disk in Windows 10 (UEFI + GPT) using DMDE, immediately after the procedure the system reported disk errors (and the problem disk was accessible and contained all the data that was on it before) and suggested rebooting computer to fix them. After rebooting everything worked fine.
If you use DMDE to fix the system disk (for example, by connecting it to another computer), keep in mind that the following scenario is possible as a result: the RAW disk will return the original file system, but when connecting it to the “native” computer or laptop, the OS will not load.
Recovering a RAW disk in TestDisk
Another way to effectively search and recover a disk partition from RAW is the free TestDisk program. It is more difficult to use than the previous option, but sometimes turns out to be more effective.
Attention: Only undertake what is described below if you understand what you are doing, and even then be prepared for the possibility that something will go wrong. Save important data to a physical disk other than the one you are working on. Also stock up on a Windows recovery disk or a distribution kit with the OS (you may need to restore the bootloader, for which I provided instructions above, especially if the disk is GPT, even in cases where it is not the system partition that is being restored).
If everything went well, the correct partition structure will be written, and after restarting the computer, the disk will be accessible as before. However, as mentioned above, you may need to repair the bootloader; Windows 10 has automatic boot repair that works well in the recovery environment.
RAW file system on Windows system partition
In cases where the file system problem has occurred on a partition with Windows 10, 8 or Windows 7, and a simple chkdsk in the recovery environment does not work, you can either connect this drive to another computer with a working system and fix the problem on it, or use LiveCD with tools for recovering partitions on disks.
- A list of LiveCDs containing TestDisk is available here: http://www.cgsecurity.org/wiki/TestDisk_Livecd
- To restore from RAW using DMDE, you can extract the program files to a WinPE-based bootable USB flash drive and, after booting from it, run the program executable file. The program's official website also has instructions for creating bootable DOS drives.
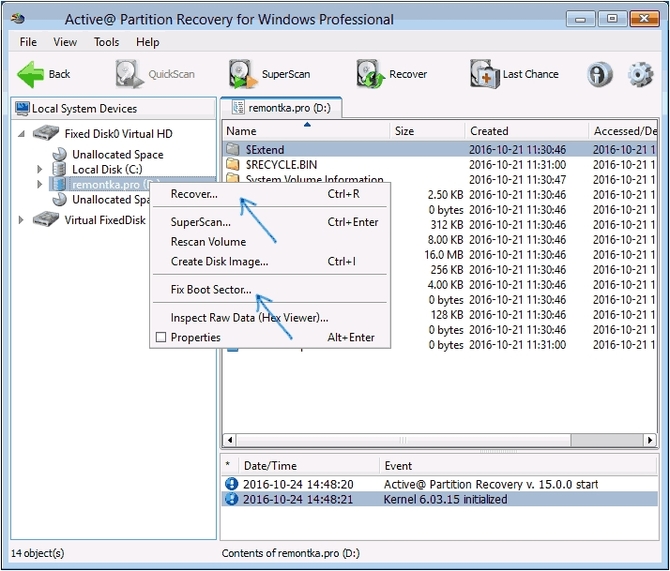
There are also third-party LiveCDs specifically designed for partition recovery. However, in my tests, only the paid Active Partition Recovery Boot Disk turned out to be workable in relation to RAW partitions; all the others only allow you to restore files, or find only those partitions that were deleted (unallocated space on the disk), ignoring RAW partitions (this is how the Partition function works Recovery in the boot version of Minitool Partition Wizard).

At the same time, the Active Partition Recovery boot disk (if you decide to use it) may work with some features:
- Sometimes it shows a RAW disk as a regular NTFS, displaying all the files on it, and refuses to restore it (Recover menu item), reporting that the partition is already present on the disk.
- If what is described in the first paragraph does not happen, then after recovery using the specified menu item, the disk is displayed as NTFS in Partition Recovery, but remains RAW in Windows.
Another menu item solves the problem - Fix Boot Sector, even if it is not a system partition (in the next window, after selecting this item, you usually do not need to perform any actions). In this case, the file system of the partition begins to be perceived by the OS, but problems with the bootloader are possible (solved by standard Windows recovery tools), as well as the system being forced to start a disk check at the first start.
And finally, if it happens that none of the methods could help you, or the proposed options seem frighteningly complicated, it is almost always possible to simply recover important data from RAW partitions and disks, free data recovery programs will help here.
Photos from open sources
A situation in which a hard drive requires recovery can happen to every PC user. It may be needed for various reasons. One of them is file system corruption.
How to determine if a file system has crashed
If the disk is used for its intended purpose, it has a FAT or NTFS file system. These formats indicate that it works well and does not require restoration. But sometimes it turns into RAW. How can you understand that a failure has occurred?If you access the disk, but it does not open and a message appears about the need to format it, then a failure has occurred.
This message may mean the following:
- The structure of the file system used was destroyed;
- There is no clear access to the content;
- Invalid data was written to the boot sector.
How to perform a restore
Don't rush into formatting. You can restore the file system of your hard drive without resorting to extreme measures.Recovery using Testdisk
It is offered free of charge. It makes it possible to return lost data to a state that is close to ideal.Let's say our hard drive has several partitions. For example, partition D turned out to be damaged. We select the damaged partition in the program, then indicate the type of structure that we have. In our example, this is the Intel/PC partition. Select the Analyze item. An analysis will be carried out and a list of partitions for recovery will be provided. Select the Quick search option. She, in turn, will select all files from the partitions. Once you find what you need, click the Write button. After all the actions performed, the lost information will be restored. Its interface is quite simple. The main menu has 3 parts. On the left is a list of hard drives and logical partitions. The center shows their data load. The files selected by the user are displayed on the right.
- To start the recovery, you must click “Wizard”. After this, the operation menu will appear. The hard drive will be analyzed.
- In the program, all partitions are divided into 3 categories: hard, removable and logical drives. In order to start data recovery, you will need to select the desired partition. After that, click "Next". You will be asked to select the type of analysis: operational scanning or full analysis.
- It is better to immediately conduct a full analysis. It processes 3 filters at once. The first filter will calculate NTFS systems. The second one will process files that belong to this system. Deep analysis will work regardless of the file system.
- If you choose the first option, then some of the files simply will not be found. In this case, files may be found that do not show signs of damage.
- After this you can start scanning. The larger the volume of the disk being checked, the longer the process will be.
- After the analysis is completed, you will find out how many folders are in this section.
- In order to familiarize yourself with all the files found during the analysis, you need to go to the main menu and click “Finish”.
- The “Deep Analysis” folder will appear in the center of the window. Next, you will need to select them in this folder, and then click “Restore”. All that remains is to choose a place to save them.
- In this window, you will need to select the location to save the data, the option to restore the folder structure that was deleted, and restore file streams to NTFS. After this, you will need to click the “Restore” button.
Most often, the disk file system changes to RAW after the computer was turned off incorrectly, when the lights were turned off, or the user saved time and pulled out the power cord of the system unit from the outlet. Another reason is viruses that change NTFS to RAW format of HDD drives. How to fix this problem, read this article.
What to do if the flash drive cannot be formatted in RAW format
Then how can you fix a raw disk without formatting or losing data? Once the quick scan is completed, a deep scan will automatically run to find more . Step Select the file you want to recover by file type from the scan results. It is better to choose another location instead of the original hard drive to avoid overwriting data.
This page will show you how to recover data from the original file system. Tools that may help you are not provided as standard on any operating system. So, you will need to use data recovery software that understands the internal systems used to store files on the drive and uses that knowledge to find the raw disk space that was occupied by the lost files.
What is the RAW file system?
If the disk has been received, Windows will display it among other partitions on the hard drive. But when you try to open it, the computer will give you an error and ask you to format it. In addition, any actions with this volume will be unavailable: error checking, defragmentation, etc. (it is useful to read “”).
How to perform a restore
The software will soon begin a quick scan to find all the files on the drive. And then a deep scan will automatically begin to find more data. Select a possible drive containing your files and let it create file structures for recovery.
The file system shows that the source and disk space become 0 bytes. The disk is not formatted, you want to format it now. . Sometimes you won't be able to format a drive even though it asked you to do so. If you have installed, you will be able to complete this file recovery task with the risk of data loss removed. This is a complex procedure and quite often ends in lost files. By installing the software in front of your partition project, you allow yourself to retrieve any lost files and protect your operation form ending with lost files or folders.
There is no RAW file system as such. If the disk receives this formatting, it means that the computer drivers are not able to determine the type of its file system - NTFS, FAT or FAT32. In practice, this happens in several cases:
- the file system structure is damaged;
- The partition has not been formatted;
- there is no correct access to the contents of the volume.
If the OS volume is damaged, the “Reboot and select proper boot device” or “Operating System not found” warnings will appear when the computer boots.
Does it sound difficult? Technicians can help if you can't find a solution, and there are many FAQs and user tutorials to help you along the way. The beauty is this: you don't need to have much experience, and it's okay if you make a mistake. You will be able to restore the formats of hard drives - both internal and external - and other equipment that you may be using.
You can get a live view of the software, navigate through menu options, and search for problems and solutions specific to your network. You will feel like a safe purchase of the software as you will feel secure about your files and folders. You should pay attention to the following points.
Recovery
If the problem occurs on a non-system drive, but it contains important information that will be lost when formatted, use standard Windows tools or third-party programs to fix the error.
Windows tools
Basically, the standard chkdsk utility helps fix problems with formatting in RAW.
You need to format the drive on the drive before you can use it. This volume does not contain a recognized file system. Formatting the disk will reinitialize the file system. It creates a new, ready-to-use, empty volume. It does not restore the old file system or its data.
Why did the flash drive become RAW?
The exact cause determines whether the corruption can be repaired or repaired, or that you need to recover the data using data recovery software. This is the safest option. Because repairs can not only fail, they can be wrong!
After checking, the computer will repair damaged sectors and the NTFS file system on the problematic volume.
Important! This method is effective if the flash drive or hard drive has been formatted in NTFS.
The chkdsk utility will also help when the system disk is damaged. But for this you will need a boot disk or flash drive.
- Start the computer from a bootable USB flash drive or disk → Select “System Restore”.
- Advanced options -> command line -> enter chkdsk drive_letter: /f.
In the recovery environment, the partition letters are different from the names of the logical drives. To avoid mistakes, open the list of computer partitions in the command line.
First, check for bad sectors first
Since file recovery software will restore a virtual file system in memory from which you can recover data, you will need an additional drive to copy the data. Sometimes fixing the " " is all that is required to restore access to the volume, however in other cases this is not the case.
It can detect invalid values, and it can check whether the boot sector points to the correct file system structures. Some values are more critical than others. For example, an incorrect jump code may prevent the partition from loading, but you can probably access the partition by driving the disk.
Enter diskpart → list volume → the list will indicate which disk is the system one.
Third party programs
There are third-party programs that help restore the NTFS file system if for some reason it was reformatted to RAW. They do not damage the user’s information stored on the volume, unlike the chkdsk utility, which can “affect” them during the recovery process.
Finding the right parameters
After all, no boot code is required to access the volume. It keeps a copy of the boot sector in its current state so that repairs can be undone. He will either find it or he won't. In fact, you are not alone in this matter. Now, let's talk about these issues in detail.
If you know others, we really appreciate you sharing them with us. And you can refer to the "Copy Section" column to get the . Convert lost chains to files? Once the disk check is complete, you can check these files to see if they contain data. Then you will see a folder like this.
MiniTool Power Data Recovery
Important! This method is most effective if the RAW file system appears on a flash drive.
TestDisk
This is a multifunctional free utility that works with hard drive partitions using a large number of options. The program is presented in a portable version, so it does not require installation. Main disadvantage
These files are definitely not accessible because their extensions have been changed. But in reality, few people can remember the extensions of each file, especially when there are many lost files, so this method is unattainable. Just search for such tools online and some of them are even free.
Recovery using RS Partition Recovery program
In this situation, using data recovery software may be a good choice. Do not install the program on a disk where data loss occurs, otherwise the lost data may be overwritten, causing the lost data to be lost forever. Some of you may be asking why choose "Full Scan" rather than "Open". This is because the first one will perform a deep scan of your device, which gives a better chance of data recovery.