Images:
FAQ:
Instructions for installing the firmware:
Rules:
- Follow the instructions carefully and clearly, all steps must be performed strictly as indicated and with the attached files or links- If you have questions, please use the " " section by asking a question through " ")
continuation of the rules...
Data is backed up in the current operating system, so that the device remains operational. Custom recovery refers to a third-party recovery environment. Popular custom recoveries. This is a sensory environment that is a little different from other recovery environments. This is because it does not need to be controlled using buttons on the device, but instead uses a touch interface.
How to install TWRP recovery on any Samsung Galaxy smartphone or tablet
It even supports themes, offers installation features, and Reserve copy. This application will allow you to schedule recovery operations during startup. When prompted, choose to restart your device. If there a new version, just tap it and follow the instructions to update it. Launch the application on your device. Manually install custom recovery.
You can install recovery only on the model indicated in the description, the model must match down to every number and letter
- Everything you do with your smartphone is done at your own peril and risk! Accordingly, the author is not responsible for a negative result!
- Charge your smartphone at least 50%
- During the actual installation process, do not interact with the device! (for example, do not press buttons, etc.)
- If in doubt, read it again!
- If it doesn’t work out for you, repeat the firmware again, reading the instructions again!
After that, follow these simple steps to manually install a custom recovery. Step 4: Wait for the process to complete and the device to restart. You should have successfully installed custom recovery on your device. Ideally, you should use the two methods above to install a custom recovery on your device. Use manual method only when applications fail for one reason or another. This is because using apps to install a custom recovery is not only easier but also very effective.
The recovery installation was tested on the files indicated in the download sources; you can use other files at your own peril and risk!
Preparing for installation:
1. Download the necessary files to your computerRecovery in format .tar or .tar.md5
Archive with the Odin program
Drivers for samsung phones(Samsung USB Driver for Mobile Phones)
2. Disable unnecessary things on your computer:
Whatever method you use, we hope you can now use additional functions that the custom recovery environment will bring to your device.
- It is also advisable to do this.
- Download and extract the file to your computer. download.
Release all buttons and press the Volume Up button to confirm and enter Download Mode. The phone will restart automatically. Don't forget to make one and also create one. Once you are able to access this recovery drive, it offers several options to repair, reboot, and even restart systems.
If you have Kies installed, then you have 2 options:
- Remove Kies
- Go to the application manager (ctrl+alt+del) and end all processes where it says Kies
If you have an antivirus, disable it
3. Install the necessary programs:
Install Samsung drivers USB Driver for Mobile Phones
Unzip Odin PC (Extract Here)
It does the same thing as inventory restore, but will have additional features such as the ability to create and restore backups. Popular custom returns. It even supports themes and offers installation and backup features. This application will allow you to schedule initialization recovery operations.
If you have a newer version, simply click on it and follow the instructions to update it. Custom recovery tool using manual methods. Step 4: Wait for the process to complete and restart your device. Use the manual method only when applications fail for one reason or another.
Installation:
4. Switch the device to Download Mode:Turn it off completely, everything should go out.
Press simultaneously three keys “Power + Volume Down + Home”
A warning will appear, you need to press “Volume Up”
5. Install recovery:
Run Odin3 (.exe), it should be located in the folder of the same name
Leave a tick only on the “F” checkbox. Reset Time"
No matter which method you use, we hope you will now be able to enjoy the additional features that custom recovery environments will bring to your device. Firstly, a bit of a dry theory. This device is a hardware serial port through which software can be downloaded to a phone with such a flash, besides this and everything else. The first thing you need to do if your phone won't work is to put it on your computer and check if it's in Device Manager.
Click on the PDA field and find the recovery file in .md5 or .tar format (for example twrp-x.x.x.x-i9300.tar)
Connect the phone with the original cable to the computer, the first ID:COM field lights up blue
If all the previous steps are done, click “Start”
Upon successful completion, you will see “PASS!”
Disconnect your phone from your computer
6. Done!
To check, you can download a new recovery:
If it goes out, you can continue reading this guide. However, if it does not turn off, it means that there is some hardware problem and this guide will not help, in which case you should take it to a repair shop. The first thing to do is close it. When enabled, a driver that is not digitally signed cannot be installed. Hang your phone on your computer and go to Device Manager to see how this happens.
Then click the Browse button and locate the images folder in the folder where you unzipped the phone rom. Specify this folder and not the script because it contains the necessary files for flashing the firmware via the serial port; scripts are not used in this flash mode. When you see the operation completed successfully, it means the process is complete. Turn on the phone then hold down the Power button for ten seconds, after which you will see the Mi logo. If there is such a file in the set, it is new.
Press and hold three keys “Power + Volume Up + Home” at the same time until the initial splash screen appears, the inscription “Samsung + model name on a black background” > Waiting for loading
Today we will talk about how to install custom recovery on your line device Samsung Galaxy. I will only talk about TWRP recovery, since it has a huge number of advantages over its analogues. Also, the developers of this project offer a simple and convenient way installation, which involves using the Odin utility. You don't even need superuser rights (Root). This instruction Suitable for all smartphones and tablets from Samsung: Galaxy S5, S6, Note 4, Note 5 and any other models.
The process takes 200 to 300 seconds and you will see a successfully completed message. Always check what you have in Device Manager. All operations are performed at your own risk. Read each point of the guide carefully and if you have any doubts, ask a question in the comment or search Additional information on one's own. Don't install only basic modifications such as.
Then run it and install. During installation, select "Install for everyone who uses this computer." Select the following three items from the Tools tab. Click the "Install" button and confirm the installation in a new window by accepting the license terms. We look forward to downloading all the items and moving on to the next step.
It is worth noting that after installing a custom recovery, you will not be able to install official ones. Samsung updates, downloaded “over the air”. Do backup copy your data on mobile device so that if problems arise, you don’t lose them forever. I recommend saving your contacts in the cloud of your Google account, and photos, videos and documents on your computer.
You need to unlock the bootloader on your smartphone. If you have done this before, you can skip this step. However, if the bootloader is locked, it must be unlocked. This is due to the loss of data on your phone, so save your most important things.
To do this, turn off your smartphone and restart it using the button combination. First, press and hold both volume keys, then press and hold the power key. After a while, the phone will start and the mode will be displayed fast loading. If you haven't changed anything and selected the install option for all users, then this will be the following folder.
What you need to do before installing TWRP recovery via Odin:

Check before starting installation to make sure you haven't forgotten anything. Each of the above steps is very important.
How to install TWRP recovery on any Samsung Galaxy smartphone or tablet:

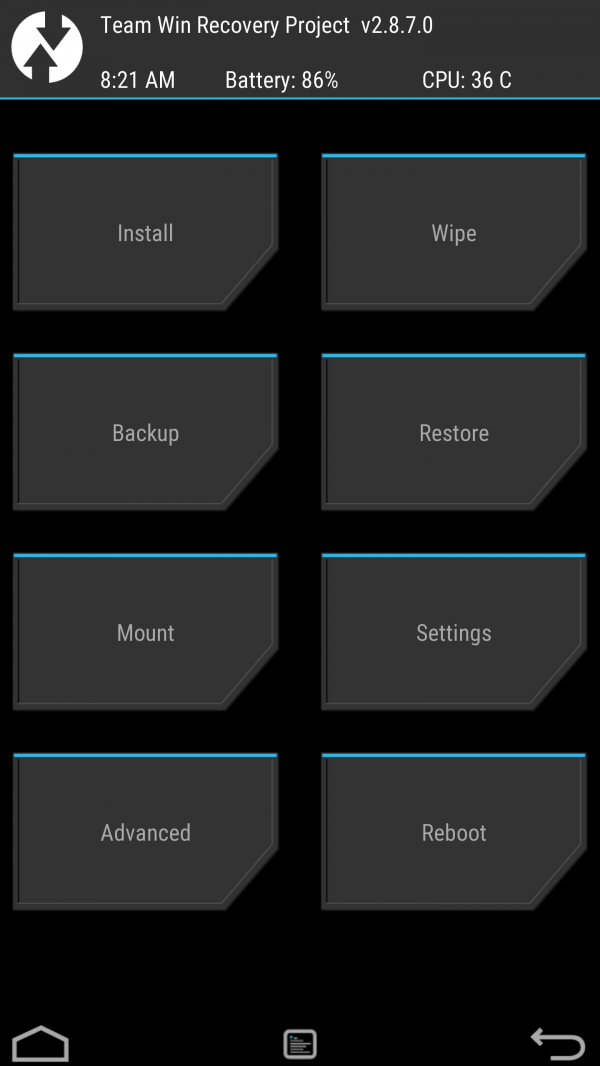
Ready! To enter TWRP recovery, you need to hold down the “Volume Up”, “Home” and “Power” buttons while the device is turned off, and release the buttons after the logo appears.
Now the important element - we need to call the window command line in this folder. You can do this easily. In a new Command Prompt window, enter the following command to ensure that your computer can connect to your phone. If our device is listed with an ID, everything is fine and we can move on.
Confirm with “Yes” and wait for the operation to complete. In the end, we will start the phone and wait for the system to start. From the drop-down menu, select "Open command window here." Leave the Command Prompt window open. First, press and hold both volume buttons and then hold down the power key.
Now you can use the new recovery to install custom firmware, backup and restore installed firmware and much more. Through TWRP you can also clear cache memory, do a factory reset, or even wipe internal memory devices.