4. The organization installs the cryptographic information protection tool (CIPF) CryptoPro version 3.6 on a dedicated computer.
Note: CIPF distribution kit CryptoPro version 3.6 and the license is provided by the Federal Treasury by proxy. Installation/removal of CryptoPro CIPF is carried out by the Organization’s specialists using the “Software Installation Instructions.doc”.
5. The organization installs Continent-AP software on a dedicated computer.
Note: Continent AP software is provided by the Federal Treasury. Installation and configuration of the Continent AP software is carried out by the Organization’s specialists according to the instructions given in the file “Software Installation Instructions.doc”. Win7 OS is installed with Continent-AP software version 3.6.7.0.
6. The Organization must determine a list of officials who, due to their job responsibilities, will have a production need to directly work in the online SUFD.
Note: At the beginning of the implementation of the software “ASFC Portal for DUBP” (SUFD-online), the specified list of persons is determined by Orders on granting the right to an electronic digital signature, issued by the Organization during connection to the EDMS FC and work in the EDMS FC.
If necessary, the list can be adjusted by issuing a new order by the Organization, similar to the existing orders regarding the FC EDMS. A certified copy of the new Order must be provided to the Federal Treasury. Generalized information on the adjusted list (full full names of employees, positions) must be provided to the Federal Treasury for the formation of accounts (“establishments”) in the PPO “ASFC Portal for DUBP”.
7. The Organization must produce electronic signature keys for the Organization’s employees mentioned in the adjusted list (See clause 6). Note: ES keys are produced by the Organization’s specialists according to the instructions “Creating ES keys.doc”, located in the archive. The electronic key generation program is provided by the Federal Treasury and is available for download at. When generating ES keys in the program, it is recommended to set the extended purpose of the public key certificate according to the maximum possible option (This will minimize the likelihood of alteration of ES keys due to possible errors when granting authority to employees of the Organization).
8. Employees of the Organization must promptly receive logins and passwords to enter the SUFD online.
9. At the workplace where work with the online SUFD will be carried out, the root certificate of the Federal Treasury and personal ES certificates of the Organization’s employees must be installed in accordance with the instructions below.
II. Installation of electronic signature for SUFD-online
To install the electronic signature for SUFD-online, you must complete the following steps:1. Go to: Start -> (Settings) -> Control Panel -> open “CryptoPro CSP” -> “Service” tab -> “Install personal certificate” button
2. The “Personal Certificate Installation Wizard” window opens, click the “Next” button.
3. In the “Certificate file name” line, click the “Browse” button and select the user’s ES key certificate that needs to be installed. This certificate can be located on a removable disk (flash drive, you were given a copy of the digital key certificate at the security department), or the user’s digital key certificate can be downloaded from the EDMS (see below).
4. Having selected the user’s ES key certificate that needs to be installed, click the “Next” -> “Next” button. In the “Key container name” line, click the “Browse” button. The “Select key container” window opens, where you need to select the key media on which the user’s electronic signature is located and click the “OK” button. In the “Personal Certificate Installation Wizard” window, click the “Next” button. In the next window, when selecting a certificate store, click the “Browse” button and be sure to select the “Personal” -> “OK” store. In the next window, click the “Next” -> “Finish” button.
Uploading a certificate from the EDMS.
In order to download the electronic key certificate from the EDMS, you must complete the following steps:
Go to EDMS -> Administration -> General -> Remote workstations.
In the “Remote Workplaces” window that opens, in the left part of the “Automated Workplaces”, select the line with the name of your organization, while in the right part of the “Workstation Crypto Profile Settings” the names of all crypto profiles of the workstations of users of this organization will be displayed. Double-click (left mouse button) on the name of the crypto profile of the desired ES subscriber - the “Cryptographic Profile Settings” of the selected ES user opens. In this window, in the “Certificates” tab, we look through all the lines with records and find a line with a record whose Status is “active”, Key is “working” and the validity period has not yet expired. Right-click on this line and select “View certificate” from the menu that opens. The “Certificate” window opens. In this window, open the “Composition” tab and click the “Copy to file” button. The Certificate Export Wizard window opens. In this window, click the “Next” button and in the next window that opens, click the “Next” button.
In the “File name” line, click the “Browse” button, the “Save as” window opens. Select the folder where you want to save the ES key certificate file or save it to your desktop by assigning a name to the certificate file and clicking the “Save” button. In the next window “Certificate Export Wizard” it will be indicated where the selected electronic key certificate will be saved, click the “Next” button. In the next window, click the “Finish” button. Upon completion, the “Certificate Export Wizard” will display a window with the result “Export completed successfully,” click the “OK” button. In the previously specified folder where you saved the ES key certificate file, or on the desktop, the ES key certificate of the required user of the organization will appear.
Working with SUFD-online
III. How to work with the Portal AWP DUBP
To work in SUFD-online, you must perform the following steps sequentially:1. Establish a secure connection using the Continent-AP program.
2. Launch the Internet Explorer or Mozilla Firefox browser (for browser version requirements, see clause 3.4 of the Technical requirements section). In the address bar, enter the link issued by the UFC
http://10.68.200.12:28081/
The Registration window will open.
3. In the Registration window, you must enter the username and password issued by the UFK and click OK. If the login and password are entered incorrectly 3 times, the user will be blocked for 10 minutes.
4. After authorization, a working window will open, in which there will be a document tree on the left. All work is done using the menu tree. In the menu tree, by opening the necessary branches, you need to select the documents needed for work. 
5. To work with documents, use the buttons located at the top of the screen:
| - Import documents | |
| - Export selected documents | |
| - Create a new document | |
| - Open the document for editing | |
| - Create a copy of the document | |
| - Delete document | |
| - Signature | |
| - Signature verification | |
| - Removing signature | |
| - Documentary control | |
| - Cancel Sending | |
| - Send | |
| - View changes in the status of a document/directory entry | |
| - Print document | |
| - Print scroller | |
| - Search | |
| - Update list of documents |

6. The main sequence of actions when working with documents in SUFD-online:
- Document creation (by manual entry, import or copying)
- Carrying out documentary control, eliminating errors if necessary
- Signing the document first with the second, then with the first signature
- Sending a document
IV. How to create and send a document on the Portal AWP DBP
Creation and sending of documents to SUFD-online is carried out sequentially:1. Before creating a document, you must ensure that you have selected the correct organizational role.
Changing the role of an organization occurs by selecting from a list called up using the button above the document tree.
 |
2.1. Create a document in the system. You can create a document in several ways by clicking the appropriate button:
1) Manual input
2) Import
3) Copy
To see the created document, you should refresh the list by clicking the button.
A document created in any of the three ways has a transfer status and a “Draft” business status.
The following operations are available on a document with this status:
editing
deletion
documentary control
2.2. Next, the document must undergo input confirmation - documentary control. At the same time, the document details are checked for compliance with reference data - preventive control, as well as control of document amounts (the sum of the lines must be equal to the total amount) and dates - blocking control. To perform document control, you need to place the cursor on the created document in the list of documents and click on the button on the toolbar.
2.3. If a document that is in the “Entered” status needs to be edited, then first the transfer status is rolled back using the button to “Draft”. After this, editing, saving the document and document control are carried out.
2.4. Next, you need to sign the document (approve). To approve a document, the user must have a signing certificate, and the document must have a submission status of “Entered.”
To sign a document, you need to select the corresponding document in the list of documents and click on the button.
In this case, the document's approval status changes (to "Approved"), the transfer status and business status do not change.
Information about signatures can be viewed on the “Signatures” tab of the information panel located at the bottom of the screen, after first refreshing the list of documents.

After signing, the document receives the approval status “Approved” or “Partially approved”.
A document receives the “Partially approved” status if it is not signed with all the necessary digital signatures. In this case, it is necessary to add the missing digital signature to the document.
2.5. In the next step, the document can be sent.
To send a document, select the required document in the list and click on the button.
The selected document is sent. If sent successfully, the document changes to the “Sending” transmission status.
Next, the status of the document changes in accordance with the statuses assigned to the document on the FC side.
After sending is completed, you can monitor the passage of the document by tracking the status in the “Status (name)” column.
V. Frequently asked questions when working with SUFD-online
1. If the error “Failed to process script” appears when opening or signing a document:
for Mozilla FireFox browser
You must click on the “Settings” button and select “Allow pop-ups for …”
for InternetExplorer browser
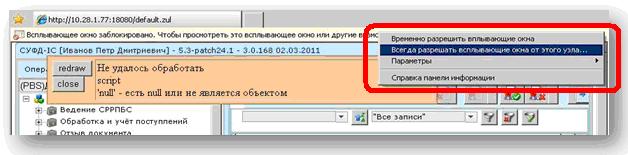
You need to right-click on the warning bar and select “Always allow pop-ups for this site”
2. If a security warning appears when opening or signing a document:

You must check the “Always trust content from this publisher” checkbox and click the “Run” button.
3. An empty “Cryptographic Operations” window appears:

This means that Java is not installed on the workstation or Java software is blocked by the browser (FireFox). Solutions:
a. Go to FireFox and type about:config in the address bar
then in the extensions.blocklist.enabled filter we set Value = false (by double clicking on the line)
menu – Tools – Add-ons – Java Toolkit -> enable
menu – Tools – Settings – Content tab -> uncheck Block pop-up windows
restart FireFox
Or
b. install Java Version 7
because There is no security certificate for this version, it will ask whether to block an unsigned application. Refuse blocking.
If the window is empty and black, it means Java is not installed correctly and needs to be reinstalled.
4. If a window appears with a message that the certificate was not found:

a. the digital signature certificate is not installed on the user’s computer: it must be installed in accordance with the instructions found in the file “Installing digital signature for the SUFD Portal.doc” and the video “00_Certificates.exe”
B. the electronic signature certificate is not registered on the server: you need to contact the UFK security department
5. If after clicking the “Sign” button an error window appears:

The system does not have the FC Authorized Center certificate installed. You need to open the file “UC 05/24/2016.cer” (or “New root certificate - install!.cer” - in a new package of documents) and right-click on the certificate file and select “Install certificate”.
6. When signing, the security system displays the following message:
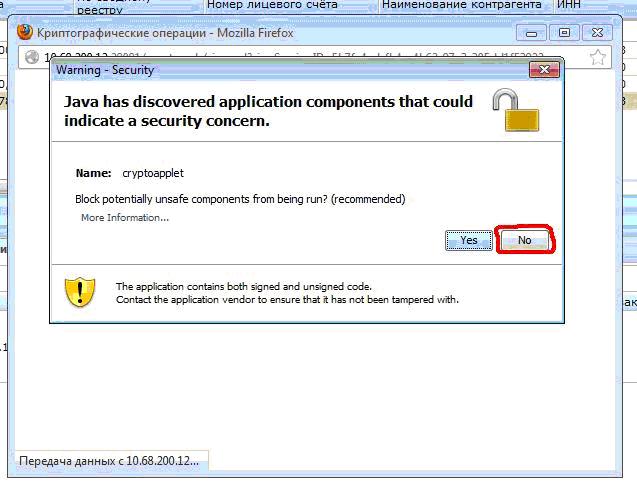
The answer to this question should always be “No”.
7. When signing a document, a window appears with a script error message:

You must check the “Don’t ask this question again” checkbox and click the “Continue” button.

To view it, you need to click ok and in the window that appears, click on the blue square

View errors in the drop-down list

9. Where to look for the extract and the PP attached to it
In the menu item operational reporting – reports10. How to print the statement and the PP attached to it
You need to select it in the list, click the button and in the attachments block, click on the square in the guid column so that everything in the attachments becomes gray. Next, click on the printer in the “Attachments” block.
In the window that opens, select templates for printing documents:

11. When creating or importing documents, new records do not appear in the table
Forgot to click the Refresh list of documents or Apply filter button12. When working with the Portal, the error “Create socket error” appeared
The security server has stopped working13. When an organization enters the portal, it sees the name of another organization
The organization was not linked to the login.14. The following message appears

Temporary problems on the Portal. Leave the portal for a while.
15. Old TFF format (file format not supported)
it is necessary to update the program from which you downloaded or set the required format in it (a description of the formats is posted at the address in the Documentation block)
16. When applying an ES to a document, the browser requires you to install a plugin.
The Mozilla Frefox browser has been automatically updated, you need to install the appropriate version of Java software: download JavaThe old version of Java must be uninstalled through Control Panel - Add or Remove Programs.
Instructions for downloading data from SUFD and further loading into Parus.
1. Uploading a report from the SUFD
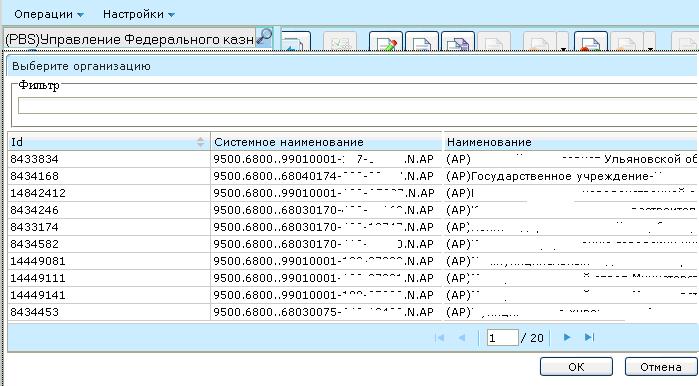
1.1 You need to go to the SUFD database, select an organization - example (“(PBS) Ministry of Culture of the Russian Federation”), then click “Ok”.
1.2 Next, in the catalog section, you need to expand the “Operational reporting” section, then “Reports”, then select the final section “Reports”. After this, you need to select a report for the required date called “Report on the account of PBS (MF) KFD 0531786 GL_M02_02”.
(example may differ from required report entry)

1.3 After making your selection, you must download the report using the “Export” button.

1.4 In the dialog box that appears, select “Save file”, then select a save location and click “OK”. 
1.5 The uploaded file will be presented in a zipped form and may have three extension options “.LO” * ", ".VX*" and ".VZ * "(where * is an arbitrary number). The availability of certain formats depends on the accounts, i.e. all three formats can be downloaded, or only one.
For further loading into Parus it must be unpacked.

2.1 To upload a report to Parus, you must add the corresponding report for the same date as the uploaded report from the SUFD.

2.2 Next, you need to attach a document, for this you need to select a report and use the right mouse button or the “Actions” button to go to the “Attached Documents” section..png" alt="Description: C:\Users\Magonya\Desktop \Trash\Loading into SAIL\Loading 3.png" width="632 height=368" height="368">!}
2.4 Next, you need to fill in the specified fields. The “Document Code” field must be generated automatically by clicking on the “V” button; in the “Document Type” and “Catalog” fields, you must select “Personal Account”. After filling out the fields, click the “Select file” button. 

2.6 After the actions taken, the attached file should be reflected in the “Attached Documents” section.

2.7 Next you need to recalculate the values, for this you need to select the report and use the right mouse button or the “Actions” button to go to the “Recalculate values” section..png" alt="Description: C:\Users\Magonya\Desktop \Trash\Loading into SAIL\Loading 8.png" width="658 height=327" height="327">!}
2.9 After attaching the file and recalculating, the report will be completed. To check the data, open the report and check the metrics. If you have data from the SUFD for branches, you need to attach several files to one report and also perform a recalculation.
Exchange with treasury authorities in OFK (UFK) formats
How it is produced exchange with treasury authorities(setting up sufd) – how to set it up format, how to upload settlement and payment documents, how to upload statements in format OFK (UFK)?
- Loading OFK (UFK) formats into the program
- Uploading settlement and payment documents
After the initial installation of the program "1C: Public Institution Accounting 8, Rev. 2" the ability to upload and download data in formats OFC (UFK) is missing. To connect it, you need to load the appropriate formats into the program and execute exchange setup.
Loading OFK (UFK) formats into the program
Setting up sufd begins with loading formats. The formats necessary for organizing exchange with treasury authorities in OFK (UFK) formats are included in the distribution kit for the standard configuration "1C: Public Institution Accounting 8, Rev. 2", and they can also be downloaded from the configuration support Internet page, where Current configuration updates and additional processing are promptly posted.
Loading formats is done in the mode "Exchange format delivery settings"(section, action bar command "Setting up delivery of exchange formats (bank, treasury)").
To download formats, click the button "Load formats", in the window that opens Format download assistant by button "Add" indicate the directory with the installed configuration in which the format delivery file "\1C\StateAccounting\2_0_xx_x\ECExchangeFormats\" is located and then follow the program instructions.


After loading the formats into the program in the tabular section"Types of exchange with treasury/bank" processing "Settings supply format exchange "a new type will appear exchange – "Exchange with OFK (UFK)". When positioning on a given element with the mouse cursor in the table section"Available formats and objects"Documents exported and imported using the specified format type will be displayed.

Setting up exchange in OFK (UFK) formats
After loading the format into the program, you should configure the exchange. For this purpose in processing "Setting up data exchange with treasury systems and bank institutions"(chapter "Setup and administration", navigation bar command "Exchange setup (bank, treasury)", bookmark "Setting up exchange rules") you need to create a new setting (button "Create").

In the opened form settings formats used for exchange with treasury systems and bank institutions, in details"Exchange type"you should select the format already loaded into the programExchange with OFK (UFK), you also need to indicate on the formSetting name.

A format setting will be created with a list of configuration objects and formats in which exchange with treasury systems is possible.

Then on the tab "Exchange Method Settings" you should indicate the method of exchange - enter (click on the button "Create") directory element and fill in the details necessary for the operation of the exchange mechanism.
In the form that opens, you should indicate:
- Name;
- Exchange type- choose "Exchange with OFK (UFK)";
- Exchange method– select value "Catalog" or "FTP server".
- Unloading and loading paths– specify the directory in which the payment file will be created – where documents will be uploaded (from where they will be downloaded).

For the exchange method with the selected value "FTP server":
In addition to the upload and download path, you should also set the upload method to set additional FTP connection settings "FTP". In this case, the upload (download) path must be specified as the name of the directory on the server (without the server name).
You should also specify the connection parameters to the FTP server.

Uploading settlement and payment documents
After making all the settings described above in the document "Data export task"(chapter "Cash", navigation bar command "Exchange tasks (bank, treasury)") by button "Set up exchange" you should create an exchange setting in a new format.

Here you should indicate:
- Exchange type– select the loaded type from the list "Exchange with OFK (UFK)";
- Setting formats– select from the directory "Configuring formats used when exchanging with treasury and banking systems" previously created setting formats;
- Exchange setup– select from the directory "Setting up exchange with treasury and banking systems""previously created data exchange method;
- Cash organ– treasury authority, recipient (for export) or sender (for import) of electronic documents.

As a result of this setting, when creating a document"Data export task" will be specified by default setting up exchange with OFK (UFK).

After all the document details "Data export task" filled, you should proceed to generating a list of uploaded objects and then working with the list, generating and sending the file.
1. In the document "Request for data export" you should set the date (period) for which you want to upload documents (button "Set selection"). Objects are searched for the specified period, by default for the document date.
In addition, by clicking "Set selection" You can set up additional selections based on the details of unloading objects.
Searching for objects for uploading is done by pressing a button "Fill in with objects for the period: from... to....". When you click the button, a search is made in the information database for objects that are not marked for deletion and that meet the following conditions:
- the document has not been posted;
- the document has execution status "Prepared";
- flag "Paid" the document execution status is not set on the form;
- the organization corresponds to the organization specified in the document "Data export task";
- the cash authority corresponds to the cash authority specified in the document "Data export task";
- the object is present in the list of upload settings (reference "Format settings"), and it is set to a non-empty upload format;
- the object has not previously been unloaded with the specified format type and Cash Authority;
- the object corresponds to the established values of additional selection in the form "Parameters for selecting documents for export".

Tabular part "Export objects" filled with found objects.
In the column "Format" reflects the format in which settlement and payment documents will be uploaded. By default, the last valid upload format is used.
Objects that are not needed to be unloaded can be removed from the list (using the corresponding icon or context menu item).
The selected objects will be analyzed and, if there are no filling errors, a file will be generated.
If for some reason the settlement and payment document was not included in the upload file or errors occurred during the export, information about them will appear in the column "Information" opposite the problematic document being uploaded, and in the column "Upload file name"- text "!The object was not unloaded! There are filling errors.".
By clicking on the inscription "Details"(or by pressing the Enter key), you can open a form with a detailed description of the detected errors.

3. After all identified errors in the uploaded documents have been eliminated, the generated files should be sent to the recipient - written to the directory specified in the exchange settings or to an FTP server.

To do this, click the button "Send files". The generated files will be transferred to the specified directory or to an FTP server, and information about the uploaded objects will be saved in the information register "History of exchange with treasury systems". The generated files are stored in the infobase. This allows you to repeat the sending if necessary.

The generated files can be seen in the information register "Attached files" "Attached files" "Open", you can open the generated file for viewing.
4. Transfer the generated file to the treasury.
After the documents are uploaded to the transfer file, their execution status will be changed to "On performance".
Download Treasury Statements
1. The received file with the treasury extract should be placed in import directory(you will need to specify it in the exchange settings).
2. In a new document Data import task(chapter "Cash", navigation bar command "Exchange task (bank, treasury)") is necessary by analogy with Export task data specify the following settings:
- Organization;
- Exchange type;
- Setting up formats;
- Exchange setup;
- Cash office;
- Period of imported documents.
3. Then you should fill the document with objects from the import files "Data import task"(button "Fill with objects for the period:...") and load them into the database (button "Upload files").
These import files can be viewed using the button "Open Document".
4. To load data from import files, click on the button "Download". Then on the tab "Import Objects" statements uploaded into the system will be reflected in the form of documents "Extract from personal account".
Please note that uploaded documents "Extract from personal account" will not be filled out completely, since the import files do not always contain enough information to fully fill out the documents.
In particular, the header of the document will be filled in "Extract from personal account", on the bookmark "Leftovers" information about personal account balances will be provided, also on the tab "Documents" previously submitted documents will be indicated ( Payment order, Application for cash expense, Application for cash expense (abbreviated), Application for cash, Application for cash (bank card), Return request, Consolidated application for cash expense etc.), as well as documents "Cash receipt" And "Box Office Retirement" for amounts for which the corresponding settlement and payment documents were not found.
You can set standard operations for documents included in the extract. For this purpose in the document "Extract from personal account" you should press the button "Set up a standard operation for executing documents"
Under each document in the field "Typical operation" You should select the desired operation from the list of standard operations in this document and fill in the additional details of the selected standard operation on the right side of the form.

To save the settings, click on the button "Write down additional details".

When posting a document "Extract from personal account" the documents contained in it will also be posted and postings will be generated based on them.

Important. Documents "Cash receipt" And "Box Office Retirement" When importing, the Statements will be partially filled in - the document header, document amount and information about the counterparty are filled in. The tabular part is not filled in, since the transfer file does not contain details of the amounts of receipts (disposals) by budget classification codes. In this regard, after the import procedure, you should check the loaded objects and, if necessary, fill them in manually.
The import files will be saved in the system. If controversial issues arise (for example, discrepancies between imported information and paper-based treasury data), they can be opened and analyzed. Uploaded files can be seen in the information register "Attached files"(form navigation bar command "Attached files"). By highlighting the file with the cursor and pressing the button "Open", you can open the generated files for viewing.

This completes the sufd setup.
Subjects of budget reporting must submit a report f.0503127 to the TOFK through the SUFD (letter of the Federal Treasury dated November 18, 2014 No. 42-7.4-05/2.2-697). To download the report, use the Upload GRBSvFormatFC.epf processing. It is possible that a report was downloaded from the 1C: Public Institution Accounting program, but the import into the SUFD was completed with an error. You will learn how to correctly upload a report to SUFD from the article by 1C experts.
According to the Letter of the Treasury of Russia dated November 17, 2014 No. 42-7.4-05/2.2-697 “On the provision of an automated reconciliation service for budget reporting forms to budget reporting entities,” the provision of an automated reconciliation service for budget reporting forms by TOFK to budget reporting entities is carried out according to the following scheme:
- subjects of budget reporting form through the software used by them for maintaining budget accounting and preparing budget reporting and send budget reporting forms to the relevant TOFK through the software "SUFD-Portal";
- the submitted budget reporting forms are automatically loaded into the PPO "ASFK" TOFK and they are reconciled;
- Based on the results of the reconciliation of budget reporting forms, TOFK sends a control protocol to the subject of budget reporting through the SUFD-Portal software, which contains information about the presence (absence) of discrepancies in the reporting indicators of the subjects of budget reporting and the reporting indicators of TOFK.
Also in the said letter it is said: “The subjects of budget reporting form budget reporting forms in electronic form using the software they use for maintaining budget accounting and preparing budget reporting and send to TOFK through the software SUFD-Portal budget reporting forms in electronic form in compliance with the budget reporting forms in force at the time of submission requirements for formats and methods of transmitting files in electronic form (hereinafter - the requirements for file formats), posted on the official website of the Federal Treasury www.roskazna.ru in the section "Methodological office", subsection "Information technologies" (hereinafter - the requirements for FC formats) .
When generating text files of the corresponding forms of budget reporting (hereinafter referred to as the report file) for transmission to TOFK, the 5-digit code of the participant in the budget process of the corresponding budget must be indicated in the “Source code” field and in the file name.”
Thus, when reconciling budget reporting forms in PPO "ASFC", format control is carried out to ensure that all necessary details are present in the transferred file.
In the program "1C: Public Institution Accounting 8", edition 1, edition 2, the code of the participant in the budget process of the corresponding budget is indicated in the institution card (the corresponding element of the directory Institutions) - see fig. 1.
If the institution conducts settlements through the Financial Financial Commission, then this detail must be filled in.
Also, the current requirements for FC formats for forms 0503125, 0503127 and 0503178 establish a mandatory attribute for the header part of the file - Payment Indicator.
The values of the “Payment Attribute” detail are given in Appendix 6 (Directory of Additional Codes) to the requirements for FC formats.
Directory of additional codes
If you previously uploaded reports for submission to the manager in 1C format, then it does not require indicating the payment attribute.
The payment attribute is a mandatory detail of the file generated according to the formats Federal Treasury.
When importing a file, in your case, an error occurs due to the fact that it does not contain Payment indicator.
In the regulated report "F. 0503127, Budget Execution Report" the Payment Attribute is indicated on the "Details" tab of the "Parameters" command panel. Using the selection button, you should select a value from the list containing values in accordance with Appendix 6 to the requirements for FC formats. In most cases, you should select 500.

Please indicate in the report Payment indicator and download the report again. Format control of PPO "ASFC" must be passed successfully.
It should be noted that according to FC formats version 4.4, forms 0503127 and 0503128 can be uploaded differently depending on the recipient of the reports:
- if the recipient is MOU FC, then form 0503128 indicates the institution’s account number in the file name (and in the “IST” parameter in the file header);
- if the recipient is TOFK, then form 0503127 indicates the institution’s account number in the file name (and in the “IST” parameter in the file header).
Who is the recipient of the reports is indicated in the parameter " Recipient of uploaded reports" in setting up reporting uploading.
In the configuration "Accounting of a government institution 8" on the form " Export of institutional reports"
- for the recipient "MOU FC", you need to specify the value "1" (without quotes);
- for the TOFK recipient - you need to specify the value "2" (without quotes).

If you do not have such a parameter on the upload form, update the upload processing from the current release.
In the configuration "Accounting of a public institution 8, edition 2" the recipient of the reports - "MOU FC" or "TOFK" is indicated in the main settings panel on the tab Unloading forms Regulated accounting reports.
