“Chief editor of the GetGoodRank blog, web analyst, blogger.
The social network VKontakte has launched a new widget - Community Messages. Now, instead of a regular chat, users will be able to ask questions to a company representative through a familiar widget.”
At a recent internal developer marathon, experts from the VKontakte social network created a prototype of a new widget for branded sites - Community Messages. This is a tool for communication between the company and clients on a branded website using a familiar and proven tool.
What does the new widget do?
The widget simplifies communication between users and the company. Any user registered on VKontakte will be able to ask questions to company representatives in the new widget directly on the site without having to go to the social network. It is not necessary to wait for a response on the website as in the case of online chat. You can reply to a message both in the web version and in the mobile application. The new widget automatically calculates the average response time by analyzing the history of correspondence with other clients over the last 72 hours.

Messages to community administrators will be received as usual. Widget settings allow you to add a branded welcome message. This will demonstrate that you care about your customers, increase loyalty and build trust.
What are the developers betting on?
Most active users have accounts on VKontakte. This eliminates the need for users to log in, additionally register, or provide contact information on the site. The messages widget retains all the functionality available in the desktop version of the social network: in the dialogue you can send a photo, image, document for a more detailed discussion.
This reduces conversion friction, makes the company closer to the user, and reduces risks for the user (now there is no need to leave real contacts on an unfamiliar site).
What is required to install the Community Posts widget?
To install a widget on a website, a company needs to:
- lead a community on the social network VKontakte
- in the “Community Management” section, activate the widget

Good afternoon dear friends. Social networks have become an integral part of the lives of many people. Some find interlocutors, others find friends, and some work. One way or another, the number of social network users is steadily growing every year. Therefore, it would be a big mistake to miss the opportunity to attract such users to your website. For this purpose, we so that VK users can easily comment on posts.
Many large sites have their own groups on VK, through which communication with clients, sales, advertising campaigns, etc. takes place. VKontakte offers the opportunity to increase the number of community subscribers, by installing the VKontakte group widget on your website. Today we'll talk how to do this.
How to add a VKontakte group widget
1. Log in and go to the developer section
Looking for on the page inscription "Developers".

2. Go to the “Widgets for websites” section
We go down to the very bottom of the page and find the link in the footer.

3. Select the “Communities” section
It makes it possible to link a VK group with a site.

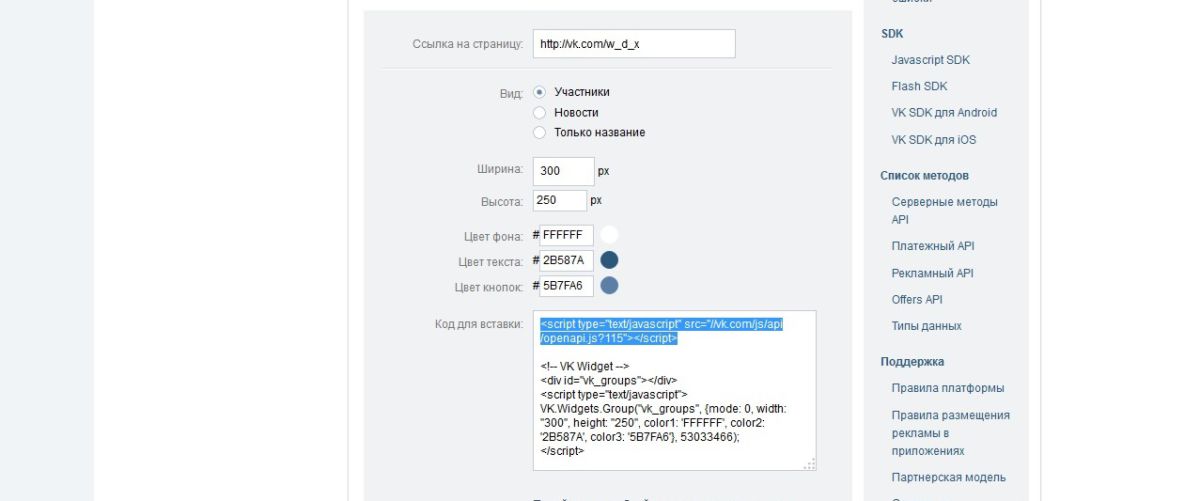
4. Set up the group widget

- Specify the community address
- Setting the appearance. You can customize the contents of the window, namely: Members - photos of group members will be displayed in the widget, News - the community news feed will be displayed, Name only - only the name of the community and the number of subscribers will be shown. All changes will be shown at the bottom of the settings window; by changing one item, you can see how it will look visually
- Width. We indicate what size the plugin should be
- Background, text, button color – customize the widget palette
5. Paste the code of the VKontakte group widget onto the site
As in all VK products, the code is divided into two parts. The first one is placed in the tag
…, the second - to the place where you want to see it. It is important that if you already have VK widgets installed on your site, then there is no need to install the first part of this code.Almost all small and large communities use widgets in VK for the group. They greatly simplify the work of the administrator, help connect the site with a social network, sell your products, communicate with subscribers, collect and process requests for services. Developers are constantly adding new applications. We decided to make a list 10 best, useful and interesting extensions that will help increase efficiency promotion of the group in VK.
After reading the article to the end, you will not only decide which widgets will be useful for a group dedicated to your business, but you will also be able to add and configure the desired widget.
Top 10 best and useful widgets in VK for a group
Despite their huge number, we can highlight the most popular and necessary options. Let's look at them:
Merchandise store
For whom: people who sell goods.
Target: selling products directly in the group without going to other sites and online stores.
In 2015, a service was launched to provide support within the retail social network. This is more like a storefront than a full-fledged online store, but you can make sales and receive money without any problems.

To connect you need to go to the menu "Community/Page Management". Select a section "Applications" and add the corresponding widget. A window will automatically open in front of you in which you need to configure all the parameters. You can see an example of filling out the fields in the screenshot above.
It is necessary to configure the main points:
- Delivery region.
- Currency. You can choose the Russian ruble, Ukrainian hryvnia, Kazakh currency - tenge, dollar or euro.
- Contact. Be sure to set up this section so that you can accept orders. You can specify a group leader or arrange for orders to be accepted via messages.
All these points will be on one page. As soon as you fill out the product cards, complete the basic setup, the product block will appear on the main page of the group.
Donations
For whom: communities that share useful information for free.
Target: Support group owners.
Most communities post useful materials for free. At the same time, there are subscribers who are ready to support the administrator with money.
To connect the widget, you need to go to the section "Community Management". Go to tab "Applications" and add "Donations".

Everything already works, you just need to configure the basic parameters:
- You can change the name of the button if you wish;
- indicate the category of users;
- select a snippet, it will be located next to the link to the application;
- the name of the application itself.
After this, be sure to save the changes. Enter the information in the text block and set up your e-wallet.

After installation and configuration, be sure to write in which you accept funds for the development of the community.
Spycat: lead widget designer for VK

For whom: community owners.
Target: improving behavioral factors, attracting customers.
Each person can set up a direct address to the visitor by name. You can write your own sales proposal to increase brand awareness.
To add an application, you must go to the group. Click on the three dots under the main photo. Select “Community Management” from the list. In the right column, click on “Applications”. Select and add the appropriate widget.

Fill out the main fields:
- button name;
- who can see her;
- snippet;
- Application Name.
Select text or personal type.

Let's move on to editing and fill in the main points. Next, save and immediately turn it on. A small window will open in front of you, if you like everything, click “Update widget in group”.

The advantage of this widget is that it does not look like a call to purchase; rather, it is like a greeting that improves the appearance and puts the user in a more positive mood. To delve even further into the topic of visuals, check out recommendations for creating a group on VKontakte.
Message distributions
For whom: those who want to send messages with any materials, automate the mailing.
Target: collect a base of active subscribers to whom you can inform about new promotions or competitions.

If you want to enable this feature, go to the page - https://vk.com/app5748831. Click "Connect application".
If everything was done correctly, a window will appear in front of you indicating the successful completion of the operation.
Applications
For whom: Ideal for businesses or groups looking to build a customer base to sell products, services or invite to events.
Target: turn users on a social network into customers.

Go to the "Applications" section on your group page. Select the appropriate application and click Add.
Customize the button title, visibility, snippet and application name. Then go to the main settings and fill out the fields as you see fit.
Tests
For whom: all communities, ideal for online stores and companies.
Target: Find out the opinions of subscribers without redirecting them to other sites.

Advantage in several types of tests. The administrator decides when the audience learns about the answers or when they may not learn them at all. You can assign points to each question.

The connection process is no different from others. You can see an example of filling out the main fields above. Save the changes and wait for the results of users passing your test.
Questionnaires
For whom: Suitable for owners of any groups.
Target: conduct a full questionnaire or survey of subscribers and visitors to the community.
You can create different types of questionnaires with questions and multi-step voting. Use this for audience research or as a brief for clients. There are detailed statistics that allow you to study your audience. Alert settings have been created to make the work of the administrator and users more comfortable.
To add, go to “Page Management” – “Applications”. Select “Profiles” and click “Add”.

We fill out the basic settings and move on to creating questionnaires. Click on the “Go to application management” button.
Let's look at an example of creating a questionnaire:
- Enter the name.
- Click on the first item (see example in the screenshot above).
- We ask a question and add answer options.
- Click “Save”.

You can significantly expand the questionnaire by adding more items, photographs, and different types of questions.
Personal account for joint ventures
For whom: owners of online stores.
Target: makes it easy to participate in joint purchases.
Immediately after installation you will get the following features:
- displaying the total account for purchases;
- notifications are received if changes occur in purchases;
- order history is saved;
The addition is no different from the others. After launching, you must click on the “Subscribe” button.

Attention! In the screenshot you can see the application settings. It will only be available after other users subscribe and you create a group for purchasing and managing products.
Event Schedule
For whom: administrators who aim to organize concerts, exhibitions or other events.
Target: drawing attention to a certain event, notifying subscribers about it.
Adding is no different from working with previous widgets. After filling out the main fields, go to the settings.
Click on the “Create event” button.

Fill in all the required fields and save the changes. After this, event notifications will be available to users.
Order status
Target: Buyers can see the order status.
If you sell products on VKontakte, be sure to install this application. Thanks to it, users will be able to see the status of their purchase. There are 3 statuses in total: for approval, dispatch and delivery. Capable of integrating with the virtual store we looked at before. This allows you to automatically load statuses for which templates are pre-configured.

Go to “Community Management”, select the “Applications” section. The widget is located almost at the end of the page, so we recommend using the search. Click “Add”.

You don’t have integration yet, so the system will prompt you to select CRM. Next, you need to follow the system prompts, because further settings and work with orders depend on the selected item.
Conclusion
Widgets in VK for a group make work much easier. You can not only share information with subscribers and visitors, but also give them the opportunity to buy products, attend your events, and collect a base for further mailings. Thanks to applications, an ordinary group on a social network can be turned into a tool that can replace a website in functionality!
Social networks are the second most accessible source of traffic for a website after search engines, and the third most effective. With proper promotion of an Internet project on social networks, you can achieve an increase in traffic by 30%, and the number of regular readers by up to 70%!
That is why webmasters first of all pay close attention to social networks, creating official pages from the site, launching news. And the main Russian platform for promoting your website or Internet business is the network, which provides sufficient capacity for a free start without any investment!
How to insert a VK group widget?
Creating and does not seem to be a difficult task, even for beginners. Thanks to the intuitive interface of the social network, all you need is time.
And in order for the site’s audience to know about your social page, you need to tell about it in any way available to you. And many webmasters prefer the widget format, which is easily integrated into web design. VKontakte, like other social networks, provides a set of web tools, of which the “Community Widget” can be distinguished.
To start inserting code onto the site pages, first log in to the VKontakte website and follow the “Developers” link at the end of the page:
- Find the item “Authorization and widgets for the site”;
- Click “Community” - 3rd item from the top and configure the display;
- Provide a link to your group or public, as it is displayed in the address bar;
- Select the display format: Participants, news, title only (we recommend the “Participants” option, as it is more common among blogs and most large sites);
- Next, adjust the dimensions of the widget (width and height in pixels), and if necessary, change the color scheme to fit into the site template.
The first part of the code is inserted after the opening tag
, which is located in the “footer.php” file of WordPress themes. We copy the second part to the “Sidebar” in the “Appearance” - “Widgets” section, placing it in a standard text block. After clicking the “Save” button, you can check the display of the “Community Widget” on the site.Note! The copied code is divided into two parts to optimize the loading of the main content on the site pages. If you have minimal use of third-party scripts, then when you insert the code into the “Text” widget completely, the time difference will not be noticeable.
How to insert a VK widget via iframe
Sometimes there may be a problem with the correct display of the widget on the site pages, which has negative consequences in the process of active promotion. As it turns out, the culprit is the widget script, which is not always processed correctly by Internet browsers.
To avoid such problems, you can use a different method of displaying the “Community Widget”, using the code built on display through