Also, during installation, do not forget to check the checkbox next to install ssh server (if needed) and samba-server (1C required) :)
1) Preparation:
Let's set up the network and use static addressing:
Sudo vi /etc/network/interfaces
Auto eth0 iface eth0 inet static address 192.168.1.8 netmask 255.255.255.0 broadcast 192.168.1.255 gateway 192.168.1.1 dns-nameservers 192.168.1.4 192.168.1.6
where, auto eth0 - tells the system that the eth0 interface should be enabled automatically when the system boots with the following parameters.
iface eth0 inet static - Indicates that eth0 is using a static interface. If a DHCP server is used, then write dhcp instead of static.
Since 12.04 the program is responsible for the DNS configuration resolvconf(instead of file /etc/resolv.conf) therefore, if a DHCP server is not used, DNS servers for static interfaces must be entered in /etc/network/interfaces using parameters dns-nameservers, dns-search and dns-domain, corresponding parameters nameserver, search And domain V resolv.conf.
Service restart:
Sudo /etc/init.d/networking restart
Updated:
Sudo apt-get update
Sudo apt-get dist-upgrade
Install Midnight Commander (mc)
Sudo apt-get install mc
2. Installation and configuration of the PostgreSQL database server
For convenience, so as not to type every time sudo Let's switch to root mode:
We install the packages necessary for proper operation PostgreSQL:
Apt-get install libicu-dev libxslt1.1 libxml2 libossp-uuid16 libreadline5
Download the latest stable version of PostgreSQL from here.
We install the packages with the command:
After this, the postgres user will appear in the system, and the /etc/init.d/postgresql script will be created to start and stop the DBMS.
Afterwards, we give rights to the pgsql folder to the postgres user and group:
Chown postgres:postgres /var/lib/pgsql
Set the password for the postgres user:
Passwd postgres
We edit /etc/group, where the existing group id tape:x:26: is changed to some other one, for example 27:). As a result, there should be the following lines:
Postgres:x:26: tape:x:27:
We start the service with the command, specify the value of the LANG variable. Required for initial database creation:
LANG=ru_RU.utf-8 service postgresql start
They may swear that the current Shmmax value is too small to run PostgreSQL and suggest that you specify your own, but we will act smarter and use the following script, which will calculate and display the required size of Shmmax and Shmall in bytes.
SHMMAX is the maximum size (in bytes) on a shared memory segment equal to half of all available memory on the server.
SHMALL is the total amount of shared memory (in pages) that all processes on the server can use.
Then we write the obtained values using the command:
Echo "kernel.shmmax = 521981952" >> /etc/sysctl.conf echo "kernel.shmall = 127437" >> /etc/sysctl.conf
Or we’ll write it in /etc/sysctl.conf manually. In order for the changes to take effect, type:
Alter user postgres with password "YOUR_PASSWORD";
Type \q to exit the console.
The file /var/lib/pgsql/data/pg_hba.conf looks like this:
#IPv4 local connections: host all postgres 0.0.0.0/0 md5
Main config /var/lib/pgsql/data/postgresql.conf edit in accordance with the following data: Average setting of the most important parameters:
Shared_buffers = 1/8 RAM or more (but not more than 1/4) work_mem = 1/20 RAM maintenance_work_mem = 1/4 RAM max_fsm_relations = planned number of tables in databases * 1.5 max_fsm_pages in max_fsm_relations * 2000; fsync = true wal_sync_method = fdatasync commit_delay = from 10 to 100 commit_siblings = from 5 to 10 effective_cache_size = 0.9 of the cached value, which shows free random_page_cost = 2 for fast cpu, 4 for slow cpu_tuple_cost = 0.001 for fast cpu, 0.01 for slow cpu_index_tuple_cost = 0.0005 for fast cpu, 0.005 for slow
To optimize settings for maximum performance, you can try using the pgtune utility.
Wget http://pgfoundry.org/frs/download.php/2449/pgtune-0.9.3.tar.gz
Tar xvfz *.tar.gz
Go to the directory with pgtune, run the command:
./pgtune −i $PGDATA/postgresql.conf −o $PGDATA/postgresql.conf.pgtune
-i— path to the input, current settings file postgresql.conf,
-o— path to the output, new settings file postgresql.conf.
As a result of executing the command, we will obtain a settings file identical to the original one, with the exception of several new pg_tune parameters at the very end of the file.
$PGDATA- a variable pointing to /var/lib/pgsql/data. If not specified, you can specify in /etc/environment.
For more complete information on setting up postgresql.conf, see Etersoft or in relation to 1C on Vecheslav Gilev’s website. For those who want to go deeper into the process of learning PostgreSQL, there is a wonderful, detailed manual from Alexey Vasiliev. :)
The most commonly used Postgresql commands are:
Change root password:
ALTER USER postgres WITH PASSWORD 'newpassword';
3. Installation of 1C Enterprise 8
For proper operation of the 1C Enterprise server, install the following packages:
Sudo apt-get install imagemagick libglib2.0-dev libgsf-1-dev texlive-base ttf-mscorefonts-installer libfreetype6 libfreetype6-dev unixodbc unixodbc-dev
Download the 1C8.2 technology platform for Linux (Debian/Ubuntu) from the 1C website.
The packages must be installed in the following order, because... there are dependencies.
If you install everything at once using a mask, errors may occur.
1) 1c-enterprise82-common_8.2.15-319_amd64.deb // common server components
2) 1c-enterprise82-common-nls_8.2.15-319_amd64.deb // national resources for common components
3) 1c-enterprise82-server_8.2.15-319_amd64.deb // 1C:enterprise 8.2 server for Linux
4) 1c-enterprise82-server-nls_8.2.15-319_amd64.deb // National resources for 1C server
5) 1c-enterprise82-ws_8.2.15-319_amd64.deb // adapter for publishing 1C:Enterprise 8 Web services on a web server based on Apache HTTP Server 2.0 or Apache HTTP Server 2.2;
6) 1c-enterprise82-ws-nls_8.2.15-319_amd64.deb // National resources for 1c8.2 web service components
Add to startup:
Update-rc.d srv1cv82 defaults
We allow user usr1cv82 to write to /opt/1C and /home/usr1cv82
Chown -R usr1cv82:grp1cv82 /opt/1C
Chown -R usr1cv82:grp1cv82 /home/usr1cv82
We restart the server. We check that the service starts correctly:
Service srv1cv82 status
It should display:
Init script: STARTED Ragent: RUNNING
On the firewall, if used, the following ports must be open for the 1C server to operate: tcp:1540 - server agent (ragent) tcp:1541 - main cluster manager (rmngr) tcp:1560-1591 - range of network ports for dynamic distribution of work processes. (just open tcp:1560)
A INPUT -p tcp -m state --state NEW -m tcp --dport 1540 -j ACCEPT -A INPUT -p tcp -m state --state NEW -m tcp --dport 1541 -j ACCEPT -A INPUT -p tcp -m multiport --dports 1560:1591 -j ACCEPT
Checking the functionality of server workflows:
Netstat -tlnp | grep:15
You should get something like this:
Tcp 0 0 0.0.0.0:1560 0.0.0.0:* LISTEN 2814/rphost tcp 0 0 0.0.0.0:1540 0.0.0.0:* LISTEN 2799/ragent tcp 0 0 0.0.0.0:1541 0.0.0.0:* LISTEN 2802/ rmngr
But we get the following:
Tcp 0 0 0.0.0.0:1540 0.0.0.0:* LISTEN 960/ragent
You can also view running processes using the command:
You should get something like this:
Usr1cv82 931 0.0 1.8 338376 18612 ? Ssl Jul04 0:41 /opt/1C/v8.2/x86_64/ragent -daemon usr1cv82 935 0.1 3.0 790496 31376 ? Sl Jul04 2:31 /opt/1C/v8.2/x86_64/rmngr -port 1541 -range 1560:1591 usr1cv82 948 0.4 11.5 720804 117412 ? Sl Jul04 6:21 /opt/1C/v8.2/x86_64/rphost -range 1560:1591 -reghost ubuntus12 -re
But only ragent starts:
Usr1cv82 931 0.0 1.8 338376 18612 ? Ssl Jul04 0:41 /opt/1C/v8.2/x86_64/ragent -daemon
Unfortunately, dancing with a tambourine did not lead to anything, and the rights are set correctly everywhere and the network is configured properly. I googled that many people have similar problems with release 15, but I have 8.2.15-319. And 318 I remember it worked :) I decided to try the latest one at the time of writing the review, 8.2.16.362, and lo and behold, everything started up as it should the first time.
Now we need to check the correct installation of the components that we installed at the very beginning using a checking script:
/opt/1C/v8.2/x86_64/utils/*config_server
If we don’t receive any messages, and a type.xml file appears in the /opt/1C/v8.2/x86_64/conf/grcmncfg directory, then everything is ok, in my case, the script produces a bunch of errors. The first message says that a certain libc file cannot be accessed.
Cannot access /lib/libc-*.so: No such file or directory Cannot access /lib64/libc-*.so: No such file or directory
Let's see where this file actually sits:
Find / -name "libc-*.so" -print
We get the following output:
/lib/x86_64-linux-gnu/libc-2.15.so
It’s not surprising that the script doesn’t find it, so we make two symlinks in turn:
Ln -s /lib/x86_64-linux-gnu/libc-2.15.so /lib/libc-2.15.so ln -s /lib/x86_64-linux-gnu/libc-2.15.so /lib64/libc-2.15.so
After which, we run the script again. The “access” error disappears, but the following remains:
./config_server: line 193: [: too many arguments ./config_server: line 193: [: too many arguments ./config_server: line 193: [: too many arguments ./config_server: line 193: [: too many arguments ./ config_server: line 193: [: too many arguments
Line 193 contains the following entry, which points to polling the $SYSTEM_LIB_PATH variable, which apparently should contain the necessary 1su libraries.
[ ! -e $aliasFullName ] && return 1
Let's see what exactly the script cannot detect, run:
Echo $aliasFullName
We get:
Can"t detect SYSTEM_LIB_PATH, please set this environment variable manually!/libWand.so Can"t detect SYSTEM_LIB_PATH, please set this environment variable manually!/libfreetype.so Can"t detect SYSTEM_LIB_PATH, please set this environment variable manually!/libgsf- 1.so Can"t detect SYSTEM_LIB_PATH, please set this environment variable manually!/libglib-2.0.so Can"t detect SYSTEM_LIB_PATH, please set this environment variable manually!/libodbc.so
As I understand it, SYSTEM_LIB_PATH should detect the files it is looking for in three possible directories:
/usr/lib /usr/lib32 /usr/lib64
Also, you need to manually set SYSTEM_LIB_PATH in /etc/environment. For example, let it search for libraries only in /usr/lib/
SYSTEM_LIB_PATH="/usr/lib"
We restart the server, run the script again, we get the following:
/usr/lib/libWand.so /usr/lib/libfreetype.so Please install the following package: FreeType /usr/lib/libgsf-1.so /usr/lib/libglib-2.0.so Please install the following package: libglib /usr /lib/libodbc.so Please install following package: UnixODBC
Files libWand.so And libgsf-1.so are where they need to be. Other files libfreetype.so, libglib-2.0.so And libodbc.so are located in /usr/lib/x86_64-linux-gnu. Accordingly, we make slinks again:
Ln -s /usr/lib/x86_64-linux-gnu/libfreetype.so /usr/lib/libfreetype.so ln -s /usr/lib/x86_64-linux-gnu/libglib-2.0.so /usr/lib/libglib -2.0.so ln -s /usr/lib/x86_64-linux-gnu/libodbc.so /usr/lib/libodbc.so
We run the script again, now we see that all the libraries are in the directories we need.
/usr/lib/libWand.so /usr/lib/libfreetype.so /usr/lib/libgsf-1.so /usr/lib/libglib-2.0.so /usr/lib/libodbc.so
On the client, if Windows, go to the 1CV8 Servers management console (Administering 1C Enterprise servers). Click, add Central Server 1C:Enterprise 8.2, add by name. An entry should appear in the working servers tab. We create a new database, either directly using the management console, or in the 1C client itself, select the option:
Add a new information base.
Let's launch 1C. Gilev's test gives 13.05 points.
Regarding HASP keys, if there are up to 12 users, then you only need a network key marked like NETXX ORGL8, where XX is the number of client licenses. If there are more than 12 users, but you also need a local key for the server. A purple HASP HL key marked ENSR8 for a 32-bit server or a green HASP HL Max key marked ENS8SA for a 64-bit server. The HASP HL Max key also supports a 32-bit server.
For normal operation of HASP keys, you need to install two packages that include the aksusbd key driver and the hasplm license manager. It makes sense to install modified versions of drivers from Entersoft. For haspd to work properly, support for 32-bit programs is required.
Therefore, we add it by installing the ia32-libs package.
Apt-get install ia32-libs
Now HASP itself and the license manager:
Dpkg -i http://download.etersoft.ru/pub/Etersoft/HASP/stable/x86_64/Ubuntu/12.04/
We insert the key and reboot the server. We check the functionality of the keys with the command:
Sudo service haspd status
Must be running: aksusbd, winehasp, hasplm, hasplmd.
4. Publishing on a web server
Install apache:
Apt-get install apache2
We edit /etc/apache2/apache2.conf, where we set the ServerName directive indicating the server name.
ServerName "ubuntus12"
Otherwise, when starting Apach, we will receive the following message:
Httpd: Could not reliably determine the server"s fully qualified domain name, using 127.0.0.1 for ServerName
In the root directory of the site, create a directory base, where base is the name of the base to which we will provide access.
Mkdir /var/www/base
Now we need to run a special script to publish the database on the web server:
Go to /opt/1C/v8.2/x86_64/ Run the script with the following parameters:
./webinst -apache22 -wsdir base -dir "/var/www/base" -connStr "Srvr="ubuntus12";Ref="base";" -confPath /etc/apache2/httpd.conf
We check the correctness of the changes made. /etc/apache2/httpd.conf should have the following lines:
LoadModule _1cws_module "/opt/1C/v8.2/i386/wsap22.so" # 1c publication Alias "base" "/var/www/base/"
A default.vrd file should also appear in /var/www/base/, the last two lines of which should look something like this:
Base="/base" ib="Srvr="ubuntus12";Ref="base";
We grant permissions to the directory and restart Apache:
Chown -R www-data:www-data /var/www/base
Service apache2 restart
We go to the browser, having previously disabled pop-up windows.
http://ubuntus12/base
And we get the following message:
 It, of course, will not work without a special network key :)
5. Backup and Restore:
We give rights to the postgres user to this folder where we will upload the backup.
Chown postgres:postgres /mnt/net
IN /mnt/net I have a mounted Windows share using the command:
Mount -t smbfs -o username=test,password=11111111,iocharset=utf8 //192.168.1.8/distr /mnt/net
Unmount, forcefully closing all connections if necessary:
Umount -l /mnt/net
Backup:
Pg_dump -U postgres -Fc -Z9 dbname -f /mnt/net/Backup/Base/dbname.dump
U (user)
-F (extract file format)
c (custom - internal compression format pg_dump, tar and plain text options are also possible)
-Z (set compression mode)
0 - 9 (0 - no compression, 9 - maximum mode)
-f (extract to this file)
If we upload to a Windows share, we need full access for Users.
Restoration (only from the postgres user): To the new database:
Createdb -T template0 newdb
#!/bin/sh BKPDIR="/mnt/net/PostgreSQL" DATEYMD=`date "+%Y-%m-%d"` pg_dump -Fc -Z9 mydb -f "$(BKPDIR)/$(DATEYMD) -mydb-PostgreSQL.dump"
Entry in crontab (from the postgres user):
su postgres
crontab -e //add task
crontab -l //view tasks
crontab -r //delete task
# start at 18:50 minutes
50 18 * * * sh /home/scripts/backup.sh
# run every 15 minutes
*/15 * * * * sh /home/scripts/backup.sh
Installing 1C on Ubuntu Linux does not require special knowledge of the operating system or programming experience. It is enough to carefully read these instructions and follow all the recommendations for entering commands and working with the terminal described below. Before you start installing the 1C client and server under Ubuntu Linux, you need to download additional DEB packages (library and hasp protection from Etersoft). If you do not have a local network, then you need to set it up.
The local network
Open the main menu, find and launch the “network connections” system utility.
For further configuration, go to “wired connection” - “edit” - “IPv4 settings”.
Change the setup method to “manual”, enter the IP address. For example, let's indicate: 192.168.128.40. The default netmask data is 255.255.255.0.

To access the Internet, specify the DNS server. You can use the default information or enter the following working DNS address - 8.8.8.8.

After this, you can start downloading distributions.
Launch an Internet browser and go to the 1C user support site - “www.users.v8.1c.ru”. From it we will download the 1C client and server distributions for Ubuntu Linux.

Click “download updates”, enter your account information (login, password).
After that, search for “technology platform 8.3” and select the latest version.

Here select “1C enterprise client for DEB Linux systems”. In addition to the client itself, you need to download the “1C server for Deb Linux systems”. Without it, you will not be able to install the 1C client for Ubuntu Linux.
Additional DEB packages
For the program to work properly, it is not enough to download and install the 1C server and client. All files must be uploaded to one “downloads” folder. In order not to get confused, it will remove everything unnecessary from there. Then, for a more comfortable installation, we will move all downloaded distributions.
You need to download additional files: etersoft (1C terminal server for Linux or hasp) and the free library libwebkitgtk. To install the library, follow the link below and then find the latest version of the distribution.
For devices based on a 32-bit processor, you must download the DEB package i386, for a 64-bit processor - amd64.
The next thing you need is a 1C terminal server for Ubuntu (HASP protection). You can download its distribution from the official Etersoft website using the link below. In our case, these are DEB packages for Ubuntu 12.04. If you are using another version of Linux or Ubuntu, return to the directory and select the one you need.
You need to download all DEB hasp packages. No other files are needed.
Preparing for installation
We will continue further installation of the client and server on Ubuntu using the Linux terminal. To avoid entering long names of files and directories manually, we recommend copying and pasting them according to the instructions below.
 If you have already worked with Linux Ubuntu and installed DEB files through the terminal, then you can skip this step and proceed to the next one.
- In your home folder, create a new one - 1C;

- open the newly created directory, create two more here: hasp, server;

- Move all DEB hasp files to the created “hasp” folder at the address “home folder” “1C” - “hasp”;
- return to the “downloads” folder and unpack the client distribution;
- as a result, you should have a folder with the 1C client files for Ubuntu unpacked in it;
- move all the files from it to the “home folder” - “1C” directory;

- open the “downloads” folder, unpack the server distribution package from the archive;
- copy all files to the “server” folder;

- the remaining distribution package is placed in the “1C” folder.
After this, you can begin installing the 1C client and server on Ubuntu Linux. We will do this using the terminal, because... in this case, it becomes possible to track all errors that may occur in the process. For example, due to missing libraries or distributions in the system.
Attention! Before installing the 1C client under Ubuntu Linux, check that its version matches the version of the 1C server.
Working with the terminal
Launch the main menu and open a terminal. Here we will enter all the working commands.

If you have not used the Linux operating system, we recommend installing DEB packages and entering commands strictly in the order in which they are listed below. This way you can notice and eliminate all possible terminal errors and download missing libraries.
 Enter the command “cd 1c” to navigate through the directory, and then press “enter” and enter the command “sudo dpkg -i”, copy the name of the first DEB file from the 1C directory and paste it into the terminal by right-clicking or using the key combination “shift+” ctrl+V".
 Press "Enter". To execute the command, the terminal will ask for the administrator password, enter it.
After this, a list of error messages should appear, indicating their cause - dependency. For example, that the 1C DEB package depends on the libwebkit library (which we have already downloaded). Or lack of 1C server.

Attention! If there is no dependency on the library in the list of errors, then there is no need to install it a second time.
Installing the library
To install the library, enter the command “sudo dpkg -i” and then copy and paste the name of the DEB package libwebkitgtk. Press Enter.
If any error occurs during the process, launch the Ubuntu Application Center, and click “yes” to any system prompts. Enter the administrator password. 

Return to the terminal, enter the command “sudo dpkg -i” to install the DEB package. To avoid typing a long command a second time and copying the file name, Linux remembers the entered commands. And you can move through them by pressing the “up” key (arrows) on the keyboard.
Server Tuning
To install the 1C server on Ubuntu Linux, in the terminal itself you need to go to the “1C” - “server” directory.
 Therefore, enter the following command in the terminal: “cd server” and then download everything in the directory. To avoid having to enter everything manually, type “sudo dpkg -i *.deb”. After this, all DEB packages from the “server” directory will be downloaded.
Installing the 1C client for Linux
To return to the level from the “1C” directory - “server” to the root, enter: “cd/home/1c/server” and then “cd ../” and press “enter”.
 After that, use the command “sudo dpkg -i” to install the 1C client. To do this, be sure to copy and paste the DEB package name and press Enter. If no errors occurred during the process, then everything was done correctly.
Install the remaining distribution kits from the 1C catalog (for quick work, use the “up” button on the keyboard, and then simply change the name of the distribution kits).
HASP
Since we are now at the address “/home/1c/”, to install hasp protection, just enter the following command: “cd hasp” (to go to the hasp directory from the 1C directory), and then “sudo dpkg -i *.deb " (to install all packages from the "hasp" directory).

After this, you can insert the HASP protection key into the server and enter several additional commands to resolve dependencies. When the terminal asks “continue installation,” enter “d” (yes) or “y” (yes).
List of commands for installing hasp under Ubuntu Linux:
- "sudo apt-get install imagemagick";
- "sudo apt-get install unixodbc";
- "sudo apt-get install libgsf-bin";
- "sudo apt-get install t1utils".

To launch 1C, go to the main menu, then enter the name of the program. Several types of clients will appear in front of you. That is, everything that is necessary to work with the program. So that you don’t have to constantly look for a client to launch in the menu, copy “1C: Enterprise” to the Ubuntu desktop. After that, launch the application, create a database and start working with the system and configurations.
Warning: There will be no detailed instructions! Only the sequence of actions, the necessary steps and tips. This guide is for experienced Linux administrators only!
Examples of some of my configs attached...
Note: This article is based on experiments with 32-bit CentOS 6.3(For the server, you need to use a 64-bit OS. But it so happened that 64-bit CentOS was not installed on the hardware available to me for experiments.)However, there is no difference in the installation method (32 vs 64bit) - it is only in the suffixes of the distribution files: either i686 (or i386), or x86_64...
Content:
- 2) Set up the Network
- 5) Set up a Samba server
- Literature (used and additionally recommended)
0) Prepare server hardware
I will not give specific recommendations for choosing server hardware (how much hardware power is required) - I have no personal experience. See official“Recommendations for choosing equipment for working with 1C: Enterprise 8” from v8.1c.ru and unofficial“Computer requirements for working with the 1C: Enterprise 8 program” from 1c.xxi.kiev.ua…
And I recommend taking hardware with a reserve of power than recommended (because it “grows” with the needs of the enterprise; and because the 1C Platform is also constantly “growing and optimizing” - which means it consumes more and more resources from release to release).
In addition, in a nutshell, the most profitable strategy is:
- Spread two servers (1C server and Postgres DBMS server) on two different machines - the capacity is doubled, and there is no need to buy extra licenses. This is also a cheap solution: Linux is free, and the cost of hardware does not count (hardware is always cheaper than licenses).
- Note: please note that the “1C server cluster” is still very buggy. Moreover, each additional separate machine for “1C Server as part of a cluster” requires the purchase of a separate “Server License”! Therefore, from all sides, it is most profitable to use ONLY ONE MACHINE for Server 1C - buy only one machine for the server, with sufficiently powerful hardware that can handle the entire load...
- Install hardware RAID10 into the DBMS server (database files are backed up, and the amount of disk space is increased as needed).
Moreover: In budget solutions, it is quite enough to use a chipset RAID controller, built into many modern motherboards, than to buy a separate and expensive Hardware RAID controller (the price of which starts from $250). Built-in chipset RAID controllers already have wide functionality; support the necessary RAID modes (0, 1, 5, 10) and automated migration between them, with data preservation.
There is only one but significant fly in the ointment: poor support for hardware RAID controllers in Linux. And besides, the SATA-RAID chipset built into the motherboard is not entirely hardware: data management occurs not at the level of the hardware itself, but at the level of the BIOS microcode through the OS driver - hence the concepts of “SATA-RAID drivers” (Intel Matrix Storage Driver), without which RAID is seen as separate disks - hence the support problems... Under Linux, software RAID arrays are traditionally used, support for which has long been implemented and debugged! - Of course, both servers can be installed on Windows/Linux 64bit OS (since they support a lot of RAM and high power). And buy and install “1C Server 32bit” (because “1C Server 64bit” costs 2 times more, and the performance increase, all other things being equal, gives only +5%!!! unofficial craftsmen tested...)
1) Install the Operating System (OS)
Install Linux CentOS 6.x (latest release), preferably 64bit.
Reasons for choosing the CentOS distribution: This is a Linux server distribution. This is a free (free, "Community Edition") distribution. This is a distribution based on the RedHat kernel, which 1C declares as “supported”.
CentOS distribution images are downloading from here (from any of the mirrors).
It’s more convenient to download the iso, burn it to a blank (DVDRW) and install from it.
For installation, as a rule, only the first disk of the two that can be assembled is sufficient (on the second disk there is any minor software).
And then installation disks are no longer needed - all the software still needs to be updated and delivered via the Internet...
Comment: The root user on a CentOS system is not logged in(it should be)!
All work in the CentOS system is ALWAYS carried out from a regular user session, incl. and installation/configuration of the system. And only for some actions the “superuser” privileges are requested each time (something similar appeared in Windows7).
Therefore, to edit configs, install packages and other “admin” actions, having opened the console in a regular user session, immediately execute the “su” command, which will switch the current console to “superuser” mode (CentOS feature):
Bash# su Password:<вводим пароль root>
This bash# console is then used for various privileged actions. For example, you can run “mc” and edit configs in /etc/…
2) Set up the Network
Configure network adapters, hostname, gateway and DNS...
Connect to the Internet and update all basic packages to the latest versions...
We will do all further actions only if there is an Internet connection, we believe that it is permanent!
Network setup is carried out as standard... But there is Common pitfalls that need to be avoided:
2a)
First, the name of our server should resolve to an IP address without any problems.
In the /etc/sysconfig/network file, we check the value of the hostname parameter (“computer name” of the server), change it if necessary, so that the new parameters take effect, you need to restart the system.
Bash# cat /etc/sysconfig/network NETWORKING=yes NETWORKING_IPV6=no HOSTNAME=delldev GATEWAY=192.168.10.2
(The last line is the default gateway, it is not necessary to specify. If not specified, it will be taken from the ifcfg configs or via DHCP...)
The /etc/hosts file should not contain entries in the localhost.localdomian format or related to IPv6; if there is no DNS server, it must contain a clear correspondence between the server IP address - FQDN name - short name. Example of a correct hosts file:
Bash# cat /etc/hosts 127.0.0.1 localhost delldev
Check: does the server ping itself? Enter in the console:
Bash# ping delldev
2b)
Secondly, there should be no rules on the firewall prohibiting the interaction of 1C enterprise components with each other.
In most cases, the enterprise 1C server is located within the local network, so we can completely disable the firewall (at least for the duration of commissioning):
Bash# chkconfig iptables off bash# service iptables stop
2c)
Third, you must also disable SELinux policy!
Causes:
1) Previously, SELinux was the cause of the Segmentation Fault.
2) Samba shares do not work with SELinux enabled (remote users log into the shares, but do not see the files... or the files are seen, but not read... etc. glitches)
3) In addition, the advantages of using SELinux on a highly loaded server located within a local network look extremely vague.
How to disable:
We edit the config /etc/selinux/config, change the line SELINUX=enforcing to SELINUX=disabled and reboot the machine...
2d)
The Internet provider "Ukrtelecom/Ukraine" also has such a rake: buggy DNS servers - so you need to use auxiliary ones (preferably from Google)... And perhaps my DSL router turned out to be poorly compatible with Linux OS...
Symptom: when working with the Internet, resolving each DNS name takes a very long time (several [tens] of seconds timeout), it works very poorly...
Solution: Therefore, I did not automatically obtain the DNS server via DHCP, but statically registered the following addresses in the adapter settings (in the config /etc/sysconfig/network-scripts/ifcfg-eth0): 213.179.249.151, 213.179.249.152, 8.8.8.8, 8.8.4.4(the first two are new Ukrtelecom, the next two are from Google).
3) Set up a package manager (yum)
Note: for a detailed manual on using yum, see the article"Package management in RHEL6. Yum...
3a)
Setting up software sources (repositories):
enable standard repositories (in the repository config we will write enabled=1, or check the boxes via the graphical interface...):
CentOS-6 - Base
CentOS-6 - Contrib
CentOS-6 - Extras
CentOS-6 - Plus
CentOS-6 - Updates
AND (it’s very sad without them, because standard repositories contain mainly server software, and outdated, albeit highly debugged versions).
Note: In most cases, to make it easier to connect new repositories, repository owners have prepared RPM packages for automatic configuration - these packages only need to be downloaded and installed. Moreover, choose the packages of the correct version: for the corresponding version of the repository and intended for the Linux release corresponding to yours. When installing this pseudo-package, the necessary configs will be automatically generated, yum will be configured, etc.
Recommendations:
Use “cat /etc/redhat-release” to find which release of EL you are using(it says: “CentOS release 6.3” - i.e. “el6”)
Use "uname -a" to find your processor architecture(it says: “i686 i386”)
Use "rpm -ivh package-filename" to install the rpmforge-release package(also works with URLs)
RPMforge
Installation instructions: repoforge.org and
packages.sw.be/rpmforge-release/rpmforge-release-0.5.2-2.el6.rf.i686.rpm "
EPEL
Installation instructions: fedoraproject.org
working installation example: su -c "rpm -Uvh download.fedoraproject.org/pub/epel/6/i386/epel-release-6-7.noarch.rpm "
ATrpms
Installation instructions: atrpms.net
working installation example: su -c "rpm -Uvh dl.atrpms.net/all/atrpms-repo-6-5.el6.i686.rpm "
3b)
Concept: the main thing is not to disrupt the functionality of the basic core of the system.
Standard CentOS repositories (especially “CentOS-6 - Base”) are compiled by specially trained people who ensure that the repository has a cross-section of packages and libraries that are compatible with each other at any given time.(CentOS is a server system that is installed on the most expensive Production servers that operate in auto-update mode. A glitch in the repository will break many servers, that is, admins will have a lot of trouble and the credibility of CentOS will be undermined... This is not allowed.)
But if you play with third-party distributions, then in them new (and unstable) versions of libraries always appear earlier - they can be automatically installed into the system during auto-update, creating incompatibility for kernel services. Badly!
In order to ensure that the most well-functioning software is installed on the server, and from additional repositories only software that is missing from the basic ones is installed (packages are decoupled according to “dependencies”), you need to configure/use a priority system:
To manage priorities - you needinstall additional plugins for yum(useful to install all three):
- yum-protect-packages (allows you to protect specified packages from removal; by default, yum itself and its dependency chain are protected)
- yum-plugin-protectbase (allows you to protect packages from a specified repository from updates from unprotected repositories) - IT IS EASIER TO CONFIGURE.
- yum-plugin-priorities (allows you to assign priorities to different repositories; packages from a repository with a lower priority value cannot be updated from a repository with a high priority value - this is a different type of protection, more advanced and flexible) - IT'S BETTER!
(Note: there are many more interesting plugins for yum, but these are the most necessary ones...)
yum repository settingsstores in: /etc/yum.repos.d/
configs that can be edited are called: *.repo
the rest of the files are service files - we don’t touch them.
You need to add to the text configs (at least for all repositories with enabled=1): lines with the parameters protect=… and priority=…(note: the lower the priority value, the more important the repository)
3c)
I also recommend installing a graphical shell for the package manager: Yum Extender (the binary is called yumex) - it is much more advanced than the standard GUI!
4) Install additional software not related to the 1C system
Now you can install (via the yum package manager management console, of course):
ntfs support
wine (emulator for running simple windows applications)
and other useful local applications...
5) Set up a Samba server
You need to install (via yum) and configure the Samba server (services “smb” and “nmb”) - this is support for the Microsoft NetBIOS protocol under Linux, the so-called. "Network environment"…
Moreover, I recommend that you install Samba, even if you do not provide file shares on this server for other clients on the local network, so that this server appears in the “networked environment” of all Windows clients and other network servers, is scanned by the standard API, and resolves its “network machine name” " - so that it can be referenced something like ¨\\MyLinuxServer¨. For convenience, configure Samba so that the 1C Server is visible in your WORKGROUP...
Note about: Is a Samba server needed to run 1C:Enterprise or not?
To configure Samba, I recommend:
create and configure shared folders like this:
Mkdir /home/samba mkdir /home/samba/allothers... chown -R samba /home/samba chgrp -R samba /home/samba chmod -R a+rw /home/samba
create non-login user/group: samba/samba
assign this user's home folder: /home/samba
Setting up the Samba service:
Configs are located in /etc/samba/
see man smb.conf
see smb-conf.ru
For simple setup, see the article"Easy installation and configuration of a SAMBA server on CentOS"...
Important: In addition to the “smb” (main) service, you should also “enable” and “start” the “nmb” service (which is responsible for publishing the NetBIOS computer name on the local network - the Server will become visible in “Network Neighborhood”):
Chkconfig --level 2345 smb on chkconfig --level 2345 nmb on service smb start service nmb start
Advice: The Services operating mode is best configured through the graphical snap-in “GNOME / System / Administration / Services”...
6) We obtain and prepare 1C: Enterprise distribution kits... Where to get everything from?
Pirate 1C distributions (and cracks) can be downloaded from exchangers (I don’t provide links, you can find them at forum.ru-board.com in the “Vareznik” section)…
So, we got/downloaded the distribution“1C: Platform 8.2 release 8.2.16.368 dated 10/05/12”-> from it we take “1C Server: Enterprise (32bit) for RPM-based Linux systems”, file"8_2_16_368_rpm.tar.gz" (169.07 MB) -> after unpacking the archive we get 8 RPM files of the distribution...
Ready-made assemblies of “PostgreSQL from 1C release 9.0.3-3.1C from 01/17/12” will not suit us, they will not be installed according to dependencies (the packages there are compiled for CentOS 5.x, not for 6.x.).
Us You need PostgreSQL source codes, patched by 1C, for self-assembly!From the distribution“PostgreSQL from 1C release 9.0.3-3.1C from 01/17/12”-> take only the file “PG90331_Patch903.rar” -> take only the file from the archive"postgresql-9.0.3-3.1C.src.rpm"(this is an RPM package with the source codes of PostgreSQL version 9.0.3, ALREADY INCLUDING ALL NECESSARY PATCHES to ensure compatibility with the 1C: Enterprise 8.1 and 1C: Enterprise 8.2 server)
Note: In addition, the source codes for self-assembly of the PostgreSQL DBMS supported by 1C: Enterprise 8 are the easiest download from the official site directly...
Notes: Which platform should I choose?
- 1C server comes in both x64 and x86
- 1C client programs are: only x86, at the moment (I repeat: only 1C server is x64)
- it is known that x86 programs can be installed on x64 OS (this applies not only to 1C)
- 1C client programs (thick and thin clients) work only under Windows!
Additional Information...
7) Assembly and Installation of “PostgreSQL DBMS from 1C (release 9.0.3-3.1C dated January 17, 2012)” on Linux CentOS (6.3)
First of all, to avoid conflicts in the system, you need to uninstall all other/previous versions of the PostgreSQL SERVER, if any are installed (check).
Bad advice: To avoid confusion due to software incompatibility, I also uninstalled the client "postgresql-8.4.13" (installed initially, from the standard CentOS 6.3 repository) ... Some packages (for example, "postgresql-libs-8.4.13" and etc.) now I had to leave it, because Many other packages in the system depend on them - however, they can be uninstalled later, after installing PostgreSQL 9.0.3 (looking ahead, I succeeded)…
However, it makes sense to leave these standard packages on the system (especially "postgresql-libs-8.4.13") in case you need to uninstall PostgreSQL 9.0.3 in the future. Because now I have a situation where all system packages now depend only on the “postgresql-libs-9.0.3-3.1C” package and the package manager does not allow me to uninstall the latter without destroying half the system at the same time (crash).
Unfortunately, in the base repositories of CentOS 6.3, i.e. In the current system, there are not all the necessary libraries (dependencies) to use the ready-made “PostgreSQL from 1C” assembly. In addition, it should be borne in mind that for the operation of the 1C: Enterprise server 8.2 PostgreSQL version 8.3.8 or higher is required.
I tried different distributions...
So, the version “PostgreSQL from 1C release 9.0.3-3.1C” is best suited, but the assembled RPM packages from the distribution kit “PG90331_setuppln903.rar” will not suit us: they will not be installed according to dependencies (the packages there are compiled for CentOS 5.x, and not for 6.x.)…
Wrong approach: Manually upgrading existing old libraries is painstaking and dangerous (a lot of software from the basic and stable CentOS kernel depends on them)! It would also be possible to insert hacks in the form of symbolic links (with the names of the required libraries referencing existing versions), but this is very bad on a Production server...
Therefore, in order not to violate the integrity of the CentOS kernel,you need to rebuild PostgreSQL itself from source code, patching it with 1C patches (so it will be based on our existing libraries). We take the patched PostgreSQL sources from the distribution kit “PostgreSQL from 1C release 9.0.3-3.1C” -> we only need the file “PG90331_Patch903.rar” -> and from the archive we take only the file “postgresql-9.0.3-3.1C.src.rpm” "...or download this file directly from the official website...
7a)
Note: I am not experienced in assembling from source code, so what follows is a slightly modified recipe from the “Admin Maniac” blog on alsigned.ru (respect to the author).
Before PostgreSQL, you need to install (or make sure it is already installed) - it is necessary for the operation of PostgreSQL version from 1C. You can install manually from the RPM package (but not necessary)... Or using yum, from the standard repository (which is better):
Yum install icu libicu libicu-devel
We also install the packages necessary for compilation and assembly:
Yum install rpm-build wget glibc-devel bison flex readline-devel zlib-devel openssl-devel pam-devel gettext gcc make
7b)
Download PostgreSQL 9.0.3 sources from the 1c website:
Wget http://v8.1c.ru/overview/postgresql_patches/9-0-3/postgresql-9.0.3-3.1C.src.rpm
and install the source package (different folders will be created in the system and the source files will be scattered throughout them):
Rpm -ihv postgresql-9.0.3-3.1C.src.rpm
Open the file /usr/lib/rpm/macros for editing and change the _default_patch_fuzz patch level in it to 2:
%_default_patch_fuzz 2
Note: Previously, such actions had to be done only on Fedora 12 and higher, when building software that did not support processing batches with new scripts, and starting from version 6, new scripts came to CentOS.
Create symbolic links to libicu libraries:
Ln -s /usr/lib/libicui18n.so /usr/local/lib/libicui18n.so.46 ln -s /usr/lib/libicudata.so /usr/local/lib/libicudata.so.46 ln -s / usr/lib/libicuuc.so /usr/local/lib/libicuuc.so.46
Let's move on to the PostgreSQL build:
Rpmbuild -bb --define "runselftest 0" ~/rpmbuild/SPECS/postgresql-9.0-1C.spec
Note: By setting the “runselftest 0” parameter, we refuse to initialize the test database and check the functionality of PosgreSQL during the build; in order for testing to be successful, it must be performed under a limited user, otherwise the build process will be stopped.
The assembly process will take some time...
Finally, let’s look at the list of compiled RPM packages (since I have a 32-bit Linux OS, the PostgreSQL packages were also compiled in the 32-bit version):
Bash# ls -1 ~/rpmbuild/RPMS/i686 postgresql-9.0.3-3.1C.i686.rpm postgresql-contrib-9.0.3-3.1C.i686.rpm postgresql-debuginfo-9.0.3-3.1C.i686 .rpm postgresql-devel-9.0.3-3.1C.i686.rpm postgresql-docs-9.0.3-3.1C.i686.rpm postgresql-libs-9.0.3-3.1C.i686.rpm postgresql-server-9.0. 3-3.1C.i686.rpm postgresql-test-9.0.3-3.1C.i686.rpm
7c)
Installing a patched PostgreSQL DBMS server from 1C:
It is not at all necessary to install all the packages... for normal operation of PostgreSQL, four are enough: postgresql-libs, postgresql, postgresql-server, postgresql-contrib. Go to the directory /root/rpmbuild/RPMS/i686 (on a 64-bit OS - in /root/rpmbuild/RPMS/x86_64) and install the packages...
The order of installing packages is as follows:
Postgresql-libs-9.0.3-3.1C.i686.rpm postgresql-9.0.3-3.1C.i686.rpm postgresql-server-9.0.3-3.1C.i686.rpm postgresql-contrib-9.0.3-3.1C .i686.rpm
Optional but useful (for developers) to then install the following packages:
Postgresql-docs-9.0.3-3.1C.i686.rpm postgresql-devel-9.0.3-3.1C.i686.rpm postgresql-debuginfo-9.0.3-3.1C.i686.rpm postgresql-test-9.0.3- 3.1C.i686.rpm
But in order not to bother with the installation order, it is better to install all the packages en masse (yum will sort out the dependencies itself):
rpm -ihv postgresql-9.0.3-3.1C.i686.rpm postgresql-contrib-9.0.3-3.1C.i686.rpm postgresql-debuginfo-9.0.3-3.1C.i686.rpm postgresql-devel-9.0.3 -3.1C.i686.rpm postgresql-docs-9.0.3-3.1C.i686.rpm postgresql-libs-9.0.3-3.1C.i686.rpm postgresql-server-9.0.3-3.1C.i686.rpm postgresql -test-9.0.3-3.1C.i686.rpm
Rake: Is there an error when installing package "postgresql-contrib-9.0.3-3.1C.i686.rpm"?
error: archive unpacking failed on file /usr/pgsql/lib/libicudata.so.46;4e9327cc: cpio: Digest mismatcherror: postgresql-contrib-9.0.3-3.1C.i686: install failed
Solution: Run rpm without checking digest and md5
Rpm --nodigest --nomd5 -ihv postgresql-contrib-9.0.3-3.1C.i686.rpm
After this, the “postgres” user will appear in the operating system, which will own all the DBMS files and in whose session the server will be launched (do not confuse it with the superuser of the DBMS itself of the same name).
The script /etc/init.d/postgresql will be created to start and stop the DBMS.
PostgreSQL 9.0.3 client and server binaries are located in /usr/pgsql/bin/…
7d)
We initialize the PostgreSQL database cluster (this is the name of the directory, usually /var/lib/pgsql/data, in which the data of all databases of this PostgreSQL DBMS installation is stored):
Note: in previous versions of Postgres there was a trick when we simply started the DBMS server, and at the first start it did not detect the directory with the database files - it initiated initdb itself... But now this does not work -
you need to run initdb explicitly and with the correct parameters. In this case, you need to explicitly specify the system user in whose session the DBMS server is launched (using the “su postgres” command). We also explicitly indicate the locale in which the server runs (locale=ru_RU.UTF-8).
Bash# su postgres -c "/usr/pgsql/bin/initdb -D /var/lib/pgsql/data --locale=ru_RU.UTF-8"
When executing this command, its console output will confirm the specified parameters (the text will appear in the console):
The files accompanying this database system will be owned by the user "postgres". This user must also be the owner of the server process.
The database cluster will be initialized with the ru_RU.UTF-8 locale. The default base encoding is set to UTF8. The default full-text search configuration is set to “russian”.
As a result, a database will be created, located in the /var/lib/pgsql/data directory (note: the PostgreSQL server configs are also there).
Rake: what if an error occurs during initialization of a database cluster?
FATAL: could not create shared memory segment…
HINT: This error usually means that PostgreSQL"s request for a shared memory segment exceeded your kernel"s SHMMAX parameter. You can either reduce the request size or reconfigure the kernel with larger SHMMAX. To reduce the request size (currently 35233792 bytes), reduce PostgreSQL's shared_buffers parameter (currently 3584) and/or its max_connections parameter (currently 104).
Solution: It is necessary to increase the value of the kernel.shmmax parameter; to do this, add the following line to the /etc/sysctl.conf file:
Kernel.shmmax = 40000000
Then we update the sysctl parameters with the following command:
Bash# sysctl -p
Note: Usually this problem is typical for 32-bit versions... But I didn’t have this problem on CentOS 6.3 32bit - the parameter kernel.shmmax = 4294967295 is already set here
7e)
Setting up the PostgreSQL service:
Add to startup and start the PostgreSQL service:
Bash# chkconfig postgresql on bash# service postgresql start
The PostgreSQL 9.0.3 client and server binaries are located in /usr/pgsql/bin/… Let's create symbolic links to the necessary binaries so that they can be launched without specifying the path (this is especially necessary for the PostgreSQL Console client):
Ln -s /usr/pgsql/bin/psql /usr/local/bin/psql etc.
When you first start PostgreSQL, to control access privileges to database entities, a superuser account “postgres” with the password “postgres” is created in the DBMS (do not confuse it with the Linux OS account). The first thing you need to do is change the standard password... Set the password for the superuser of the DBMS “postgres” with the command:
Bash# psql -U postgres -c "ALTER USER postgres PASSWORD "newpassword""
Note: now this password will be used when connecting clients to the DBMS: login="postgres" password="newpassword".
7f)
We configure the PostgreSQL server to work with “1C Server: Enterprise” (edit the configs):
See description of config parameters in Russian...
In the file /var/lib/pgsql/data/postgresql.conf - server settings. You need to specify the parameters (uncomment the lines or if these parameters are not there, then enter them manually):
Default_with_oid = on
By default, Autovacuum in PostgreSQL 9.0.3 is disabled... If you want to enable “Automatic Garbage Collection (Automatic Vacuuming)” in the database (which is useful for lightly loaded servers, so that the administrator does not need to do the “database packing” procedure periodically and manually, but simply install and forget) - then set the following parameters:
Track_counts = on autovacuum = on
Note: in previous versions of the DBMS there was a “stats_row_level” parameter... but in PostgreSQL 9.0.3 this parameter was deprecated and included in the new “track_counts” parameter.
The file /var/lib/pgsql/data/pg_hba.conf configures the user access and identification policy (i.e., acceptable parameters for connecting to the PostgreSQL server)... Make sure that at the end of this file there is an uncommented such line (which means “allow connecting to the server from any host, login passwords are hashed with md5"):
Host all all 0.0.0.0/0 md5
Note: if you replace “md5” with “trust” in the policy line, the password will not be checked when connecting! (useful for recovering/changing a forgotten superuser password) Also note that the default policy for client connections from localhost is: passwords are not checked...
Note: You can configure these settings later. And when you make sure that everything, including the 1C client, is working, it makes sense, for security reasons, to limit connections only to the local host localhost (or more precisely, to the hosts of the “1C server cluster”, if they are separate)...
Finally, restart the PostgreSQL server:
/etc/init.d/postgresql restart
8) Installing “1C Server: Enterprise 32bit for RPM-based Linux systems (8.2.16.368)” on Linux CentOS (6.3)
The 1C: Enterprise 8 server distribution for Linux is presented in the form of several rpm packages:
- 1C_Enterprise-common - common components of 1C: Enterprise 8;
- 1C_Enterprise-server - components of the 1C server: Enterprise 8;
- 1C_Enterprise-ws - adapter for publishing 1C: Enterprise 8 Web services on a web server based on Apache HTTP Server 2.0 or Apache HTTP Server 2.2;
- 1C-Enterprise-crs - components of the 1C: Enterprise 8 configuration storage server.
- Packages containing the suffix "-nls" in their names are additional national resources for the corresponding package.
The 1C_Enterprise-server and 1C_Enterprise-ws packages do not depend on each other. Accordingly, they can be installed on one computer, either together or separately (i.e., the “1C server” and the “Web server” can be separated into different machines, just as the DBMS server can be separated to relieve the “1C server”) ...
Note from 2014.01.15: it was noticed that the code of the “1C_Enterprise-ws” package still depends on the “1C_Enterprise-server” package, but this is not important...
Installation must be done as root user...
When installing, you should take into account the following dependencies between packages (to successfully install a package, you must first install all the packages on which it depends) - therefore, the installation order is as follows:
Rpm -ihv 1C_Enterprise82-common-8.2.16-368.i386.rpm rpm -ihv 1C_Enterprise82-common-nls-8.2.16-368.i386.rpm rpm -ihv 1C_Enterprise82-server-8.2.16-368.i386.rpm rpm -ihv 1C_Enterprise82-server-nls-8.2.16-368.i386.rpm rpm -ihv 1C_Enterprise82-ws-8.2.16-368.i386.rpm rpm -ihv 1C_Enterprise82-ws-nls-8.2.16-368.i386 .rpm rpm -ihv 1C_Enterprise82-crs-8.2.16-368.i386.rpm rpm -ihv 1C_Enterprise82-crs-nls-8.2.16-368.i386.rpm
Then the server should be started in daemon mode:
/etc/rc.d/init.d/srv1cv82 stop /opt/1C/v8.2/i386/ragent -daemon /etc/rc.d/init.d/srv1cv82 restart
All of the above actions must be performed as the root user.
During the installation process of the 1C: Enterprise 8 server components, an operating system user named usr1cv82 is created, under whose account 1C: Enterprise 8 server processes will be executed.
8a)
After installing all the required packages, you need to run the script utility for diagnosing and initializing the graphics subsystem in 1C v8.2 and follow its recommendations, if any. (The utility checks the system for the presence of components and settings required for the graphics subsystem in 1C v8.2, and makes recommendations if 1C still requires something.)
/opt/1C/v8.2/i386/utils/config_server
Additional information about the “config_server” utility: at nefrit.arvixe.ru and blog.unixstyle.ru ...
The procedure for configuring the system using the “config_server” utility will be approximately as follows(you may not have some of these steps - skip):
Installation must be done as root user...
1) After the first launch of the “config_server” utility, the error should appear: “Can not detect font directory, please specify it!”
Solution: install missing TTF fonts according to recipe linewb.ru FAQ and .
Note: you should already have a ~/rpmbuild/ folder system (they were created earlier when building the PostgreSQL distribution).
As a result, to install fonts, the following steps are sufficient:
Yum install rpm-build cabextract wget http://corefonts.sourceforge.net/msttcorefonts-2.5-1.spec rpmbuild -bb msttcorefonts-2.5-1.spec rpm -ivh ~/rpmbuild/RPMS/noarch/msttcorefonts-2.5-1 .noarch.rpm
2) Run the “config_server” utility again - the error should appear: “No truetype conversion utility found!” Please install ttf2afm or ttf2pt1!”
Solution: install the ttf2pt1 utility (available in the EPEL repository):
Yum install ttf2pt1
3) Run the “config_server” utility for the third time - the system will think longer and everything will be fine: it will not display any more errors in the console...
Finally, you need to reboot “1C Server” (or the entire machine):
/etc/init.d/srv1cv82 restart
All of the above actions must be performed as the root user.
8b)
That’s it, installation of “1C Server” on Linux OS is complete!
All that remains is to connect to this “1C Server” through the MMC console “1C Server Administration: Enterprise 8.2” and create “information bases” of configurations. More on this below...
Note: The MMC console is installed as part of the 1C Technology Platform: Enterprise 8.2 - on a different host, and only under Windows. (Although in version “1C: Enterprise 8.3” they promise that administration software has already been implemented for Linux...)
8c)
We configure support for 1C web clients via the Apache web server:
Preparation: We will use a local Apache web server installed on the same Linux machine as 1C Server. If you have not yet installed the Apache web server, then follow the steps in the “Task: Install Apache/httpd under Fedora Core/Cent OS Linux” section of the article“How to install and start the Apache or httpd service under Linux”:
Yum install httpd chkconfig httpd on /etc/init.d/httpd start
Next, we proceed as stated in section “2. Publishing a web client" article“We install the 1C web client on Apache”...
Suppose you have an information base on “Server 1C” called “test1c”(in fact, it will be created later, after initializing the cluster and creating a database in postgreSQL... but publication can be done speculatively now, since we will not actually access the information security, but will simply correct the Apache configs and create a stub on the web server, some folders/ files).The publication procedure is very simple and automated (each step is described in detail in the above article, so I will not repeat it here) - you need to execute the following commands:
Cd /opt/1c/v8.2/i386 ./webinst -apache22 -wsdir test1c -dir "/var/www/html/test1c/" -connStr "Srvr="delldev";Ref="test1c"" -confPath / etc/httpd/conf/httpd.conf chown apache:apache /var/www/html/test1c/default.vrd chkconfig httpd on service httpd start
That's it, the “test1c” information base has been published! When you have fully configured the “1C server cluster” and the information base, you can connect to it through a browser by entering the address http:// delldev/test1c(where delldev is the name of the host running CentOS, with “1C Server” and “Apache web server”, which we are currently setting up)...
Remember: in order for the web client to work, it is also necessary: to the host on which “1C Server” or “Apache Web Server” is running (in this case there is only one), connect the package of “Network client licenses” (the protection key can be connected locally or configure access to the “license manager”); and enable the item “Issue licenses by application server” in the “Properties” of the Information Base (configured through the “Server Administration” snap-in).
8d)
Additional things to know how to enable “Technology Journal” (aka “logs”, aka “log”)...
By default, logs are disabled because they grow quickly and take up a lot of disk space (in case of errors, “dumps” are also created along with the “logs”). Only enable logs if you really need to track down a specific problem.
8e)
Additionally: if you suddenly need... to remove “1C Server”, you should follow these steps:
Before deleting, you must shut down the server cluster:
/etc/rc.d/init.d/srv1cv82 stop
Then, we remove the packages in the reverse order of installation, so that the dependent package is removed before the package on which it depends:
Rpm -e 1C_Enterprise82-crs-nls-8.2.16-368.i386.rpm rpm -e 1C_Enterprise82-crs-8.2.16-368.i386.rpm rpm -e 1C_Enterprise82-ws-nls-8.2.16-368.i386 .rpm rpm -e 1C_Enterprise82-ws-8.2.16-368.i386.rpm rpm -e 1C_Enterprise82-server-nls-8.2.16-368.i386.rpm rpm -e 1C_Enterprise82-server-8.2.16-368.i386 .rpm rpm -e 1C_Enterprise82-common-nls-8.2.16-368.i386.rpm rpm -e 1C_Enterprise82-common-8.2.16-368.i386.rpm
Or you can also remove all rpm packages with one universal command, which will remove all installed packages that begin with the prefix “1C_”, and dependencies will be tracked automatically:
Rpm -e`rpm -qa|grep 1C_`
9) Installation of security keys (1C licensing)
Connecting keys to 1C Server is easy. You need to download the driver from the key manufacturer’s website, unpack it and double-click the installation...
Tips for choosing a driver -
Rpm -ihv haspd-3.3-eter4scientific.i586.rpm haspd-modules-3.3-eter4scientific.i586.rpm
Next, you need to insert two hardware keys into the USB port of this server: “key for 1C: Enterprise server” and “key for X network user licenses” (all keys in one physical “flash drive”). And everything should work: clients will receive client licenses through the server...
Note: Keys are needed only for “1C Application Server: Enterprise” and for “secure 1C client applications”. there are no problems with the PostgreSQL DBMS - it is open source and does not require any licenses or keys (unlike the MS SQL Server DBMS, but we do not use it).
Note: Some versions of 1C worked without keys (beta)...
Attention: Unlicensed “1C Server” (i.e., even without a “server key”) works normally with a small number of client connections (up to ~12 connections). This was probably done to facilitate administration tasks: initial configuration and monitoring in case of problems... But if this administrative limit is exceeded, the Server begins to reject new connections and require a key.
According to the results of the experiment...
Note: however, “client keys” (local or network) are required for “secure 1C client applications”, in any case - whether for the first connection to the server or the hundredth! instructions for installing Technology Platform for Windows (in pictures and video)…
We launch the installer “Technological platform for Windows version 8.2.16.368” (version 8.2 only comes in 32-bit version) - it contains all the programs in one bottle. During installation, select the following components:
- "1C: Enterprise" (Main components of "1C: Enterprise", including components for administration, configuration, thick and thin client)
- “1C: Enterprise - Thin Client” (Thin client components only for working in the client-server version, without the ability to work with the file version)
- “1C Server Administration: Enterprise” (MMC console for administering a server cluster)
- “Interfaces in various languages: English, Russian...” (default)
I emphasize that we do not install the following components (they are not needed in this 1C client/server use case):
- “1C: Enterprise - Thin client, file version” (Thin client components, including components for working with the file version of the infobase)
- "Server 1C: Enterprise" ( it is not needed on this machine, because it is already installed on another host running Linux... Although if in the future you will have a heterogeneous “cluster of 1C servers”: which will include machines running not only Linux, but also Widows, only then will you need this item...)
- “Web server extension modules” (work only under Windows: “1C Server” for Windows + IIS web server for Windows, possible on different machines... These modules allow you to simply implement a website on which the 1C client interface will be built directly into the web -page. Heavy, clumsy site, because the connection from the web server modules to the “1C server” is via DCOM... But the benefit is doubtful: this crap requires a separate full-fledged “client key” for each connection to a remote web client! Therefore, such a site cannot possibly become widespread...)
- “1C: Enterprise configuration storage server” (Used if the configuration is stored not in a relational DBMS, but in a file format - optimizes the work with it for multi-users, 1C server or Apache Web server. According to reviews: buggy garbage, and 1C seems to have given up on its development...)
- “IB 1C: Enterprise 7.7 Converter” (needed only by developers)
"Installing the HASP driver"We do this if we use a licensed 1C on this computer: either a hardware protection key will be attached to the USB port, or the license will be taken from the network from the “license manager”...(Reminder: if you use a crack/emulator, do not install the “HASP protection driver” during installation!)
Advice: So that nothing goes wrong,make sure your DCOM settings are correctON EVERY MACHINE running Windows OS that you use to work with 1C.
DCOMs are configured through the dcomcnfg snap-in, as shown in the instructions... (Note: the instructions talk not only about DCOM, but about installing 1Cv8+MSSQL... But it also contains a visual description in pictures of where to click to configure DCOM.)
10b)
Now let’s move on directly to operating the installed software package:
Launch the MMC console: Start -> Programs -> 1C: Enterprise 8.2 -> Advanced -> Server Administration 1C: Enterprise.
Through the console, we sequentially create objects: “Central Server”, “Cluster”, “Working Server”, “Working Process”, “Information Base” - as described and shown in article “Administering 1C Enterprise servers”...
The following articles are a little outdated and incomplete (the appearance of the MMC console, the order of creation and the parameters of the components have changed), but can also be useful to illustrate what needs to be done at this stage:No further work is possible without the keys!I don’t consider other key options and issues with them here - they are beyond the scope of this article... You can also activate software licenses via email/phone (if the Linux driver supports them?), or set up emulators/cracks (but I note that Emulators have not yet been implemented for Linux, and they are unlikely to do so, because... not really needed)...
After the “Information Base” (still empty) has been created through the MMC server administration console, you can connect to it using the “Thick Client” in the “Configurator” mode and start creating/configuring the application Configuration... Do it now:
- Connect to IS Configurator (when you first start the client, you need to add IS to the list: button “Add” / “Add existing infobase to list” / “On 1C: Enterprise Server” / “Server cluster” = delldev (server host name); “Name of information security in the cluster” = test1c);
- Load the Configuration (“Configuration / Load configuration from file (.cf)”... then there will be a long process of merging configurations and rebuilding the database, with confirmation requests);
- Import real credentials (menu item “Administration / Load information base” - this is when the data was previously uploaded to the “file version of information security”, used for service needs);
Note: do not confuse this item with “restoring a PostgreSQL database from a regular backup” - this process is done on the PostgreSQL DBMS server, for the entire database cluster, i.e. for all information bases stored on the current DBMS server... This is a rough and ambitious operation, done in case of server failures or when migrating an existing server to new hardware... - Configure the system Users and their Roles (menu item “Administration / Users”... be sure to create the “Administrator” user and enable all possible Roles for him).
And when the application Configuration is downloaded and configured, it will be possible to connect to it with different clients (thick, thin, web) to use and solve application problems...
That's all! Thank you for your attention!
“1C: Enterprise on Ubuntu 10.04 / Installing PostgreSQL 9.0”, here, ...
The combination of 1C:Enterprise server and PostgreSQL is the second most popular among 1C installations and the most used solution on the Linux platform. Unlike implementations based on Windows and MSSQL, where it is difficult to make it not work, implementations based on Linux are fraught with many pitfalls for an inexperienced administrator. It often happens that everything seems to be done correctly, but error follows error. Today we will look at the most typical of them.
general information
Before you start looking for installation errors and, in general, start implementing the server version of 1C:Enterprise, it would be nice to refresh your understanding of how it works:
Server 1C Enterprise. Part 1 - General questions.
In small implementations, the 1C server and the DBMS server are usually combined on one physical server, which slightly narrows the range of possible errors. In our case, we will consider a situation where the servers are located on different machines. In our test lab we deployed the following scheme:
We have two servers running Ubuntu 12.04 x64, one of them has the 1C:Enterprise server version 8.3 installed, the other has PostgreSQL 9.04 from Ethersoft, as well as a client running Windows. We remind you that the client works only with the 1C server, which, in turn, generates the necessary requests to the SUDB server. No requests are made from the client to the database management server.
Database server not found IMPORTANT: user "postgres" is not authenticated (Ident)
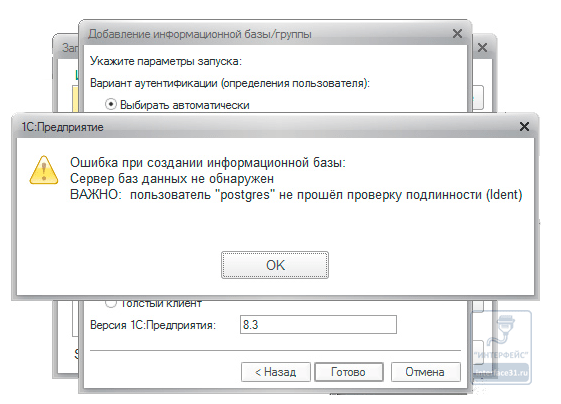
This error occurs when servers are distributed across different PCs due to incorrectly configured authentication on the local network. To resolve this, open /var/lib/pgsql/data/pg_hba.conf and find the line:
Host all all 192.168.31.0/24 ident
and bring it to this form:
Host all all 192.168.31.0/24 md5
where 192.168.31.0/24 is the range of your local network. If there is no such line, it should be created in the IPv4 local connections section.
Database server not detected could not translate host name "NAME" to address: Temporary failure in name resolution
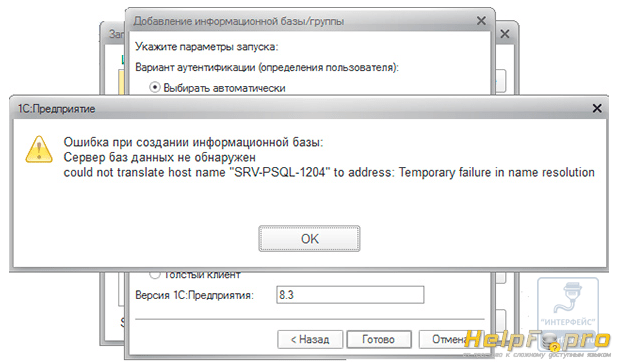
At first glance, the error is clear: the client cannot resolve the name of the DBMS server, a typical error for small networks where there is no local DNS server. The solution is to add an entry to the hosts file on the client, which does not give any result...
And now let’s remember what was said a little earlier. The client of the DBMS server is the 1C server, but not the client PC, therefore the entry must be added on the 1C:Enterprise server to the file /etc/hosts on the Linux platform or in C:\Windows\System32\drivers\etc\hosts on the Windows platform.

A similar error will occur if you forgot to add an A record for the DBMS server on the local DNS server.
Error when performing an operation with the infobaseserver_addr=NAME descr=11001(0x00002AF9): This host is unknown.

Like the previous one, this error is due to the client incorrectly resolving the server name. This time it is the client PC. As a solution, add an entry like this to the /etc/hosts file on the Linux platform or to C:\Windows\System32\drivers\etc\hosts on the Windows platform:
192.168.31.83SRV-1C-1204
where you indicate the address and name of your 1C:Enterprise server. If you use local DNS, you should add an A record for the 1C server.
DBMS error: DATABASE is not usable

A much more serious error, which indicates that you installed a version of PostgreSQL that is incompatible with 1C:Enterprise or made serious mistakes during installation, for example, you did not install all the necessary dependencies, in particular the libICU library.
If you have sufficient experience in administering Linux systems, you can try to install the necessary libraries and reinitialize the DBMS cluster. Otherwise, it is better to reinstall PostgreSQL, remembering to delete the contents of the /var/lib/pgsql folder.
This error can also occur when using builds 9.1.x and 9.2.x Postgre@Etersoft, see details below.
DBMS error: ERROR: could not load library "/usr/lib/x86_64-linux-gnu/postgresql/fasttrun.so"
A rather specific error, typical for builds 9.1.x and 9.2.x Postgre@Etersoft, can also lead to the previous error. The reason lies in an uncorrected bug in the fasttrun.so library. The solution is to roll back to build 9.0.x Postgre@Etersoft.
Error SUBDERROR: type "mvarchar" does not exist at character 31
Occurs if the database was created without the help of the 1C:Enterprise system. Remember, to work with 1C, databases should be created only using the tools of the 1C platform: through the 1C Enterprise Server Administration console

or through the 1C launcher.

Database server not found IMPORTANT: user "postgres" is not authenticated (password)
A very simple mistake. The password for the postgres DBMS superuser is specified incorrectly. There are two solutions: remember your password or change it. In the second case, you will need to change the password in the properties of all existing infobases through the 1C Enterprise Server Administration snap-in.
Database server not foundFATAL: database "NAME" does not exist
Another very simple mistake. Its meaning boils down to the fact that the specified database does not exist. Most often it occurs due to an error in specifying the database name. It should be remembered that the 1C information base in the cluster and the DBMS database are two different entities and may have different names. You should also remember that Linux systems are case sensitive and for them unf83 and UNF83 are two different names.
What to choose, 1C for Linux or 1C on a terminal server?
Php Copyright: 2003-2019 SysElegance Ltd. All rights reserved.
In connection with the announcement of the client part of the 1C 8.3 platform for the free Linux operating system, we increasingly began to be asked questions about the advisability of further using terminal mode for the 1C platform.
In short, our answer is as follows: the terminal mode for the 1C platform solves a number of issues that simply cannot be solved with a local installation, be it free Linux, paid Windows or any other operating system.
The only difference is the starting price of the carrier operating system; the 1C platform on the Linux operating system will not work better or worse than a local installation on Windows.
Most companies choose the terminal operating mode of the 1C platform not at all because of the price (in the implementation of the Microsoft terminal server, for example, the price is much higher than the price of a local installation).
In addition, terminal solutions are a platform for the entire infrastructure, which includes all programs, peripherals and workstations. The 1C platform is just one of the infrastructure components.
As you can see from the table below, there are many more shortcomings and issues than their solutions.
| Advantages and opportunities | Disadvantages and Limitations |
|
|
|
|
|
|
|
|
|
|
However, the 1C 8.3 platform client will be available as a downloadable module for the SysElegance Thinstation Enterprise diskless operating system (starting from version 4). The scope of its application will be extremely limited:
- backup access to the 1C platform when the terminal server is unavailable
- access to the 1C platform from places that do not require work with other applications (for example, warehouses)
- access to the 1C platform from places that do not require printing documents
- in the future - cash terminals (with support from configurations and fiscal peripherals)
Conclusions: the availability of the 1C 8.3 client part for the free Linux operating system is a huge step forward in terms of the development of technology and the 1C platform. But in the near future only large companies that use clusters of 1C servers on the one hand and exclusively Linux in their workplaces on the other hand will be able to fully take advantage of it.
As practice shows, there are currently only a few such companies. For the vast majority of companies, the terminal mode will continue to be simpler, more cost effective and more flexible to use.