Then, due to lack of finances and out of sporting interest, a Chinese vulture. The vulture arrived at the beginning of winter, I put it on the mezzanine and forgot it until recently.
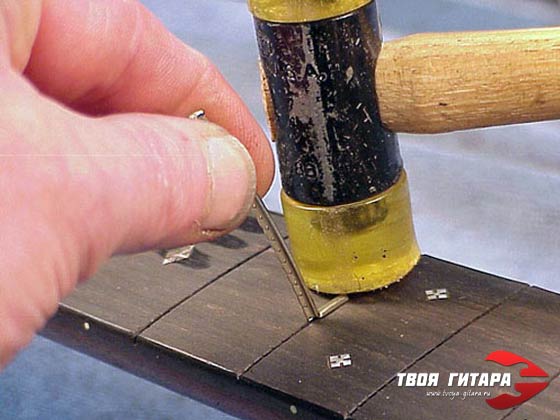
With the arrival of warmer weather, I decided it was time to do it. I took it out, looked and, without surprise, discovered that the frets had come out a little - a common thing. That is, the neck has shrunk a little, which is generally not bad. I took a file and straightened the frets, but noticed that the Chinese had not completely hammered some of them. With the help of a hammer and such-and-such a mother, I was unable to get them into place. After some thought and advice from knowledgeable people, it was decided to replace the frets.
It would seem, what could be simpler? I took it and bought it! However, there are a huge number of frets on the market and they all differ both in size and alloy composition. Let's deal with the alloy first.
What are frets made of?
Yes, they don’t make anything from... Personally, I decided that it would be a classic, i.e. no bronze, brass, stainless steel or other frills. We'll take nickel silver.So, usually frets are made of nickel silver with a nickel content of 12% and 18%. 12% is kind of a classic. And it is believed that these are the frets that were installed on all vintage instruments (on the other hand, I was unable to obtain detailed information on this issue).
18% nickel means more wear-resistant frets. By the way, almost all modern fret manufacturers use just such an alloy. Dunlop included.
I was unable to find out what alloy frets are now made from for stock Fender, Gibson and others like them.
You can talk for a long time about the influence of fret material on the sound, but the fact is that if you do not want to experiment, then you need to choose just from these two - 12% and 18%. Moreover, if you buy branded foreign frets (Dunlop for example), then in 95% of cases it will be nickel silver with 18% nickel content, so you still need to try to find a 12% alloy. Although this is actually not difficult. For example, the Belarusian company Sintoms produces, among other things, these.
Okay, now let's move on to the geometric dimensions of the frets.
Fret sizes
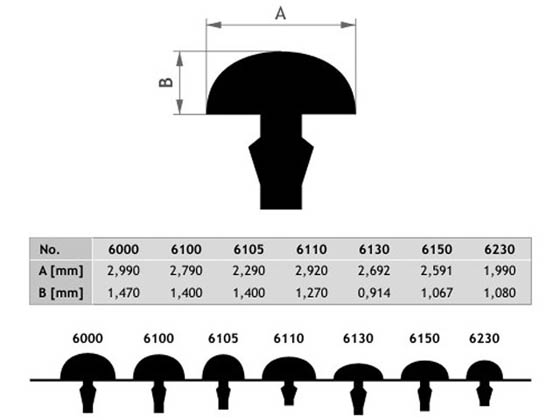
There is great variety and confusion here. At the same time, there are general considerations that work regardless of the specific size.First, let's look at those dimensions that directly affect the feeling of playing the guitar - these are the width and height of the fret head (B and E in the picture).
For example, Gibson in the 60s had fairly low and flat frets, which gave a feeling of sliding and contact with the fingerboard. On vintage Fenders you can find narrow and low frets. But on modern “fast” guitars, the frets are usually quite high, and so high that when gripping the string, your fingers can barely touch the fretboard.
If you think a little, you can understand what's what.
For example, if the fret is not high, then sliding along the fingerboard is quite pleasant, however, it will be somewhat more difficult to clamp the strings. It is also somewhat more difficult to make bends on low frets, because By pressing the string you will touch the fretboard with your finger. Well, on high frets it’s easier to hit individual notes and it’s easier to make bends. If the frets are very high, then the feeling is almost like a scalloped neck. It's easier to play legato, easier to play tapping. On the other hand, here you will have to monitor the pressing force, because if you overdo it, you'll end up with a micro-band.
Fret head height can vary from 0.7mm to 1.48mm (0.029″ – 0.058″).
Now let's talk about fret width. Wide frets give a smoother playing feel, while narrow frets give the opposite effect. Also, wide frets wear out somewhat more slowly than narrow ones, but as they wear out they become even flatter and wider, which can ultimately lead to problems with the instrument's intonation and chatter.
Fret head width can vary from 1mm to 3mm (0.047″ – 0.118″).
In fact, no one likes to go to extremes, so most guitars have frets that are not too wide and not too low.
This is where the confusion begins. Typically, specific fret sizes are not written in guitar specifications, but simply “jumbo”, “medium”, “small” or very often “medium jumbo”. The funny thing is that all manufacturers mean slightly different things by these words. And if, for example, fret manufacturers still write down the geometric dimensions of the fret, then here are exactly what frets are on stock tools it is absolutely incomprehensible. Therefore, it may turn out that medium jumbo on a Fender Telecaster and medium jumbo on an ESP Eclipse are, as they say in Odessa, “two big differences.”
Here, for example, is what the guys from Warmoth think about this.
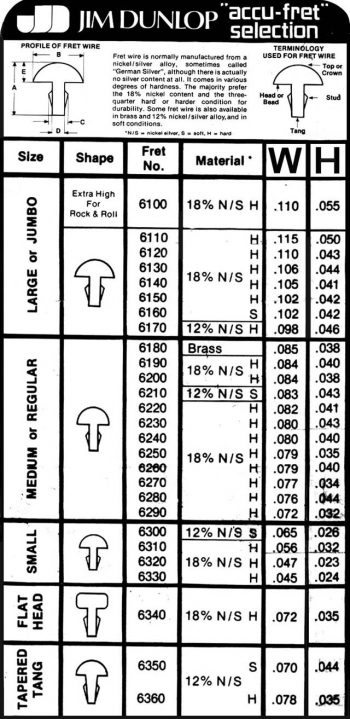
And here is what is written on the sign from Dunlop (however, the picture is ancient, maybe everything is different now).
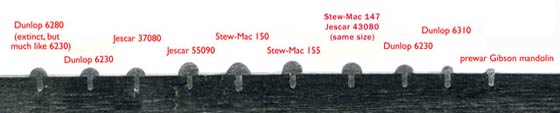
Here's just a picture from the Internet.
Excellent summary table of fret sizes.
Now let's return to the most popular “medium jumbo”. Typically, medium jumbo measures approximately 2.7mm x 0.91mm (0.106″ x 0.036″). Look, 2.7 mm is quite a lot, i.e. close to the upper fret width range, hence the jumbo. But the height of 0.91 mm is, roughly speaking, approximately the middle of the height range, hence the word medium.
By the way, a person on the Fender forum took a caliper and measured the Fender medium jumbo:
Width - 2.83mm / 0.1115"
Height - 1.01mm / 0.040"
Based on all of the above, we can recommend focusing specifically on the geometric dimensions of the frets, and not on anything else.
Ok, we've talked about the size of the fret head, now let's talk about its foot (sizes D and (A-E)). This characteristic is worth taking care of if you are planning, for example, to change the fret. In order for the fret to sit well in the fretboard, the width of its foot must be proportionate to the cut. And in order to hammer the fret completely, the height of its foot should be no more than the groove in the fretboard.

Just imagine, you bought replacement frets, but it turned out that the fret was too high. It’s good when you can deepen the groove in the lining, but what if not? What if the lining itself is quite thin? That's it...
A little more about the thickness of the leg. For example, Sintoms produces a special series of repair frets, where the stem is slightly thicker than on regular ones. If you think about it, this is correct, because... when removing the old fret, the groove willy-nilly expands and loses its original size.
Although they write about these repair frets on the forums that they say that installing something else after them is quite problematic, because... They supposedly have a brutal fastening and are quite difficult to pull out of the pad.
Phew, I hope this article helps you right choice, just in case.
As for me, I’ll probably buy Belarusian Sintoms REF280140. Because the reviews about them are not bad, they are still ours, and they are almost 3 times cheaper than the same Dunlops.
You have probably already noticed that when they talk about the key of a song or any piece of music, they only talk about major and minor keys. This is because there are no other varieties. As already mentioned, the complete scale used in modern music consists of twelve equal semitones (when played on an instrument, this is called the chromatic scale). Diatonicism is a fundamental property of this particular twelve-equal-semitone system. The melodic-harmonic structure of diatonics underlies modern music. The principle of the diatonic mode is that when using only tones and semitones, the placement of two semitones in a row (without chromaticism) is not allowed. Modes that meet these conditions are diatonic. Accordingly, modes that violate these conditions are not diatonic. Scales, which are the modal basis of music (major and minor), consist of seven steps. Obviously, the five sounds of our twelve-semitone scale remain unused. Leaving within this harmonious system freedom for melodic and modal variations. If we choose a major tonic center, we get a major key, and if we choose a minor tonic center, we get a minor key.
Major scale formula (tone, tone, semitone, tone, tone, tone, semitone). If, when performing a major scale, we suddenly accidentally violate the formula, that is, we “take” one of the five sounds that are not “involved,” then immediately “by ear” we hear a violation of the “modal melody.” Our hearing perceives this sound as “alien” for a given melody, that is, it violates the sense of harmony. The mode is a “sound-pitch system of subordination of tones, based on their logical (subordination) differentiation” (T. S. Bershadskaya, 1978). The structure of diatonicism is precisely this logical (subordination) differentiation, and tonality is just the height of the fret. The name of the key comes from the name of the first degree, as well as the fret itself. For example, if the first degree is C (C) and the scale is major, then the key is C major; if the first degree is G (G) and the scale is minor, then the key is Gm (G minor).
In general, diatonic is a modal system consisting of seven seven-step modes, the main ones being natural major and natural minor. In major keys, the first degree is the natural major, the second is the Dorian minor, the third is the Phrygian minor, etc. in accordance with the diatonic structure. In minor keys everything is the same, but on the first step there is naturally a natural minor, on the second step there is a Locrian minor, on the third there is a natural major, etc. In other words, in parallel keys, for example G || Em we use the same scale, only with different tonic centers.
To explain the principle of the diatonic structure, we take the fingering of a two-octave major scale and, on its basis, consider one-octave seven-step modes. That is, we play using only the notes of the G major scale, but from the first degree to the first degree through the octave. We also play from the second degree to the second through the octave, from the third to the third, from the fourth to the fourth, from the fifth to the fifth, from the sixth to the sixth and from the seventh to the seventh. And so we get seven seven-step gams. Seven different formulas. Now let's analyze the result. To facilitate this process, we will consider the resulting scales starting from the sixth string and compare their “formulas” with the standard ones (major - (tone, tone, semitone, tone, tone, tone, semitone) and minor (tone, semitone, tone, tone, semitone , tone, tone)).
The simplest guitar chords in pictures
First, let's look at three chords, which are the simplest and with which the process of learning to play the guitar usually begins. Simple chords for guitar are chords played on the first frets of the fingerboard without using the bar technique.
The graphical chord notation system is the easiest to understand for beginning guitarists. The figure shows three to four frets of the guitar neck. The circles indicate where the fingers press the strings. Strings not marked with such circles sound open (without finger pressure), but they all form a single chord. The six horizontal lines represent the strings of the guitar. The upper horizontal line indicates the thinnest (first) string, the lower line indicates the sixth string. The vertical lines indicate the frets (frets) of the guitar neck. Each chord has its own alphanumeric name: C - C, D - D, E - E, F - F, G - G, A - A. H – B B – B flat. The minor is indicated by a small letter m to the right of the capital letter. Am – A minor. The absence of an m indicates that it is a major chord. F – F major. The string marked with an X is not voiced. Arabic letters represent the fingers of the left hand: 1 – index finger, 2 – middle finger, 3 – ring finger, 4 – little finger.
Here's a simple D minor (Dm) chord in graphical notation:
The first string of a D minor chord is pressed at the first fret, the second string is pressed at the third, and the third string is pressed at the second fret. The fourth and fifth strings are not pressed down and sound open. The sixth string, marked with an X, is not voiced.
The second A minor (Am) chord below is also a simple chord:
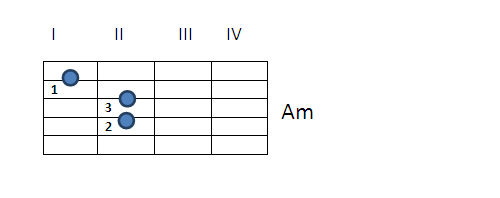
The first string is not pressed and sounds open, the second string is pressed on the first fret of the neck, the third string is pressed on the second fret, the fourth string is also pressed on the second fret, the fifth and sixth strings sound open.
The third simple chord in E major (E) in graphical notation:

As you noticed, the E major chord completely repeats the position of the previous A minor chord along the frets, but with a difference in placement along the strings.
So, we have analyzed the first three simple chords in the graphic notation of D minor, A minor and E major. If you play these chords in a certain order, you will get an accompaniment to ditties: D minor, A minor, E major and again A minor, then again D minor, A minor... This is a very good exercise for setting up chords. This is usually how all self-taught people start.
Digital recording of chords in tablatures
Digital recording of chords is less visual and is a six-digit number, where each number is the number of the fret on which the string is pressed. String counting starts from the first (thinnest) string. This is how the already familiar chords in D minor (13200X), A minor (012200) and E major (001220) look like in digital recording.
From simple chords to complex chords
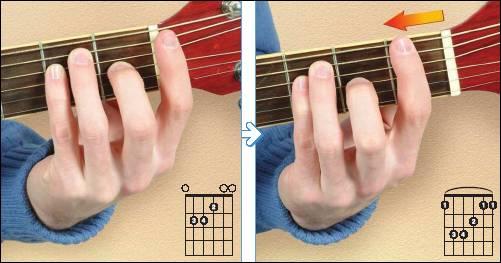
There are two options for recording chords using the bar method. Bare chords are chords where the index finger simultaneously pinch several strings on the guitar neck. The Roman numerals in the diagram indicate the fret on which the chord is set. So, let's look at a digital recording of the G major chord (G).
This chord can be written as (334553), but also as B3/001220. B3 – bar on the third fret. The second entry may seem not too ordinary and obscure. The thing is that the tuning of a six-string guitar makes it possible, having learned simple chords on the first frets of the neck, to increase your knowledge of guitar chords many times over using the bar technique. The index finger performing the bar technique replaces the upper saddle of the guitar. I once taught guitar to Americans from Montana. In order for them to understand the principle of placing chords on the fretboard, they had to divide simple chords into three levels. Pay attention to the first three chords that we have already covered. Now all that remains is to imagine a three-story building, where the first floor (level) is a D minor chord. The main name of the chord is given by the fourth open string. It is under this fourth string that the entire chord is located. The second level will be the A minor chord - the name of the A chord is given by the fifth open string. The third level is E major - the name E comes from the sixth open string located above this chord.
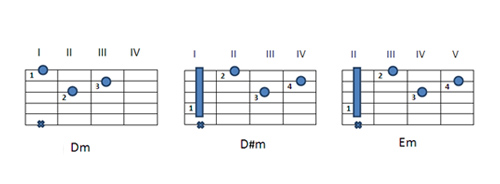
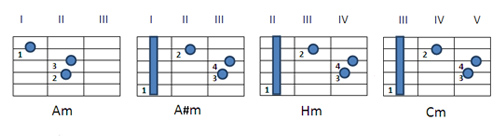
Let's take a closer look at the first level - the D minor chord. If this chord is placed, but with a bar on the first fret of the neck, then it will be D sharp minor (D#m), moving this chord to the next second fret we will get E minor (Em), etc. The name of the chord changes depending on which fret the bar is placed on and the fourth string is pressed. Knowledge of first level chords completely depends on knowledge of the location of notes (sounds) on the fourth string.
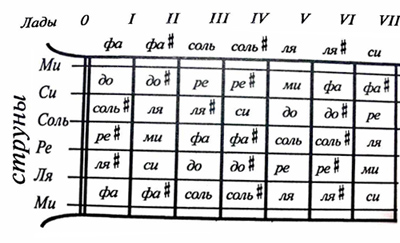
Name of sounds on the guitar neck
A simple A minor chord is a second level chord. The fifth open A string indicates the name of the chord. The same chord with a bar on the first fret will be called A sharp minor (A#m), on the second B minor (Hm), on the third C minor (Cm), etc.
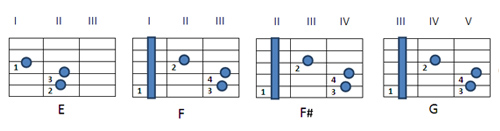
Now let's take a closer look at the chords of the third level. These chords are identified by the sixth string. With a simple chord will be in E major. Taking a bar on the first fret turns this chord into F major (F), moving it to the second fret, we get F sharp major (F#), on the third fret it is G major (G), etc.
The digital chord symbols will look like this:
E major______without bare_______001220
F major______with bar on the 1st fret_B1/001220
F sharp major_with bare on the 2nd fret_B2/001220
G major____with bar on the 3rd fret_B3/001220
I hope it has become clear that knowledge of the chords of a six-string guitar directly depends on knowledge of the notes (sounds) of the fourth, fifth and sixth strings from which these chords are built. Having learned simple major, minor and seventh chords on the first three frets, you will easily transfer them to other positions, and knowing the notes on the strings will help determine their names.
Here are chords that can be used to build with a bar across the entire fretboard:
Simple chords - level one
Simple chords - level two
Simple chords - level three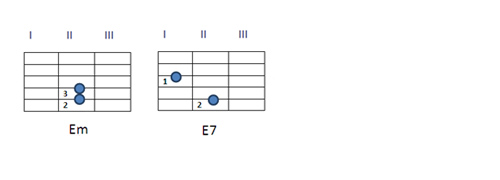 To further master simple guitar chords, go to the page.
Someone calls them guitar frets, some use metal thresholds, but by and large this does not change the essence. Thanks to them, we take the notes and chords we need while playing a song or melody on the guitar. What they are like and from what materials they are made, a little lower and in detail.
Guitar frets. Theory
Frets are parts located along the entire length of the guitar neck, which are protruding transverse metal strips that serve to allow you to change the sound of the string by one semitone and change the note accordingly.
By fret they sometimes also mean the distance between two nuts, and therefore they basically say: “press the string at the 3rd fret”, and not “press between the 2nd and 3rd frets”, which means that you press the string against the fingerboard, and not to the metal threshold itself.
When we pinch a string, we shorten its length, as a result of which its tone increases. In this case, only that section of the string sounds, which is located from the clamped fret to the lower nut, and in this case its vibrations will not propagate above this fret.
One of the main advantages of frets is that thanks to them it is much easier to achieve the sound we need, because the positions of the notes are already indicated by them. In addition, playing on a fretted neck is much easier than on a fretless one.
The limitation in the range of sound, which is already predetermined by the frets, is sometimes a disadvantage when using them. But some variations in pitch are still possible, for example, if you take a string and pull it up or down. This performance technique is used by jazz and rock guitarists, which is very important when playing the guitar.
The pitch of guitars with thin frets changes depending on how you press your finger fret by fret. But such playing techniques are most suitable for fretless guitars, mainly bass guitars. In this design, they are more reminiscent of a double bass, which has no frets at all.
What is characteristic of such a guitar is that you can extract the sound of an arbitrary key, and you can also smoothly change the pitch of this sound. There are, of course, classical guitars without frets, but this is quite rare and such instruments are made mainly by hand.
Many people ask: “How many frets are there on a guitar?” The number of frets on different guitars can be from 19 to classical guitar up to 27 frets on an electric guitar. Today, the most common electric and bass guitars are those that do not have 21, 22 or 24 frets (two octaves).
Fret size
This parameter, oddly enough, can greatly influence the height of the guitar strings. Lower frets allow you to press the string directly against the pickguard, so that you can even touch it with your fingertips; therefore, there is very little space left under the string, which makes it much more difficult for us to make regular bends on the guitar. With very high frets, the opposite is true - pressing the strings is more difficult, but making bends is much easier.
Fret width
The width of guitar frets determines how long they will last and how long they will wear out, so you can know approximately how long it will take to grind the frets or even replace them. In short, narrow frets wear out faster, while wide ones last the longest.
Materials for making frets
The most popular materials from which frets are made are: stainless steel, silver and nickel. But how do they differ from each other? What is the advantage of one or the other metal? There is still quite a lot of debate on this topic, both among guitarists and manufacturers.
Some argue that silver/nickel frets wear out much faster and require regular maintenance, but stainless steel frets do not. Others say that stainless steel frets do not sound as good as silver-nickel ones.
My opinion on this matter is a little different, because I believe that any of these materials used to make frets has a right to its existence. Whether it's a guitar with stainless steel frets or silver/nickel frets, it will still work great.
Here the question is different; you need to proceed primarily from personal needs and requirements for the instrument. Oddly enough, it is also the fact that steel frets, unlike silver-nickel frets, are more expensive in price.
Profile and shape of guitar frets
Now we come to perhaps the most important thing. Let's now see what frets come in shape and size.
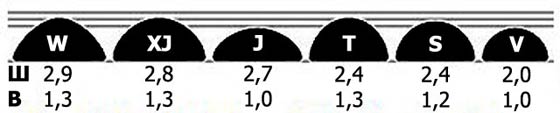
Sh- width; IN- height; W– wide; XJ– extra jumbo; J– jumbo; T– tall; S– standard; V– vintage
That's all about guitar frets. Now you know enough what they are and what they are. Be sure to watch a very interesting video on this topic.
Frets are often referred to as the metal saddles that are located throughout the guitar neck. Each fret serves as a fulcrum for the string when it is clamped, thereby reducing its length and amplitude of vibrations, in simple words: the closer to the body the fret on which the string is pressed is located, the higher the sound.
What materials are the frets made of?
Most often, an alloy of nickel and steel or nickel and silver is used to make plates; alloys of brass and stainless steel are used less often. The sound of the instrument depends on the density and hardness of the material; hard steel will give a brighter sound, although it is quite difficult to find on modern guitars. The ease and ease of processing of nickel has made it a leader among metals for making frets.
About sizes.
The width and height of the frets is an individual parameter, and if for one guitarist playing on high saddles will cause inconvenience, then for another, on the contrary, it will help achieve maximum comfort, for example, when playing high-speed passages. The width of the metal nut is usually about 2 -2.5 mm at the top, and the height is above 1 mm, these parameters also differ depending on the type of guitar.
Wear and damage to frets.
Over time, the frets begin to deteriorate, small pits appear, depressions above the level of the string, various irregularities and roughnesses, all this is the result of constant contact (friction) of two metal products: the string and the fret nut. As a result of damage to the structure of the metal saddles, some problems may arise: the guitar begins to play poorly due to different fret heights, and abrasions or natural wear (“eating” the fret by the string) often causes unwanted overtones or ringing. The first few times you can solve problems with the help of grinding, beginners should seek help from a specialist so as not to make things worse. After 2-3 such grindings, you will have to shell out a fairly large sum to replace the old frets.
Protruding frets.
Storing your guitar in the wrong place can affect the condition of the neck, which in turn will affect the condition of the frets. Frequently leaving the guitar in a hot room with low humidity causes the pickguard to dry out and the metal saddles to bulge. To avoid this, keep the guitar in a room with good temperature conditions. Lemon oil or other special fretboard care products also work well to prevent drying out.
Attention!
1. Ringing in the area of a fret can be caused by many factors, before you start sanding, check that the tuning is correct anchor rod, the height of the strings, as well as the condition of the strings themselves, perhaps it is high time to change them.
2. The size of the nuts has a slight influence on technicality and can cause inconvenience during playing, but do not rush to change frets, the reason may be due to incorrect hand position or simply not enough experience. In the end, the winner is the one who worked more than the one who spent more money on “eyeliner” of the tool.