Today, there are many software products that allow you to use virtualization for various operating systems. The most interesting product is the program VirtualBox, which is published and supported by Oracle Corporation.
This program is distributed under the GNU GPL license, which gives the right to use it absolutely free. The main task of VirtualBox is the virtualization of operating systems, that is, using the program you create a virtual machine on which you run the OS. In this article, we will take a closer look at installing VirtualBox on the latest Microsoft operating system - Windows 10.
Download and install VirtualBox on Windows 10
To download VirtualBox, open any installed browser on Windows 10 and go to www.virtualbox.org/wiki/Downloads. The program download page will open in front of you.
At the moment, VirtualBox 5.0.8 is the newest version of the program and is fully compatible with Windows 10. Therefore, feel free to download this version, which is linked in the “VirtualBox 5.0.8 for Windows hosts” section. After downloading, run the installation file, after which the program installation window will open.

Click the Next button > and go to the window where you will be given a choice of three components to install:
- Virtualbox USB Support;
- Virtualbox Networking;
- Virtualbox Python 2 x Support.
The first component is responsible for supporting USB devices connected to the virtual computer. The second component is responsible for network support in such a machine; with its help, virtual network adapters are created and drivers are installed for the interaction of virtual adapters with physical ones. The third component is installed to support scripts that are created in the Python programming language.
The main task of scripts is to automate tasks in a virtual machine. Also, when you click the Browse button, you can specify the installation location of the executable files.

The next window will allow you to create shortcuts on the desktop and in the start menu, and will also allow you to associate virtual machine files for working in VirtualBox.

Next comes a warning window “Warning Network Interface”. This window indicates that you should install additional networking tools for virtual machines. So feel free to click Yes button.

Now go to the last installation window and click the Install button.

The process of installing the program on your computer will begin, which will take a couple of minutes.

As soon as the installer completes the installation, a window will appear notifying you that the program has been installed. There will also be a checkmark in the window that says “ Start Oracle VM VirtualBox", which will allow you to launch VirtualBox after clicking the Finish button.

After all the steps taken, the main program window will launch, as shown in the image below.

Installing a virtual machine on Windows 10
First, you must decide for which operating system the virtual machine is being created. Therefore, first, let’s prepare an OS image for installation on our machine. As an example, we will take the free Linux Ubuntu OS image, which can be downloaded from www.ubuntu.com/download/desktop. Let's select a 32-bit Ubuntu image and download it to the local drive of the PC. The most recent release of Ubuntu is version 15.10.

Now let’s deal with such a pressing issue of how to install a virtual machine on Windows 10. To do this, launch VirtualBox and click the “ Create" In the window that appears, create a name for the virtual machine. Select the system type: Linux, Ubuntu version and move on to the next step.

Now let's indicate the amount of memory allocated for our virtual machine.

The next step is to create a virtual disk, so select “create a new virtual disk”, click the Create button and go to the next window.

Let's indicate the type of our hard drive by checking the "VDI" box.

Let's create a dynamic hard disk that will fill up as information is written to it, then press the Next button

Select the name and required disk size that suits you best and click the Create button.

That's it, our virtual machine has been created, in the settings of which you can change the amount of memory, connect and edit virtual hard disks, edit the configuration and network settings, set the amount of memory of the video adapter, and also set load options for your processor. This is only a small part of the described settings. By installing VirtualBox, you can understand in more detail all the intricacies of setting up the machine configuration.

The creation of our virtual Linux computer is complete, now you can start it by clicking on the green button “ Launch" When starting, the virtual machine will prompt you to select a boot disk. Select the boot disk ubuntu-15.10-desktop-i386.iso that we downloaded earlier and click Continue.

As you already understand, the system will begin to boot from the image we selected.

Next comes the standard installation of the operating system, in which you have to select the hard drive, time zone, keyboard layout, and also set the computer name and user. That is, further installation will proceed as if you were installing Ubuntu on a clean computer.

After installation, you will be able to use the virtual machine as a separate computer and take advantage of all the features of the Ubuntu OS that are missing in Windows 10.

In VirtualBox you can customize the configuration on an installed virtual machine. For example, if your virtual computer does not have enough RAM, you can quickly increase it by going to the virtual machine settings. You can get to the settings menu by pressing the " Settings", having previously selected the virtual machine to be edited.

In the setup menu you will see ten items:
- Are common;
- System;
- Display;
- Carriers;
- Audio;
- Net;
- COM ports;
- Shared folders;
- User interface.
The first item allows you to change the VM name and operating system type.
The second allows you to change the amount of virtual memory and the loading order of storage media. Also at this point you can edit processor settings, select the number of cores for your VM and enable support for Intel-VT and AMD-V hardware virtualization technology.
Using the third item, you can change the memory size of the virtual video adapter and enable 3D acceleration.
Paragraph " Carriers» makes it possible to configure SATA/IDE storage media and add new ones.
« Audio» allows you to select the type of virtual sound card.
Paragraph " Net"can change the network configuration, the type of network adapter, and also allows you to connect new adapters.
Menu " COM ports» allows you to use the serial COM port and change its settings.
Using the menu " USB» You can turn on the USB controller and select its type, in addition, you can add, remove and edit new USB devices.
Adding a shared folder
« Shared folders» make it possible to create shared directories between the VM and the physical system. Using the menu " User Interface"You can customize the interface of the window in which the VM is running.
Creating a shared folder is actually not as easy as we would like, however, here are precise and working instructions on how to do it:

Bottom line
We hope that the material presented in the article will help you master the methods of virtualizing operating systems, and you will not have any questions about how to install virtualbox on Windows 10.
I would also like to give some tips before using virtual machines.
Before creating such a machine, make sure that you have enough computer hardware resources to run it. Therefore, to run virtual machines, use a powerful processor that supports Intel-VT and AMD-V hardware virtualization technologies. The amount of RAM on your PC also plays an important role. For example, if you create a virtual machine based on Windows 10, you will need a minimum of 2048 MB of RAM, which will be allocated from the main system.
In addition, VirtualBox can use the Extension Pack of plugins, which significantly expands the functionality of the program and adds support for new devices.
Video on the topic
This article shows you the steps to create a virtual machine in Hyper-V Manager on Windows 10
Technology Microsoft Hyper-V is a built-in hardware virtualization system that provides guest systems with direct access (without the participation of intermediate virtual drivers that slow down operation) to computer devices (disk, memory, processor).
The operating system inherited the Hyper-V component from previous versions, Windows 8 and . In Windows 10, Hyper-V is only available in 64-bit Pro and Enterprise editions. System requirements for enabling Hyper-V are described in detail in the article ➯
In Windows 10, the Hyper-V hypervisor, in addition to guest operating systems of the Windows family, now supports some Linux distributions, in particular the popular Ubuntu.
You can install new distributions of operating systems on a virtual machine for testing, and also use it as a server.
How to start Hyper-V Manager
There are several ways to start Hyper-V Manager.

➁ You can use the search, to do this, click on the search icon on the taskbar or press the key combination + S, in the window that appears, enter hyper-v in the search field. In the search results, select Hyper-V Manager or right-click and select from the context menu To Home screen or Pin to taskbar(if you will be using Hyper-V Manager frequently).

➂ You can also launch Hyper-V Manager from the list of programs in the Start menu in the section "Administration Tools"

➃ You can also create a shortcut to launch Hyper-V Manager, to do this, right-click on the desktop and select from the context menu that appears Create > Shortcut, in the window Create a shortcut in field Specify the location of the object: enter virtmgmt.msc and click the button Further

In the next window, in the field Enter a shortcut name enter for example Hyper-V Manager and click the button Ready, as a result of which a shortcut will be created on the desktop with which you can launch Hyper-V Manager.

How to create a virtual switch
Network access settings in Hyper-V Manager are configured separately. To do this, in the Hyper-V manager, in the list on the left, select the item with the name of your computer, and in the right part of the window, select Virtual Switch Manager...

In the virtual switch creation wizard that opens, you need to select the network type. Depending on what access you plan to provide to virtual machines, you can choose one of three types of virtual network:
● External - This type uses the network card or Wi-Fi adapter of the physical computer and connects the virtual machine to the same network as the physical computer. Accordingly, this is a type of network that provides virtual machine access to the Internet.
● Internal—This type provides a network between the physical computer and the Hyper-V virtual machines, but does not allow them to access the Internet.
● Private - this type allows you to create a network between Hyper-V virtual machines, but there will be no physical computer on this network, nor will there be Internet access.
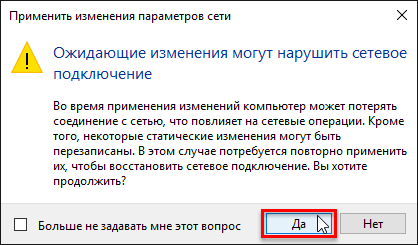
In this case, the virtual machine needs access to the Internet, so select the first type - external network and click Create a virtual switch

In the properties window of the virtual switch we give it a name, it can be any name, for example Virtual Network. If your computer has both a Wi-Fi adapter and a network card, select External network one of the network adapters that is used to access the Internet. In this case, a Wi-Fi adapter is used. After the settings have been made, click the button OK
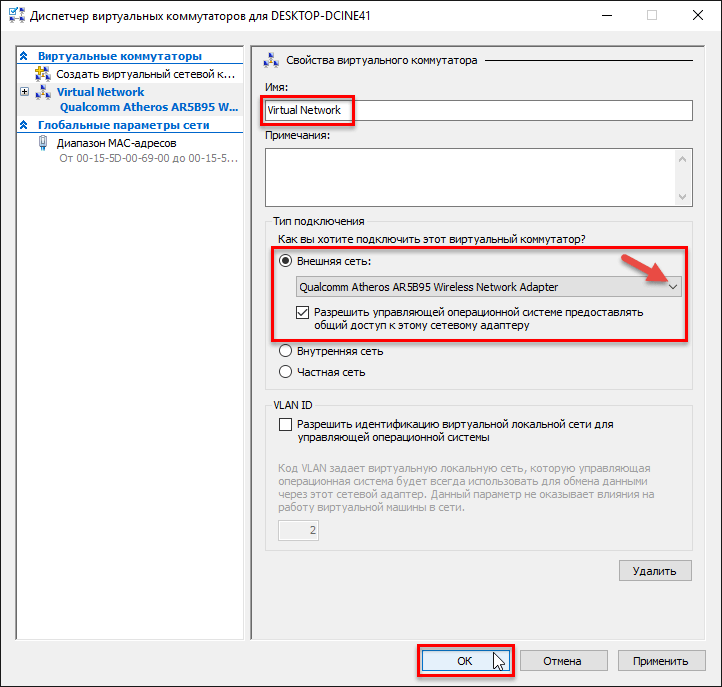
The virtual network adapter has been created. You can see the result of adding a virtual switch to Hyper-V on a physical machine in the window Network connections, a network bridge and a virtual adapter were created.

How to create a virtual machine in Hyper-V Manager
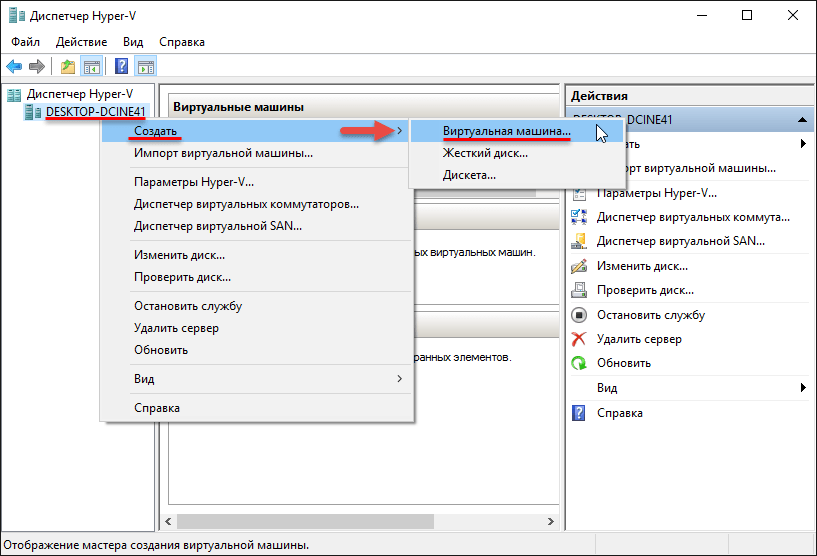
To create a virtual machine in Hyper-V Manager, right-click on the computer name and select from the context menu that appears New > Virtual Machine...
In the first window of the virtual machine creation wizard, click the button Next >

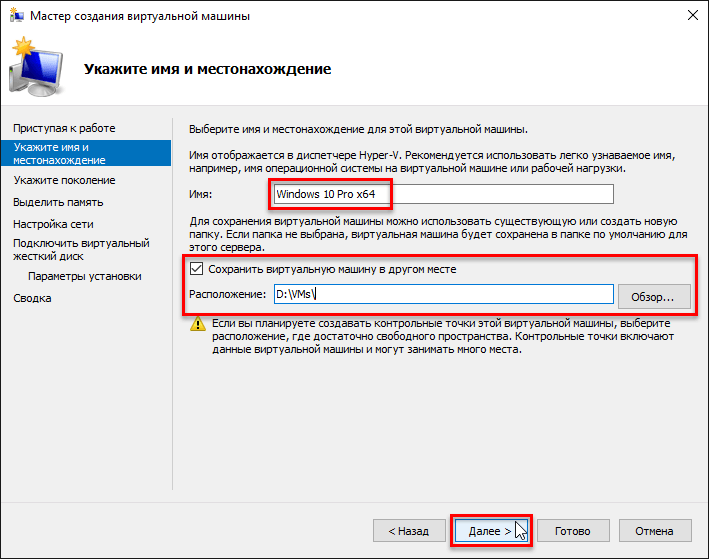
In the next window, we give the virtual machine a name; you can also change its location (the standard location for virtual machines is the folder C:\ProgramData\Microsoft\Windows\Hyper-V\) on the disk of a physical computer by specifying the desired disk partition and the desired folder using the button Review..., press the button Next >
The next step is to select the generation of the virtual machine. In this case, generation 2 is selected. Press the button Next >
Generation 1 are virtual machines that support 32- and 64-bit Windows systems. Generation 1 is compatible with legacy versions of Hyper-V
Generation 2– virtual machines of a new format with embedded software based on UEFI. Such virtual machines support a number of new features and can provide a small performance increase. On generation 2 virtual machines, only 64-bit versions of Windows 8.1 and 10, as well as server versions of Windows Server 2012, Server 2012 R2 and Server 2016 are installed as guest operating systems.

Next, in the memory allocation window, leave the preset parameters if the physical computer has no more than 4 GB of RAM. If you have more than 4 GB of RAM, you can increase the amount allocated when starting the virtual machine. Select the required amount of memory and press the button Next >

In the window Network setup in the dropdown list Connection: select the previously created virtual switch and click Next >

In the window Connect virtual hard disk specify the desired location on the disk, the name of the virtual hard disk file, and also set the size that will be sufficient for your purposes and click the button Next >. In this case, the default parameters are left.

The next step is to specify the path to the Windows distribution. Second generation virtual machines do not allow booting from a physical CD/DVD drive. The only sources for downloading the guest operating system distribution can be the network and ISO image. In this case it is an ISO image. Click the button Next >


Connecting and starting a virtual machine
Once the virtual machine is created, it will appear in the list of virtual machines in Hyper-V Manager. Now the virtual machine needs to be connected. To do this, right-click on the virtual machine and select from the context menu To plug. Team To plug is also present on the right side of the Hyper-V Manager window. To connect, you can also double-click with the left mouse button on the preview window of the selected virtual machine.

In the connection window that opens, click the green button Start


Once the installation files have started copying, you can close the virtual machine connection window.
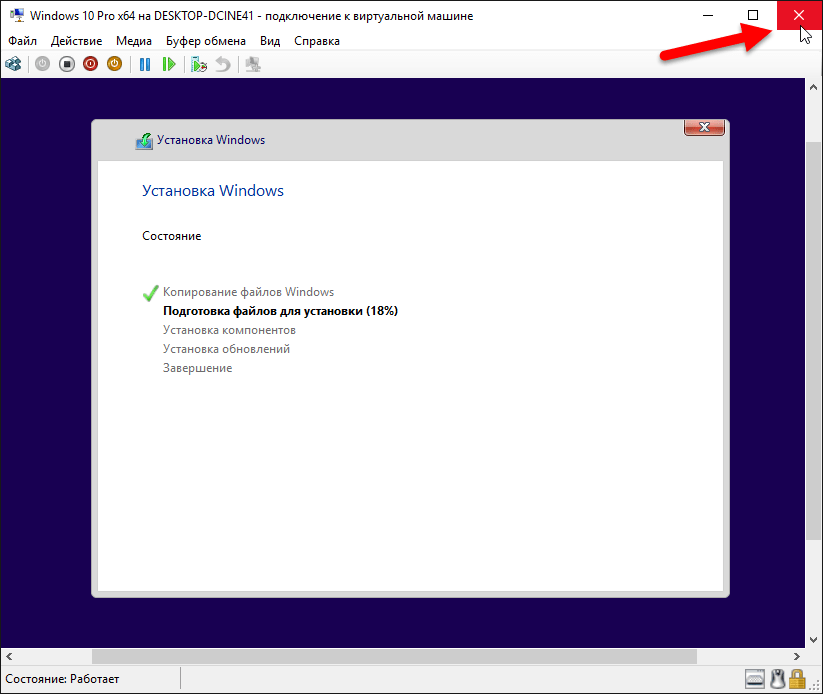
Closing the connection window will free up some of the physical computer's resources for other tasks, while the virtual machine will continue to run in the background. Its performance will be displayed in Hyper-V Manager. You can connect to the virtual machine as needed to perform actions in it.

A program for creating a virtual machine on a PC is software that allows you to emulate the interface of a particular operating system. Ideal for testing any software, or running applications that function only on certain operating systems. The article will talk about the three best programs for simulating a VM on a PC, the nuances of installing such applications, and brief instructions for setting up the software the first time you launch it.
Top 3 virtual machines for Windows 10
The three most popular programs for creating a virtual machine on Windows 10 are as follows:
- VirtualBox
- HYPER-V
Each of these programs has its own characteristics and advantages.
So VirtualBox can boast that it is distributed completely free of charge.
- The software is open source, which makes it possible to create and run virtual machines with special properties and functionality.
- Also the most important quality of the application is its support for many operating systems. So, thanks to this virtual machine, you can run Windows, Linux and MacOS.
Key features of the program are: - Snapshots are an analogue of recovery points on the main OS. Allows you to roll back changes to the user-saved state. This option is useful when testing various settings and applications.
- Supports full screen mode.
- The ability to “drag” objects from window to window (Drap and Drop).
- You can make several clones of virtual machines, and each copy can be used for different purposes.
- An intuitive interface allows even a user who has never encountered virtual machines to understand the basic functions.
The software product interface looks like this:
Concerning Hyper-V, then the program was originally created as a server tool designed to create a virtual Windows Server 2008.
Later, the software was added to Windows 8 and 10. It is noteworthy that when loading the OS, it is not activated; it must be enabled using the admin panel. Compared with VirtualBox, has much greater functionality. Can be used on local servers.
The advantages include
- intuitive interface
- no need to download and install
- snapshots
- the ability to clone running virtual machines.
The disadvantages include the fact that when working with the program, the user must have certain skills, and the software is available in the Pro business package for Windows 8 and 10. In the “home” version of these OSes, the presence of the utility is not provided.

- is a free simplified version of the program VMware Workstation.
Compared to VirtualBox, The software is “deprived” of a number of options and functions. So, for example, you cannot use snapshots, make clones, or create remote connections.
However, being free and having basic options allows the user to run various applications.
If you need to test various resource-intensive software, or use “stripped-down” options, you can purchase a paid version of the program.
By the way, it is much more functional than the freely distributed VirtualBox machine.

How to install oracle vm virtualbox
Attention! The installation process of the program in all other cases, except Hyper-V, is carried out in a similar way.
 Download VirtualBox from the official website
During installation, you need to click on the NEXT button, and to install a full-featured version of the software, you need to select all the components offered in the list.

Pressing a button Browse, makes it possible to select the folder where the software product will be installed. Next, a window will appear in which you can create shortcuts.

Then the warning “Warning Network Interface” will appear. It means establishing new network connections for the program. This action must be confirmed.

The final step will be to confirm the installation of the application.


After installation is complete, you can proceed directly to installing the virtual machine on Windows 10.
First launch of virtualbox
First of all, you need to download the operating system image. For example, let's choose Ubuntu 32-bit version.

Next, in the running program, to create a virtual machine, you need to click on the “create” button. In the window that opens, indicate the name of the VM; in the system type section, select Linux, Ubuntu version.


Next, you need to select “create a new virtual disk” and confirm the action.

Disk type - "VDI".

A dynamic disk fills up as data is written to it.

Next, select the disk size

That's it, the creation of the VM can be considered complete. Now all that remains is to install the previously downloaded operating system on it.
To begin, you need to click on the green “run” button, then select the downloaded image, and click “continue”. After which the normal installation of the operating system on the VM will begin.
Installing a virtual machine on Windows 10. Detailed video instructions
Good afternoon. Thanks to my site, I constantly tinker with the operating system and, of course, over time I began to look for a way so that I could write instructions, but at the same time make fewer changes to the operating system of my work computer... The solution came to an elementary one - a virtual machine. This is an emulation of a completely (or almost completely) working operating system that runs on your operating system. I tried VirtualBox, VMware Workstation and Hyper-V... VirtualBox is free and not as user-friendly as the other two. VMware Workstation is excellent in all respects, but is paid. Hyper-V is a completely balanced virtual machine, which migrated from server operating systems to Windows 8 and simply requires turning on for access. Therefore, the choice fell on the latter: simple, free and tasteful. By the way, I have Windows 10 Professional, which is licensed, but I got it for free thanks to the Windows Insider program (six months of suffering with bugs and a license in my pocket)).
I’ll probably warn you right away that when you enable Hyper-V components, you will not be able to use other virtual machines. So, let's begin:
Right-click on the corner of “Start” and select “Programs and Features.”
In the left pane, select “Turn Windows features on or off”
Now open the “Start” menu → “All Programs” → look for the “Administration Tools” directory and find “Hyper-V Manager” in it.
By launching it, we will see the virtual machine management console, I already have one machine created, on which there is a music bot for my TeamSpeak server. But now we are creating another machine to show how this is done. But first, let's immediately create a “Virtual Network” so that our VM has the Internet. To do this, click on the computer name in the left column, and in the right column select “Virtual Switch Manager”.
I add this paragraph two months after writing the article. That’s because below I described an easier way to connect a virtual machine to the Internet, but I myself use a slightly different one. The difference between them is that in the method described here, the VM gets the main access, and the computer works after it and this is not correct, but it is easier to configure. If you use your computer not only for running virtual machines, select “Internal” → “Create a virtual switch” and check the “Allow identification” checkbox. Internet access is configured using .
On the left select “Create a virtual network switch”, on the right “External” and click “Create a virtual switch”.
Enter a name for the network, in the “External Network” section, select your network adapter and click OK.
Now let's create a virtual machine. Click “Create” - “Virtual machine”.
" New Virtual Machine Creation Wizard“, on the first window just click “Next”.
Specify the name for the future virtual machine. If desired, you can also change the storage location of the virtual machine, I changed the location in the settings so as not to clog the SSD and all virtual machines are stored on one of the hard drives. Click “Next”.
Everything is simple here, read what is written, if you have a motherboard without UEFI support or you are going to install a 32-bit system, then select the first item, if the conditions for using the second generation coincide with your capabilities, select the second generation. I want to install 32-bit Ubuntu for one of the following articles, so I choose the first generation of Hyper-V. Click next.
Amount of virtual memory. In the case of Windows, 2-3 GB for 32-bit systems and 3-4 GB for 64-bit systems are desirable. More does not make sense for a virtual machine, and less can affect the operation of the system. You can also use “Dynamic memory”, in this case the VM will be allocated as much memory as it needs.
VirtualBox (Russian: Virtual Box) is a virtual machine from Oracle Corporation. A free program designed for virtualizing operating systems Windows, macOS, Linux, FreeBSD, Solaris/OpenSolaris, other platforms are supported.

Benefits of a virtual machine
Using a virtual machine (VM) on a home PC, first of all, will allow you to simultaneously run several operating systems (guest OS).
For example, one of the editions of the Microsoft Windows operating system (host OS) is currently installed on your computer or laptop. Installing a virtual machine, in this case VirtualBox, allows you to use any other systems (guests) in the host OS environment, including macOS, Linux, Android, Windows, and so on; there can be a lot of options here.
Some features and capabilities of VirtualBox
- Support for VMDK () and VHD (Microsoft Virtual PC) hard disk images;
- Audio device virtualization (optional AC97 / SoundBlaster 16 / Intel HD Audio emulation);
- Creating, deleting, restoring VM snapshots;
- Shared Folders – creating shared file exchange directories between host and guest systems;
- OVF/OVA format support;
- Creating secure environments for accessing the Internet;
- Supports various connection options: NAT, network bridge, virtual host adapter, etc.;
- Experimental support for hardware 3D acceleration;
- Cross-platform (Virtual Box, );
- Convenient navigation and user-friendly interface;
- Multilingual localization – Russian, Ukrainian and other languages;
- The program is distributed under the GNU GPL 2 license - free software (no restrictions on use).
Download VirtualBox for Windows
The latest version of Oracle VM VirtualBox for Windows 7, 8.x, 10 is available for download on our website (starting from version 5, Virtual Box does not support Windows XP).
Download VirtualBox for free, without registration.
Spoiler (Oracle VM VirtualBox Extension Pack)
Oracle VM VirtualBox Extension Pack – components that expand the capabilities of the virtual machine (RDP server, support for USB, NVMe, PXE and other capabilities).
Download and install Extension Pack only of the same version as VirtualBox.
Download the latest version of Oracle VM VirtualBox Extension Pack
[collapse]
VirtualBox is a virtual machine from Oracle Corporation. A free program designed for virtualizing operating systems Windows, macOS, Linux, FreeBSD, etc.
Version: VirtualBox 6.0.8
Size: 168 MB
Operating system: Windows 10, 8.1, 8, 7
Russian language
Program status: Free
Developer: Oracle
Official site:
What's new in version: List of changes