Everyone likes right angles in images. But still, there are times when these same corners need to be rounded. Then the Photoshop program will come to your aid again. In this article we will look at one of the many ways how this can be done. Keep in mind that my method also involves cutting off the image a little at the edges, this is a kind of sacrifice in the name of rounded corners.
For those who like more clarity, I recorded a video tutorial that can be watched at the end of this lesson. So, let's start rounding the corners of the image:
Step 1
By default, all images opened in Photoshop become background image. Photoshop names this layer as “Background” and also blocks it from unnecessary editing. This is indicated to us by a small padlock icon.
To unlock such a layer, you need to double-click on it. The New Layer dialog box appears. Don't change anything, just click OK. The lock should now disappear.
Step 5
In the layers panel, click on the very first layer with our original image and press the key combination Ctrl+Shift+I. As a result, we should select the entire area outside the boundaries of our square. It is called . Take a closer look at what has changed:

Step 6
Now press the key combination Ctrl+X (edit - cut) to delete the selected area. The selection should disappear and a checkerboard background (transparency) will appear where the image once was.

Step 7
Now let's make our shape layer invisible. To do this, in the layers panel, click on the eye icon opposite the square layer. Here is the original image with rounded corners.

Step 8
Run the command Image - to have Photoshop remove all the extra space around the image. As a result, the transparency mode should be visible only in the corners.
In the future, to use such an image, it must be saved in PNG format! In this case, the corners will remain transparent. Otherwise, if you save, for example, in JPG format, the corners will automatically become with a white background.
So, everything is ready. The image with rounded corners will look like this:

How to make only, for example, one rounded corner?
Very simple. Let's go back to the stage when we drew the figure. Stretch it so that only one rounded corner is visible to you, and the other three are hidden outside the canvas. Here, then follow the instructions described above. Everything is the same.
I hope the instructions helped you and you can make something cool! Good luck.
If you notice an error in the text, select it and press Ctrl + Enter. Thank you!
The blur value depends on the linear size of the image and the size of the fillet radius you want to achieve. I chose a value of 4 pixels:
Just in case, I create a copy of the layer with the blurred figure by pressing Ctrl+J.
Hold down the Ctrl key and click on the layer icon in the Layers panel to create a selection around the shape. Go to the main menu tab Select --> Refine Edge. Select the viewing mode (at the top of the dialog box) “on black”:

The “Smooth” parameter is responsible for the corner radius, so you can choose it to your taste, but the “Feather” and “Contrast” values must be set to 0 pixels. and 100% respectively.
Click OK, the "Refine Edge" dialog box closes and the "running ants" appear in the document again. All we have to do is click on the create layer mask icon at the bottom of the layers panel, with this we will create a layer mask from the selected area.
Result:

The Layers panel looks like this:

As you can see in the penultimate image, the corners are rounded, but along the edges inside the shape there is an unnecessary color transition (this happened due to blurring). To fix this, hold down the Ctrl key and click on the layer mask icon:

A selection appears around the shape. Then Necessarily Click on the layer icon, select the desired color in the color palette and press Ctrl+Delete to fill the selection. I took the original color of the shape. Done:

Here's how to round corners in text using the method described above:

In addition, if you apply a layer mask to the source file and partially remove it, you can achieve an effect on individual areas of the shape or text.
On some sites that do not have sharp corners in their design, illustrations in articles and news also have rounded edges. Very often, web designers do not think about the fact that making such illustrations with rounded corners will be difficult for the site owner; he does not necessarily have the necessary knowledge Photoshop. However, the site customer himself is to blame. Because he demands that everything be beautiful, he often doesn't think about how he will then add rounded images to articles and news on his site.
In this lesson Photoshop we will see how easy it is to round the corners of a picture using the example of an avatar, without being limited by the thickness of 1px:
When I first needed to round corners in an illustration for a website, the answer was not obvious to me. I googled and came across a couple of translation instructions that were too abstruse for a beginner - struggling with channels, paths, blurs, guides and other tools for advanced users Photoshop Even a professional is lazy, and for a beginner such a process may seem incomprehensible and tedious. After thinking a little, I found my own way to quickly and easily round the edges of the design I needed.
Round all the corners of the drawing using a Photoshop shape
Let's say you need to make it with rounded edges. However, you do not have a similar image with smooth edges. Offering you a very simple, but very detailed and illustrated Photoshop tutorial on how to make a picture with rounded corners for a beginner.
1. Open Photoshop. This tutorial uses my favorite version. Adobe Photoshop CS3, but any other version installed on your computer will do.
2. Open the original drawing, the edges of which we will round off. If the drawing differs in size and shape from the one we need, it is necessary and/or in Photoshop before starting to round the corners.

3. Press on the keyboard Ctrl+A to select the entire picture, then click Ctrl+C to copy it. Open a new window in Photoshop ( Ctrl+N) and paste the copied picture into it ( Ctrl+V). In this case, the background in the new window should be either , or the color that should surround the picture with rounded edges on the site.
4. We create new layer (Ctrl+Shift+N). And in this new layer using the tool Rounded Rectangle Tool (U) draw a square or rectangle of the required size:

5. The background color of the drawn rectangle does not matter. Parameter Radius, characterizing the degree of roundness of the corner, for this lesson is equal to 8 , but you can change it to your liking:
6. The shape drawn in the new layer can be moved using the arrow keys on the keyboard. Its shape can be changed by pressing on the keyboard Ctrl+T and then stretching the shape with the mouse. If you drag around a corner while holding down the key Shift, the size of the figure will change proportionally. As a result of all these actions, we will ensure that the figure with rounded edges will be of the size and shape that we need:

7. While holding down the key Ctrl click on the layer preview in the layers panel Layers(for us this is a red square). This will allow us to select a red rectangle with rounded corners, as evidenced by the dotted line that appears along its border:

8. In the layers panel Layers go to the bottom layer with the main image and press the combination Ctrl+Shift+I(or Select -> Inverse in the main Photoshop menu). This will highlight the area that lies outside the red rounded square.
9. Press a key on the keyboard Delete to remove this part of the main image that we don’t need. After this, make the top layer with the red square invisible (in the panel Layers Click on the eye icon next to the layer with the red square). Press on the keyboard M and click anywhere on the drawing canvas to deselect the finished avatar image with rounded corners. If we set the background to transparent, we get the following:

10. The drawing without sharp corners is ready. You can also use it as an avatar or illustration on the site.
If you need to make pictures with rounded corners often and they are all the same size and style, it would be logical to save the result of this lesson Photoshop in format PSD so that the layers remain editable. Then the process of creating new pictures without sharp corners will be simplified until the outline is selected finished picture, inverting the selection and removing the unnecessary part of the new picture.
If you need to round only one corner of the design, and the rest should remain sharp, the above instructions are also perfect for use. To do this, just do it using the combination Ctrl+T The red rectangle is larger than the image you are editing. In this case, the edges of the red square will end outside the canvas and such a rectangle can be superimposed on the drawing so that only one corner overlaps the visible area of the drawing, and the rest remain outside it. By inverting and deleting the selected part of the picture, we will round only one desired corner of the picture, and the remaining corners will remain sharp. Similarly, you can quickly and easily round any number of corners of any image.
Also, to create a picture with jagged edges or any other similar effects, you can use a picture with such jagged edges or rounded corners, downloaded from some site. In this case, you need to remove the background that is not related to the picture, for example, using the tool Magic Wand Tool (W).
You can learn more about promoting mobile applications on the website advertmobile.net. This service offers motivated installations in large volumes for the application you have developed, as well as their competent promotion in App Store and Google Play.
25.07.2016 27.01.2018
In this tutorial you will learn how to smooth out sharp corners of shapes in Photoshop.
First, let's create a shape. You can do this by selecting the Custom Shape Tool from the toolbar. Hotkey calling the submenu of tools for creating vector shapes-U.
There are two ways to make this tool active:
1. With clamped Shift key Click on a group of tools and a submenu will open to select the desired tool;
2. Long-clicking the left mouse button on a group of tools will also open a submenu.

Load all available shapes into Photoshop (click on the shape’s thumbnail in the top panel and click on the “gear” on the right to open additional settings):
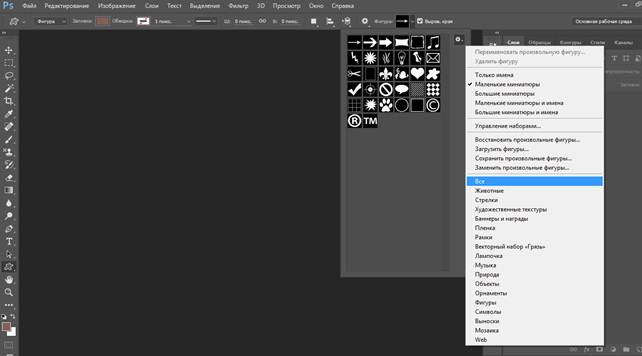
From the drop-down list, select a shape with sharp corners, for example, this star with 10 corners:

When creating a figure, do not forget to hold keyShift- this will help maintain proportions.
Now you need to rasterize the figure - Right-click on the layer with the shape - Rasterize Layer.

We select the radius depending on the size of the canvas and the desired result, I chose 6 pixels.

Now we need to load the selection of the layer with the shape, to do this, hold down keyCtrlclick on the layer thumbnail with a figure on Layers panel.
When the selection is active, press the button "Refine edge" (Refine Edge):
A settings menu will open in which we need the parameter Feather leave on 0 , and the parameter Contrast increase to maximum 100%. Parameter Smooth customize it to your taste, it will help round the corners of the figure. In the case of the 10-sided star, I set it to maximum, but you may have completely different settings.
In the parameter Output to... leave the default setting - allocation.

Press the Enter key to apply the settings. Create a new layer and use Paint Bucket Tool or by going to the menu Editing-Fill fill the selection with the desired color, for example, black, as in the original figure. Turn off the visibility of the original layer with the shape and get this shape with rounded corners:

That's all. In this tutorial we learned how to round corners of shapes in Photoshop. I hope the lesson was useful to you.
Good morning, afternoon, evening or night everyone. Dmitry Kostin is with you again and again. Somehow I was looking through different pictures and then I liked some of them. And they liked them because they had rounded edges. It immediately looks more interesting. Don't you think so? And that’s why in today’s lesson I would like to tell you how to round corners in Photoshop to make the photo look more interesting.
What I love about Photoshop is that in many cases the same thing can be done in several ways. So it is here. Let's get started with our photoshop.
Simple smoothing
Smoothing Using Borders
This method is similar to the previous one, but still very different. We will do everything with the same image.

By creating a shape
The third method is already radically different from the previous two. So take a break for a couple of seconds and move on. I won’t change the image and will load this car into Photoshop again.

Do you see what you ended up with? The picture has rounded edges, and all because it is displayed only where our drawn rounded rectangle is. But now you can crop the extra photo using the Frame tool, or you can immediately save the picture and you will already have a separate image with rounded corners.

Try to do everything yourself, and at the same time tell me which of the presented methods is more preferable to you.
And by the way, if you have gaps in Photoshop or you just want to fully learn it in the shortest possible time, then I highly recommend that you watch one great photoshop course for beginners. The course is well done, everything is told and shown just great, and each material is discussed in great detail.
Well, I’m finishing my lesson for today. Don't forget to subscribe for new articles and share this with your friends. I was glad to see you on my blog. I'm waiting for you again. Bye bye.
Best regards, Dmitry Kostin