In this tutorial, we'll take a look at the color replacement program and learn how it can quickly change the color of objects in a photo.
We will show you not the most professional, but the easiest and fastest way to change the color in an image. This method doesn't always give the desired result, but it usually works well for simple tasks. It's a simple tool and worth a try before moving on to more complex and time-consuming methods.
Color Replacement Tool
The Color Replacement Tool was first introduced in Photoshop CS, and if you're working in Photoshop CS or CS2, you can find it grouped with the Healing Brush tool.
If you have Photoshop CS3 or CS4, CS5 or CS6, click on the Brush tool icon and hold it until a drop-down list of other tools in the group appears, select “Color Replacement”.

Once you select the Color Replacement tool, your mouse cursor will turn into a circle with a small cross in the center.

You can adjust the size of the circle using hotkeys - brackets [ or ]. The left bracket reduces the size, the right one increases it. To adjust the hardness of the brush, add a Shift keystroke (Shift+left square bracket makes the edges soft, Shift+right square bracket makes the brush harder).
How the Color Replacement tool works:
When you drag the Color Replacement tool on an image, Photoshop continuously scans the color swatch currently under the crosshairs. This is the color that will be replaced with the current foreground color. Any other pixels that surround the round cursor also change color as it moves over the object.
For example, if you place the cursor on a blue color in a photo and the foreground color is red, the color underneath the cursor will change to red in the cursor's area of effect. There are several options for customizing the tools in the top bar, but we'll look at that later.
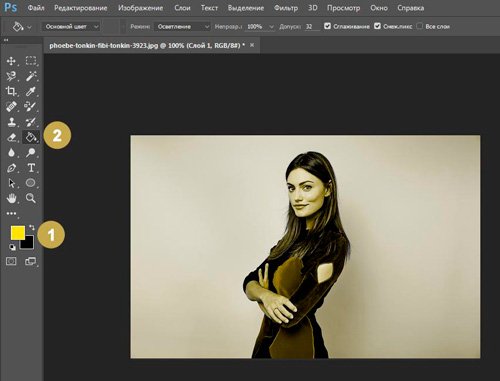
In the Tools palette you can see the current color settings. The default color is black:
To change the foreground color, click on the top square (color swatch) and select any new color from the color palette. Choose green color. Click OK and close the color picker.

Look at the tool palette. The foreground color pattern has changed. Now the foreground color is green. Now, if we paint on the image with the Color Replacement tool, the original color will be replaced with green:
Let's take an example of a photograph of a girl with balloons:

She looks happy with a blue balloon in her hand, but maybe she would like to have a green balloon. Let's see what we can do for her. Using the “Color Replacement” tool, clicking on the ball with the cursor will begin moving inside it. Photoshop begins to replace the blue color with green.

To change the color of the rest of the ball to green, you just need to hold down the mouse button.

If you accidentally go beyond the boundaries of the ball and hit the yellow wall behind it, Photoshop will begin to change the color from yellow to green:

Tolerance
Everything is simple and hassle-free until you reach the edges of the ball. If you look closely, you will notice that the edges of the ball are not completely closed, a blue stripe is noticeable.

We've already mentioned that the Color Replacement tool has several options that you can customize in the Control Panel. One of these parameters is “tolerance”. “Tolerance” determines the sensitivity to the color being replaced. The default tolerance is 30%, which is a good starting point. But this is not enough for our case. We increase the tolerance to 50%, which will allow the Color Replacement tool to affect a wider range of colors:
We have established greater tolerance. Now, let's undo the last step and try finishing the edges again.

We finish processing in the remaining areas and our blue ball magically turns into green, thanks to the “Color Replacement” tool:

Use color from image
In the example above, we randomly selected a new ball color from the color picker in Photoshop. You can just as easily select a color directly from the photo itself. To do this, with the Color Replacement Tool active, press the Alt key and your cursor turns into an Eyedropper Tool.
Click on the area of the photo that contains the color you want to use. Photoshop will make this color the main background color. In the Foreground and Background color icon, the top square changes to the color you selected.
Let's take the color of the girl's blouse:

If you look at the Foreground color swatch in the Tools panel, you'll see that the color you clicked on has become the foreground color:
We can paint the ball with this color again using the Color Replacement tool:

Blend Modes
Blend Modes
The reason the Color Replacement tool preserves volume and texture is because it uses blend modes to blend new colors.
The new color interacts with the previous color and this effect is obtained. You can see blending modes in the top settings menu. There are four of them: hue, saturation, color and brightness (Hue, Saturation, Color, and Luminosity). The default mode is Color.
If you've ever studied color theory, you've probably heard that color is made up of hue, saturation, and brightness. You can choose any blending mode depending on which of these three aspects of the original color you want to affect.
Hue: When you apply Hue mode, only the base color will change. Will not change the saturation and brightness of the original color. This mode is useful for images where the colors are not very intense and it usually produces very little change.
Saturation: The “Saturation” mode only changes the saturation of the original color. Hue and brightness are not affected. This mode is useful for reducing the intensity of a color, or removing color completely.
Color: Color mode is the default and changes hue and saturation. The brightness will remain unchanged. This is the blending mode you will use most often.
Luminosity: Finally, Luminosity mode changes the brightness of the original color to the brightness of the new color. Hue and saturation remain unchanged.
Let's take another photo with balls:

One way to make one balloon stand out is to reduce the color saturation of the other balloons. We will not change the actual color of the balls, but only the intensity of the colors. In the Blending Modes tab, I'll select the Saturation mode.
If we wanted to completely desaturate the balloons, we would set the base color to black, white or gray, but since we want a more subtle effect, we'll just take one of the less saturated colors from the image. While holding down my Alt (Win) / Option (Mac) key, we temporarily switch to the Eyedropper Tool, and click on the color we want to use. We will choose a less saturated yellow color. The color itself doesn't have any meaning since the blend mode won't change the original color. The mode will only affect the saturation:

Select the “Color Replacement” tool and paint on those balls on which we want to reduce the saturation level, making them paler. The brush size can be adjusted using square brackets. If necessary, adjust the tolerance level. In the example below you can see how different the original shade of the ball is from the changed one.

Paint over the other balls. Their saturation decreases. This is what the result looks like:

Brightness Issues
Unfortunately, there are situations in which using the Replace Color tool causes difficulties.
These are cases where there is a big difference between the brightness of the original color and the replacement color. For example, we want to change the hue of the top orange ball to the purple color of the other ball. It seems easy to do, but...
First, let's return all the colors of the balls to their original state. To do this, go to the menu File - Revert. Then take a color sample from the purple ball by clicking on it while holding down the Alt key to switch to the eyedropper.

Set the blending mode to Color. This is the default value. Then we start painting over the orange ball to change its color to dark purple. Here's the result:

Hm. It's definitely purple, but it doesn't quite look like other purple balls, does it? The problem is that our orange ball is much brighter than the purple balls. The set blending mode does not affect the brightness. It only affects color. Let's change the blending mode to “Brightness”/”Luminosity”:
Let's undo all previous actions and return the ball to orange, and then set the blending mode to “Brightness” / “Luminosity”. Now we paint the ball dark purple.

It's safe to say that the result is bad. In the “Brightness”/”Luminosity” mode, the ball became brighter, but it remained orange and lost its structure.
The problem is that there is too much difference in the brightness of objects. The Color Replacement tool is great for simple tasks where you just need to change the hue or saturation of a color, but if there are too many differences between the brightness of two elements in an image, you'll need to choose other color replacement methods.
Let's take another look at the “Color Replacement Tool”.
In the top menu we see three icons depicting pipettes. Each of these icons represents an option for selecting a color sample to work with (Sampling). We look from left to right: test - continuously “Continuous” - set by default; sample - once “Once”; sample - sample background “Background Swatch”. To switch from one option to another, you simply need to activate the selected icon.
Let's consider the options.
Test - continuously “Continuous”. In this option, the color selection will be made by the tool continuously while you hold down the mouse button and move the cursor over the image. This option can be used when you need numerous and complex color changes in an object.
With the “Once” test, Photoshop respects the color you clicked on, no matter how long you hover over the image. This option is best for replacing large areas of uniform color.
Sample background “Background Swatch”. You probably won't use this option very often. Here the background color replaces the original color. Only those pixels in the image that match the background color will be replaced. To do this, you need to select a shade from the color palette that best matches the color of the image. This can be done by clicking on the bottom square of the color icon. Adjust the tolerance value if the shade does not suit you.
“Restrictions”/ “Limits”
The next option for the Color Replacement tool controls the location of the pixels to be replaced and is called “Limits”. There are three color detection options: Contiguous, Discontinuous, and Find Edges.
Most often you will use the first two.
The default constraint type is “Contiguous”/ “Contiguous”. In this version, the “Color Replacement Tool” recolors the pixels that are under the cross within the cursor. The tool will not affect pixels that match the selected color but are separated from the cursor by an area of a different color. At least until the cursor is in these zones.
The “Discontinuous” constraint type replaces all pixels within the cursor.
The final type of edge highlighting, “Find Edges,” replaces color in areas that have a tint of the selected color, preserving the outline of the object's edges.
Let’s look at the last option in the top settings menu for the “Smoothing”/”Anti-aliasing” tool. Use this option if you need to smooth the edges of an object's precise outline. If you don't need anti-aliasing, uncheck the box.
Good luck with your processing ;-))
1 voteHello, dear readers of my blog. Today we will again learn the basics of working with Photoshop. I wonder what you would look like if your hair or skin color were completely different? I have already talked about that.
Today I will tell you how to change the color of a layer in Photoshop without any problems. I won’t once again mention how to work with them, but I’ll also tell you about various tools: a magnetic lasso, a magic wand, and so on.
All the relevant articles are already on my blog, and if you accidentally stumbled upon this publication and want to fill in some gaps, you can easily find out all the information you are interested in from the materials prepared in advance.

Today we will quickly go over the main tools, at the end you can find a good video instruction, and over the next 5-7 minutes you will see a sea of screenshots that will help you figure out what manipulations will be necessary in order to change the color of the picture or her plot.
I'll be working in Photoshop CC, but if you have a different version, that's okay. All functions are simple. The software is installed in Russian. By the way, if you have an English version, I can also recommend the article “”. Very convenient, makes life easier.
Color correction
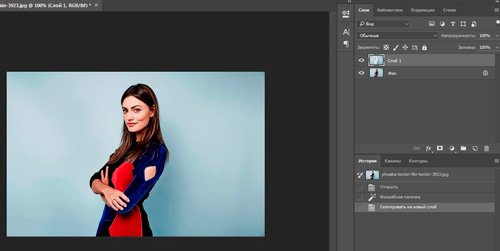
So, I have already selected the object, or rather the background of the photo, and transferred it to a new layer using the Ctrl+J keyboard shortcut.
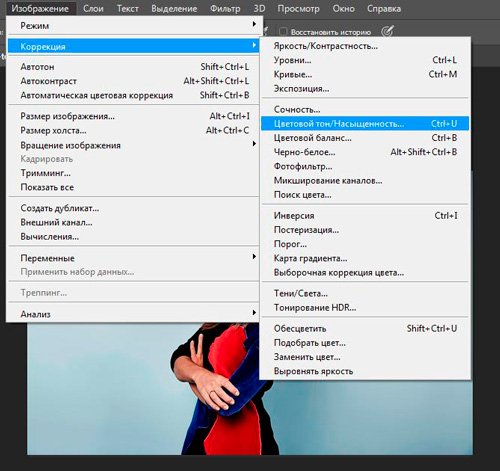
Now I go to the “Image” - “Correction” tab. There are a lot of options here that will help you change the hue: “Brightness/Contrast”, “Color Balance”, “Photo Filter” and even “Gradient Map”. You can try each of them to understand from your own experience how this or that tool works, and choose an interesting method that you like specifically.
I'll use Hue/Saturation.
You can pull different sliders to achieve excellent results.

As you can see, the differences are not striking, but there is no need to fool around with the selection so that the layers look uniform and professional, and the object does not stand out from the general background.
Dramatic changes
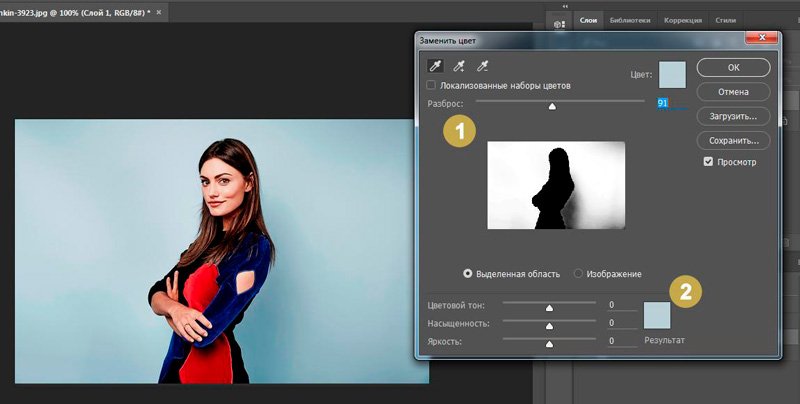
To make the background a completely different color, I will use the “Color Replacement” tool in the same “Correction” tab (about how to draw a black background for Photoshop -).

Once the dialog box opens, your cursor will change. The eyedropper tool will be hidden in it. Just click on the color you want to change. Use the Scatter slider to determine the area you want to work with, and then click on the color block above the Result entry or work again with the Hue, Saturation, and Brightness sliders.
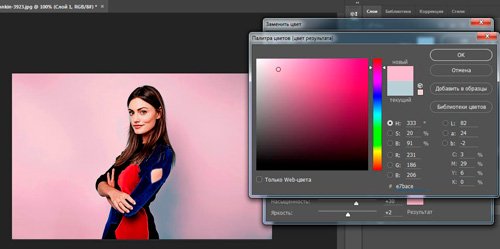
I chose the first option. I clicked on “Result” and now I select the shade and color on the palette so that the soft blue turns into pink.
Professional, fast, easy
In my opinion, the most successful tool for working with colors of complex objects is the color replacement brush. Long-press the left mouse button on a regular brush until an additional menu opens.

Now select the shade to which you will change the layer color.

All that remains is to paint over the necessary areas, as you can see, all the shades are preserved. Very fast and convenient.

Can be repainted in any suitable option.

Video instruction
Bonus
Another way to change the color using a new layer is not very appealing to me, but I imagine that some people might like it and will certainly come in handy someday in the future. So, I create a new layer and then set its blending mode to Hue.

This is how it should turn out in the end.

Now I take any color, for example, yellow, the Fill tool and fill the newly created layer.
You can try other blending modes as well. Don't be afraid to experiment.

Using an eraser, you can return the girl to her normal complexion.

By the way, don’t forget that many professionals use . Still don't know how to work with it? Then the publication to which I provided a link will be useful to you.
Well, if you want to learn as much as possible about all the tools that are in Photoshop, I can recommend the course by Zinaida Lukyanova “ Photoshop for beginners in video format " You don't have to wait for anything. Just a few weeks and you will know everything that this program contains.

See you again and good luck.
Hello again, my dear readers. Today I would like to tell you how to replace a color in Photoshop with another in a separate area and even in the entire picture. After all, you probably have often had the desire to repaint something just to see how it would look. But in order not to make a mistake, it is better to first do this on some kind of layout or photograph. Then you will already know how and what it looks like. Let's see how to change the color of an object to a specific one using the example of repainting the car in the picture.
First way. Color replacement
Let's look at the simplest case, when our background is completely different from the object itself, i.e. cars.
- So, upload a photo, picture or drawing into our editor and now go to the familiar “Image” menu. Next, select “Correction”, and then “Replace Color”.

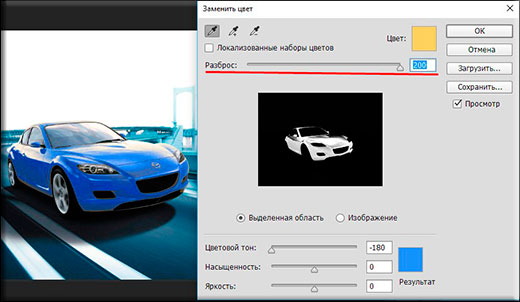
- A color replacement window opened in front of us. What are we doing here? First, let's make sure that the active tool in this window is a regular eyedropper (without signs). Now just left-click somewhere on the hood of the car.

- As you can see, we have a small drawing in the window. What is colored light shows us which area will undergo a color change. Now start dragging the Hue slider. Do you see? Some of the color starts to change as you move that tone. Don't be upset that not the whole car is painted over. We'll fix it.

- To begin, hold down the left mouse button on the “Scatter” slider and drag it towards the larger side. Just try to make sure that the car is painted over as much as possible, while the background remains untouched. In this case, there are no yellow tints in the background, which allows me to set the maximum spread to 200.
- Has the desired object changed almost all its color, but not completely? Again, no problem. Activate the internal tool “Pipette+” and left-click on those areas of the car where there are unpainted areas in the drawing.

- Voila!) As you can see, everything worked out and even our background was not damaged. And by the way, you can also move the “Hue”, “Saturation”, “Brightness” sliders to achieve the desired shade.

Look. It looks like it should be. And this function can be used in different areas, for example, to replace the color of clothes, or to give an unusual but specific shade to vegetables or fruits. In! Try making a blue watermelon. Trust me. It's easy, very interesting and useful for consolidation.

Correcting Misunderstandings
Let's look at a slightly more complicated case. Let’s say I again want to change the color of the car, but this time it’s different. As you can see, the color of the car is the same as in the background. Well? Let's do everything the same as above and see what we get.

But we’re doing a bad job, the background is so similar to the color of the car that neither the “Pipette-” nor reducing the spread helps. If we want ours to be purple, then our mountains will also be similar. What to do?

In such difficult situations, you will have to do a little manual work. There's really nothing wrong with this. You'll just have to use the one you know. Yes Yes. We erase unsuccessfully painted objects or backgrounds with pens, thereby leaving only the object itself with a certain color, i.e. in our case a car.

Even better, before you start changing the color, duplicate the layer and perform all the actions on the created copy. And unnecessary details can be erased with regular . This will be better if you suddenly want to change the color later.
Second way. Blend Mode
Well, since we’re talking about repainting a car in Photoshop, I can’t help but mention another good way to carry out this action. True, here you will also have to work with your hands, since you will have to change and paint over everything. But we can easily replace the color in Photoshop with any other.
Let me load the same car as above.
- Let's take and how we would like to paint this car. Well, let’s say I want to see it green, then I’ll choose this specific color.
- Now create a new layer by pressing the keyboard shortcut SHIFT+CTRL+N. And then take a look at the Layers panel. Do you see any blending modes there? The default is normal, but open the drop-down list and select “Color” (By the way, the “Color Tone” mode is also suitable, so you can select that too). Great. Well done.

- Now choose the size, shape and hardness of the brush, and go ahead! We paint the car. Just be careful not to touch too much. Well, if you hit it, then use an eraser to correct it, no big deal.

- And now, if you want to change the color that you sculpted, you need to go to our again familiar “Image” menu and select “Correction” there - "Hue/Saturation". But I advise you to immediately use a simple key combination CTRL+U.

- Well, in the newly opened window, you can also move the hue, saturation and brightness sliders to change the hue. It's simple.

Well, how do you like the lesson? Was everything clear and interesting? I hope that yes. Personally, when I learned about changing the color of an object in Adobe Photoshop, I was simply delighted. If, of course, something is unclear, you can always clarify or ask. I will be glad to help as much as possible.
I would also advise you to look cool video course on photoshop. The video lessons are simply awesome, the course goes from easy to complex, everything is told in human language, nothing is missed and at the same time there is no unnecessary “water”. Everything is spot on. So be sure to check it out.
Well, I say goodbye to you today. I will be glad to see you in my other articles. Well, in order not to get lost, be sure to subscribe to my blog updates. I won’t spam - everything is just to the point, honestly. Well, you practice. See you in other lessons. Bye bye!
Best regards, Dmitry Kostin.
1 voteGood day, dear readers of my blog. Today we are again talking about Photoshop and its tools. Not many people know that the “Color Replacement” brush is hidden among them. Nevertheless, thanks to it you can very coolly change the color of any object in the photo.
I already wrote about this, but if you use the tips from that article, you can quickly get rid of a certain shade from the entire photo.

Today we will talk about the Color Replacement tool in Photoshop. I'll show you how to work with certain objects. For example, change not all the red in the picture, but only the hair. You don't have to bother with any masks. Everything will be very easy and simple. A couple of moves and you're done.
Well, shall we begin?
Color Replacement Tool
How does Color Replacement work? It recolors pixels of one color to another. And although this method cannot be called super-professional, the darker and lighter areas and highlights remain as such even when repainted.
The method is very easy to use and is ideal for solving simple tasks of changing colors and shades in Photoshop.
This tool “hides” on the same button as the other brushes. Hold down the left mouse button for a few seconds and additional tools will open.

You can control the size of the brush using brackets ( and ) (“X” and “B” on the keyboard). In this, the brush is no different from its other “brothers”.
How does the brush work? You move the arrow and everything that falls within the diameter of the brush changes its color to the one you need. It's very easy to set it up. This is active. To replace it, just click on the front color plate, select a shade and click “OK”.

Look, I took the black color and moved it over the girl’s head. Her hair has changed, but all the shades have been preserved. They don't look like a dark spot.

Tool Settings
If you zoom in on the image, you will see that the color has moved onto the girl’s body. One of the brush parameters is “Tolerance.” It determines how different the color can be from the samples. By default this figure is 30%. If I set it to 90, I’ll go over the girl’s forehead and eyes, but if I set it to 1, I won’t paint anything.

There is another interesting setting here – mode. If you try to change something now, it will seem to you that the option does not work. The whole point is that you first need to set the settings, and then work with the brush.
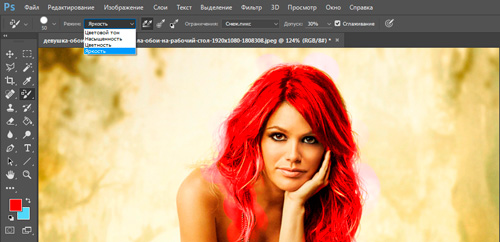
See in the picture below, I tried all 4 modes. 1 – hue, 2 – saturation, 3 – chroma (this parameter is set by default) and 4 – brightness. You already know how to use them, but what is each of them?
If the colors in the photo are not too saturated and minor changes are required, then it is best to use “Color Tone”. In this case, you will only change the hue, but the saturation and brightness of the original color will not change. The hand looks dull blue.
If you need to slightly reduce the intensity or even completely remove the color, then it is better to use the “Saturation” mode. It will not affect the hue or its brightness. The lower part of the arm has remained virtually unchanged. The color only hints that the hand is bluish.
“Color” will change both the hue and its saturation, but the brightness will remain unchanged. The girl's face became like the Avatar's.
“Brightness” will not change the hue and saturation, but its brightness, of course, will be completely different. You see, in my case, the girl’s hand became almost white.

Another interesting setting is “Restrictions”. Of the three available options in life, as a rule, only two are used: Adjacent and all pixels. The settings determine the location of the points that you are going to change.

In the “Adjacent Pixels” mode, only those points that are adjacent to the center of the cursor and do not differ from them in color change. This allows you to make changes more accurately, taking into account contrasting borders. If the diameter of the brush suddenly contains a color of a completely different shade, it will not change.
If you set the “All pixels” mode, the photo will be “blurred” evenly, without taking into account the difference in shades.

OK it's all over Now. The tool, in principle, is not complicated. To make a real masterpiece you will have to dig deeper, but changing parts of the object will not be so difficult. If you need to turn a large photo into a spectacular miniature, then there is simply no better tool.
If you are concerned about how to make the quality of your work more impressive, then I would probably still recommend that you take a deeper look at Photoshop. Get to know him better. The course will help you cope with this " Photoshop from scratch in video format ».

In this course you will be told all about the tools and capabilities that this program has. You no longer have to look for answers to your questions on the Internet. They will appear on their own. You will be able to find ways to solve any problem yourself and create incredible masterpieces.
Well, if you already know enough and want to start making money on your skills, then I’ll advise you another “ Commercial Web Design Basics " These lessons will help you understand what web designers do. If you already know something about Photoshop and want to take this hobby to a whole new level, then this option is for you.
 An online course with the support of the author is a reliable investment in your future profession.
 Stop inventing your own work. Let other people pay you to solve their problems with this powerful program. I assure you, you will be able to quickly find clients, and thanks to the ability to make collages, you will be able to complete the most incredible projects.
Read my introductory article about web design and learn as much as you can. I'm not talking about scams and games, but about real work that someone is willing to pay for. I won’t hide that at first the money won’t be that much, but now you don’t earn anything from your hobby. Is not it?
I wish you success and want you to succeed. Subscribe to the newsletter and VK group, and let every day bring you one step closer to your dream of becoming better.
See you again and good luck in your endeavors.
Good day everyone! Today we will learn how to change the color of an object. Sometimes it becomes necessary to change the color of clothing in a photo to highlight some details. This very useful skill will be very useful to you, since replacing colors on an object allows you to refresh your work and give it originality. It's simple, and today's episode will contain different examples.
If you suddenly decide to tune your car in real life, and don’t know what color is best to choose, then you can try Photoshop here for starters. Repainting for real is expensive, but on a computer it’s just the thing. You can see the result and make the right decision.
There are several ways to change the color of an object. We will consider them. The first way is to use the built-in color change function, or color replacement. Let's get to know him first. As usual, load the image and duplicate the layer. Next, open in the top menu “Image” - “Correction” - “Replace Color”.

A window will open in front of us in which we need to select the color to be replaced and the color that will replace it.

Let's start by checking the box in the first line (if not checked) for localized color sets. These are the standard colors available in the program. Next, choose the color that we are changing, for example, the red color of the insect. Click on the pipette (the first of three icons) and press the pipette on the insect’s body in the square window below.
At the same time, the replacement shade will appear in the window with the name of the color. Please note that the next line is “scatter. You can set it to "maximum". The higher this setting is, the more colors it will capture. At the bottom of the window, options for replacing colors are shown.

You can use the slider, moving it from right to left, choosing a color, or you can immediately click on the colored square and in the color selection window that appears, set the desired one, for example, blue. Next, use the sliders to adjust the saturation of this color and brightness. Having done all this, click OK and get the result:

The ladybug turned from red to blue. The second color change option is slightly similar to the first, but the operations are carried out differently. This procedure can be called color selection. Earlier we talked about car tuning, so let’s take a car as an example. Load the image and go again to the top menu “Selection” - “Color Range”.

A window will open in front of us, slightly similar to the previous one. We also set the spread to the maximum, and use the “Pipette” to click on the red color of the car. It turned white in the viewing window.

Having completed all the necessary operations, click OK and, as a result, we get a picture of a car in which the red color is highlighted with a dashed flickering line. We ensured that only the necessary areas of the picture of a certain color were highlighted. And we did not resort to classic selection tools like Lasso and others.

Now go to “Image” - “Correction” - “Hue/Saturation”.

The settings window will open. In the “Toning” line, put a tick. Next, use the slider to select the desired color tone. In my version - green. We adjust the brightness and saturation as you like.

When you have reached the desired option, click OK. After that, remove the selection and get the result. The car went from red to green. If this color does not suit you, we do the same thing step by step, but choose a different color.

These are such simple operations, and the results are impressive. Fast and accurate. You've just gotten an idea of computer color matching. If you also know the computer code of car paint, you can try to select real colors.
Change the color of the object to white
In this example, we repaint the object white. Let's take the same red car as an example and repaint it white. First, let's go to layers - new adjustment layer - black and white.

As a result, a new layer will appear and its adjustment window will open.

Here we move the sliders, especially the top red one, since the car was red, until we get the desired result.

How to change the color of an object using a sample in Photoshop?
You can also change the color of an object by creating a template or sample of the desired color. We create a new window in the program, in which we paint the background in the desired color, for example blue.

Next we move on to the picture that needs to be recolored. Here we select selection - color range. Now use the eyedropper to click on the color to change. Use the eyedropper with the + sign to add selection points and click OK. If, as a result, not only the desired object is selected, but also neighboring areas, do it as follows.

Select the lasso tool, and from the top menu use the add to selected area and subtract from selected area buttons.

Using the lasso tool, draw around unnecessary areas (with the button activated, subtract from the selected area). As a result, unnecessary areas will be removed.

Having thus performed the necessary manipulations, we will obtain the desired selection, namely a clearly red car.

Go to image – correction – select color.

A window will open in front of us.

Here you first need to open the source drop-down menu and select the picture with the created blue color in it. She will appear in the window nearby.

At the same time, the color of the car will change. Now, by moving the luminosity, color intensity and weaken sliders, we find the desired color option

Once you get the desired result, click OK and remove the selection. The picture has changed color. Well, for clarity, here’s a short video in which the sky above a girl’s head on the beach is repainted using the Eyedropper and Gradient tools.
Replace the color of an object using the Eyedropper tool
Above we talked about how to change the color according to the sample. In the described version, a created Photoshop document template was used. However, you can select the color to change in the edited picture itself. To do this, there is an eyedropper tool, which is located on the toolbar (sixth from the top).

If you need to create a color scheme that will be the same as that of the image, then the eyedropper is just designed for this. Having selected the eyedropper, you need to click on the desired color and it will immediately appear in the primary color selection square. If you do not click the mouse button, but hold it down, you will see that a sample ring has formed around the pipette.

If you move the cursor with the eyedropper over the picture, you will see how the color on the ring changes. The upper part shows the selected color, and the lower part shows the original color. So, these are actions with the eyedropper tool. Now how to use it to change the color of an object. To do this, you will need to perform a number of operations. The first is to select that part of the picture whose color needs to be changed. For example, in a photo with a red car, you need to repaint the side mirror in one of the color schemes of the entire picture. For example, take the black color of the bumper.

Select the quick selection tool or any other tool that is more convenient for you and select the area. Since the object in the example is not complex, I used a magnetic lasso.

Now select the eyedropper tool, click on the black color of the bumper and see that the desired one has appeared in the primary color square.


The result, of course, is not the same as in the options described earlier, but if you work on correcting the resulting image, you can achieve more realistic results.

Good luck in mastering the program!