Accidentally deleted all data from your Android smartphone? And there were your favorite photos, a selection of tracks and an unfinished book. Now you will never know where the pirates buried the treasure! Or is not everything lost from memory?
Most often, all information can be returned using one of the methods. And after we return everything, for the future, do not forget to “stock up” with a reliable program for creating backups so that the next time data recovery does not take so long. Go!
Turn on developer mode and USB debugging
Recovering data lost from the memory of a mobile device occurs when the developer mode is enabled on the Android side. To activate it, you need:
- Go to "Settings".
- At the bottom of the data section we find the tab "About the device" and go into it.
- Select "Build Version".
- We knock on it 7 times. At the same time, the number of touches remaining to activate (after 4 times) is displayed next to it.
- After that, the operating system will display a message stating that you have become a developer.
- Now a new item "For Developers" will appear in the settings of your device.
To continue data recovery, enable USB Debugging mode. This can be done in the new Android settings section.
Features of the return of lost information on Android
Regarding the location of the lost information, all recovery methods can be divided into two main categories:
- Recovery of information deleted from an expansion card (flash drive).
- Recovering data erased from internal memory Android devices.
Increasingly, device models based on this operating system are produced by manufacturers without expansion slots for SD cards. This can become an additional obstacle on the way to achieving the main goal - the return of information lost from the phone.
The whole “salt” of the problem lies in the fact that access to the built-in memory of an Android device is carried out via the MTP protocol. Because of what connected to personal computer the device is not recognized by its system as a normal USB drive. Therefore, you need to copy the entire OS of the mobile device to HDD PC as an image.
Although it is better to use a special software, which can be used to recover such data. That will greatly facilitate the implementation of this task.
When recovering information lost from a phone flash drive, the whole process is much easier. The expansion card is connected to the computer through a card reader and the PC system sees it as a removable disk.
Recovering information using the 7-Data Android Recovery program
Initially, the Android data return program was completely free, but now it requires "money" for its work. But on the Internet, you can easily find an early version of this application. Data recovery step by step:
- Download the program to your PC and install it.
- Let's launch it.
- Activate the USB debugging mode in the phone settings.
- We connect mobile device on Android to PC.
After that, the main application window will appear on the computer screen. Now the whole process of recovering information lost from the internal memory of the mobile device, will take place on PC:
- Select the desired source for recovery.
- Scan the selected drive for deleted, lost or formatted data.
- Then 7-Data Android Recovery will list the items that can be recovered.
An important feature of this program is that it displays all elements in the form of a structure. file system. Thanks to this, you can familiarize yourself with the contents of the lost folders. And also view images deleted from memory, listen to music and open text documents.
- Select items to return.
- Specify a place to save them (but not a recoverable disk).
- We get the result.
Described here step-by-step instruction quite suitable for all other similar software products, which are used to restore deleted items from the device's memory.
In the same way, you can restore information on the expansion card and internal memory using the following applications:
- HandyRecovery.
- R-studio.
- Tenorshare Android Data Recovery.
- Hetman Partition Recovery.
How many times have they told the world
What should be a backup; but it's just not all right...
Data loss on Android can happen in good and bad scenarios. A good scenario is when the files were stored on the mobile device's memory card. In this case, you can return them easily and even for free. Unfortunately, memory cards are becoming less and less common in smartphones, and data recovery from internal memory is a completely different story. Let's consider both situations.
How to recover data on an SD card
Everything is simple here. To get started, download and install a normal free data recovery utility on your computer. It can be the mega-popular Recuva, the open-source TestDisk or its offshoot PhotoRec, or any other similar program.
Then connect the SD card to the computer like a regular USB flash drive and run a scan on it using the installed utility. Save the rescued data and finally back up them and other valuable files to the cloud.
How to recover data from the internal memory of a mobile device
Unfortunately, the vast majority modern smartphones are connected to the computer using a special protocol, that is, not like a regular flash drive. Accordingly, all the utilities listed above are useless.
To recover data on Android, there are special programs, and most of them are shareware. This means that you can, without paying a penny, install the utility, scan your mobile device and see what was recovered from the lost. But in order to pull out and save the restored one, you have to buy a license.
On the one hand, this approach can be called fair. The user does not buy a pig in a poke, but gives money only after he is convinced that the utility works. On the other hand, parting with several thousand rubles is still difficult. In any case, the loss of information is usually the user's fault, and a powerful blow to the wallet is a great motivator to start backing up important data.
Utilities to recover data from Android internal memory:
- iCare Recovery (Free!!!).
- Undeleter (if you have superuser rights).
These programs work in much the same way. First, the client is installed on the computer, then the smartphone or tablet is connected to the computer via USB. It is enough to follow the instructions exactly, and you will surely succeed.
The only difficulty may be the lack of utility support specific model mobile device. That is why you first need to test the program in free mode and only then buy a license.
What to do so that data is not lost
Backup, backup and again. Almost all the data that is on your mobile device can and should be copied to cloud storage. It's almost always free, secure and takes place in automatic mode. For example:
- Google Mail backs up your emails.
- Google Contacts backs up contacts.
- Google Photos backs up photos, videos, and screenshots.
- Google Music backs up music.
- Google Office Suite backs up documents, spreadsheets and presentations.
- Universal storage like " Google Drive”, Dropbox and others back up everything.
Take any type of data - for sure there is an easy and convenient way to safely store it. Take advantage of this and protect valuable information.
Preparing to recover Android phone memory
At the moment there are many various programs which can help in data recovery. If we accidentally formatted the device's memory, did a hard reset, and so on, we'll have to take care to fix it. Of course, for this we can contact service center, where the restoration will be handled by a specialist for a fee.
If we do not want to trust our device to others, then we have the right to use special software. an example of a good free application is Recuva. At the same time, our PC should recognize the mobile device as a USB flash drive.
A good program is Android Recovery from 7-Data. You can download it from here: 7datarecovery.com/android-data-recovery. Installing such a program is very simple. It is Russified and easy to manage.
After starting the program, enable USB debugging in the device itself and connect it to the PC using a USB cable. The sequence of steps to enable debugging depends on the version of Android. For example, if we have firmware 4 or 4.1, we go to the smartphone settings and at the end of the list we see the Developer Options menu. Go to it and check the option "USB Debugging". On devices 2.3 and earlier, go to "Applications" through the settings, and from there - to "Development". We mark the desired item.
So, the preparation for the implementation of the intended task is completed. In fact, it is no more difficult than or a smartphone. Now let's talk about how to restore phone memory using Android Recovery.
How to recover android memory phone?
After turning on debugging, we connect the smartphone to a PC on which the program from the developer 7-Data is open. In the main window of the application, click "Next", after which we see a list of drives in our smartphone. It can be both internal memory and memory together with the drive. We select what we need, and again click "Next". After that, the scanning process will start.
After some time, we will see the data that we can recover. When studying them, we can use the function preview.
Select the files you want to restore and click "Save". The information will be transferred to the PC. It is not allowed to save data to the same medium from which they are restored.
Some users experience crashes with this program. Often this is caused by constant updates of the application on the site.
Hello dear friends and followers of my blog. In this article, I will describe several ways to recover erased information from your device using operating system Android. Yes, yes, we will consider how to recover deleted files on android.
The programs that I will talk about are designed for different cases, including the most difficult ones. Data can be recovered after formatting a memory card, clearing the memory of a smartphone or tablet, as well as when completely resetting the device to factory settings (Hard Reset).
Let's start with a little theory. First of all, I would like to say that this instruction that you will read today is relevant for this year. This is important because android work with the internal data storage has changed a lot. There have been some innovations in the update of the android itself. The way the computer and portable device also became different, hence, as you understand, new opportunities for information recovery.
Previously, a gadget connected via USB was recognized by the computer as a regular drive. That is, you could try to recover data using utilities designed for flash drives. Now you can also use such programs if the files were erased from the memory card, and not from the phone itself. For example, you can take a simple program Recuva, which I wrote about in other articles. Here is one such article for example.
As for modern devices, now most of them are perceived by the operating Windows system and Mac as a media player. In this case, the MTP protocol is responsible for the connection. We will not go into details with you, but you cannot change it, as a result, you will no longer be able to connect the phone as a USB device. Because of this, the methods of recovering information that were used several years ago will be irrelevant today. In addition, recover data after full reset now it is also extremely difficult, it all depends on whether the system files or not.
In any case, we will try to recover your information. Today, I receive just a ton of letters in my mail from many users who just ask questions - “How to recover deleted files on android?”, How to return all data from android? What to do and how to live now? In general, this issue is relevant at the present time and therefore cannot be left without attention.
So, well, it's time to move on to the practical part of our today's article. I chose several programs, among which there are both free versions and paid options. I will inform you in advance about the method of distribution of the application.
IMPORTANT! There is no guarantee that file recovery will be successful - this also applies to hard drive on the computer.
If your computer does not see the phone, in this article you will find a solution to this problem:
1. We recover lost data using Wondershare Dr.Fone (the program is paid, there is a 30-day trial version)
Although the program is paid, the developers offer us a free 30-day version, you can download it from this site.
http://www.wondershare.com/data-recovery/android-data-recovery.html
A detailed video from this program can be found below.
So, we will restore data from a new phone where it is installed android version 4.4.2. Before you start working with the application, you need to perform a preparatory step - USB debugging, which differs depending on the version:
- For Android 4.2-4.4. You need to go to the "Settings" of the phone, then open "Device Information" and click several times on the "Build Number" section - you need to perform this step until the system reports that you are now a developer. Now go to the "Developer Options", which have become active, and start debugging via USB.
- For Android 3.0-4.1. Go to Developer Options and turn on USB Debugging.
For older versions. We go into the main "Settings", select the section "Applications - Developer" and turn on USB debugging.
Instructions for recovering deleted files
Debugging via USB is running, now you can proceed to recovery. We connect the device to the computer using a USB cable and run the application.

At the beginning, "Dr.Fone" activates automatic detection phone or tablet, then the program will ask for permission to download drivers from the Internet, confirm the action. The next step is to confirm debugging from this computer.

After that, the recovery process will start, you need to select the partitions from which important data was deleted.
IMPORTANT! There is a chance that the application will give the following error:

Don't be afraid in this situation. The program reports that it is impossible to recover data from this gadget, since there are no root rights. In this case, you will have to use another program, since Dr.Phone cannot cope with such a modern device. By the way, you can watch a video on recovering deleted data.
2. Data recovery using the application "Android Recovery" (there is a free version)
Do the same USB debugging as described above. In many cases, it is this program that allows you to basically recover deleted files on android.

So, we connect your gadget with a USB cable to the computer, and then run "Android Recovery". Click "Next" and go to the list of drives that are present on your device. This can be only internal memory or a memory card along with internal storage. Select the storage where you want to restore the data and click on the "Next" button.

This will start scanning the storage and identifying deleted information.

The scanning speed depends on the size of the memory card, so the process may take some time. It remains to be patient. After the scan is completed, you will see a list of all files that have been formatted, deleted, or lost for other reasons.

The found files and folders appeared in the window - you can try to restore them all at once or one by one. It is worth mentioning the preview function, which works with documents, audio and photo files. You can also open folders before starting recovery.
After selecting data for recovery, you must click the "Save" button to move this information to your computer.
3. EASEUS Mobisaver program (free).

It's pretty handy application, which differs from paid counterparts in a simple interface. It allows you to preview which files are on your Android device available for recovery. You can then save them to your computer. But in order to fully work with the application, you will need Root rights. For some users, formal hacking will be a minus, but for those who have already received Root rights, I recommend using, of course, "EASEUS Mobisaver".
Concluding today's post "How to recover deleted files on Android", I hope my instructions in this article were useful to you and you were able to easily recover your lost files on your phone!
Modern people are increasingly using their smartphones as a storage medium. Favorite music, personal photos, videos from any events and even important documents - why keep these files on a flash drive when they can always be at hand?
However, there are risks here as well. For example, you updated Android or the auto-cleaning program erased valuable information for us in order to free up space on the device’s memory. Or did you accidentally delete desired file. In such cases, do not despair and panic - everything can be fixed and now we will tell you how to do it.
Important! For most of the described methods Root presence- required condition. How to get root rights.
Universal data recovery on android without using a PC
Basket Dumpster
This application is the best way for the most prudent users who want to protect themselves in advance from accidental loss important information. The Dumpster Recycle Bin is an analogue of the Recycle Bin on a PC, where deleted files go and from where they can be very easily restored. You can download the program by clicking on.
Instruction:
Download, install and launch the Dumpster Recycle Bin.
If you are interested in how the program works, click "Show how" or go straight to its operation by selecting "Skip introduction".

While the basket is empty, because we just installed it. Its effectiveness needs to be tested. We go into the device's memory and delete any file. I have this, for example, the installation apk of DiskDigger.

We restart the basket and see that it contains the deleted file. We select it with a long press and press the button in the form of an arrow - this is the restoration.

That's all - the apk I deleted is now in its original place. This method of recovering various files is the simplest, most convenient and effective.
In addition, you can also protect yourself in advance with the help of popular app to create backups - Titanium backup. You can download the application by clicking on . You will also find instructions for use there.
Undeleter - Recover Files
A popular application that allows you to "reanimate" accidentally deleted files. You can download Undeleter by going to .
Instruction:
Download, install and run the application.
The program will check the smartphone for root rights. To do this, click the "Next" button.

During the verification process, the following window will appear. Click "Allow".

Once the process is complete, click the "Next" button again.

Then Undeleter will prompt us to choose the type of recovery. Let's consider each type in more detail.
"Restore files" - thanks to this function, we can return photos, videos, audio files, documents, etc. Click on the appropriate button: the program will scan all available storage media and prompt you to select a location from where we will recover lost files. In my case it is Internal memory.
Then you need to select the type of scan: Log Scan, Deep Scan or Generic Scan. What each of them means is written under each of the types. And the most effective way is the last one. I click on it.

Now we need to choose the format of the files that we will recover. It is not recommended to select many formats at once - this will lead to a heavy load on the system. The best option is one format. For example, let's select PNG (image) and press the "scan" button.

Upon completion of the process, we will see a list of files that can be restored. We find the picture or photo we need and click on it. Then click on the floppy disk icon and select a location to save the file. We can restore it directly to the internal memory of the device or choose a cloud service for storage: Google Drive or Dropbox.
Select the first item, enter the path to save or leave it by default and click "Restore".

Now the desired file lies at the specified path.

Let's go back and look at the remaining functions of the program.
"Recover data" - here we can return application data, such as deleted SMS. Select an application, for example, SMS and click next. The program will scan the device's memory and find deleted data, if any.
Another function called Shred is responsible not for recovery, but for the permanent deletion of data. That is, what is erased using Shred cannot be restored. Deletion is performed in the same way as recovery: we also scan the memory by selecting the file format, and then delete those found forever.

DiskDigger Pro file recovery
One more popular program allowing access to deleted files followed by their restoration. You can download it.
Instruction:
Download, install and run DiskDigger Pro file recovery.
We immediately give her root rights. Note that the application is possible without root rights, but in a limited mode.

Then we select the section of memory from where the files of interest to us were deleted. In my case, this is / data, i.e. the internal memory of the device.

After that, we tick off the type of files that we deleted. Here you can select the formats of graphic, audio files, text documents and much more. Confirm the action by clicking "ok".

In the window that appears, where we will be informed that the scan is completed, we also click "ok".

After that, check the boxes for the files that we want to return, and click the "Restore" button.

Here you need to select the location where these files will be saved. cloud services, as well as FTP servers, we are not interested: we will go the simpler way and restore files to the internal memory of our device.

The next step is to select a specific folder, for example, Pictures (select this at your discretion). Click on it and confirm the action by clicking "ok".

Everything. Now the file we need is located at the specified path.

As we mentioned above, DiskDigger Pro file recovery can work without Root rights. In this mode, it can only restore images. For many users, this will be enough. Just click "Start a simple image search" and the program will find them. The recovery process is exactly the same as described above.

Universal data recovery on android using PC(works only on older versions of Android OS up to 4.4 inclusive)
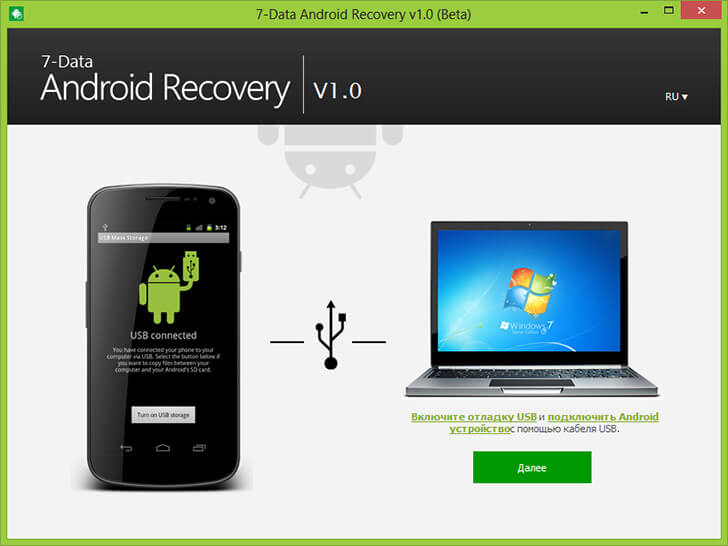
7-Data Android Recovery
You can also recover lost data using a PC. For this, download this program to your computer.
Instruction:
Download, install and run 7-Data Android Recovery.
In the settings of the smartphone, go to the section for developers.

Turn on "USB debugging" and connect the device to the PC using a USB cable.


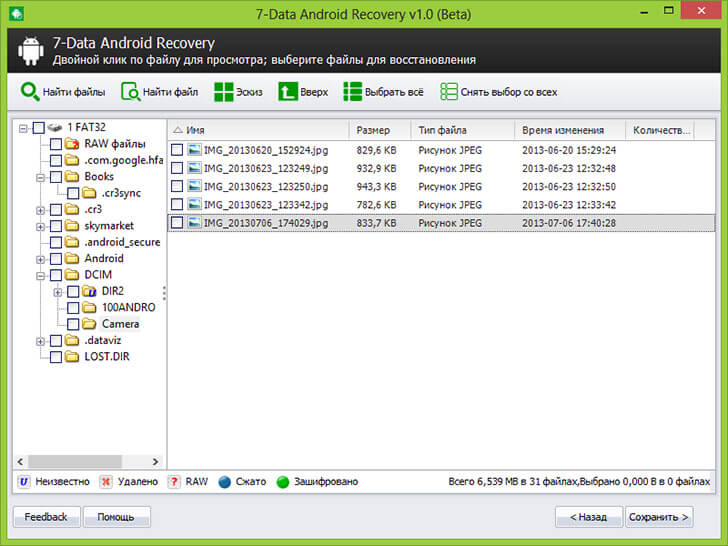
A window that appears will display all the drives available on the device. We select the drive from which we will recover information, and click the "Next" button.

After the scan is completed, a window will appear in which all found files will be displayed. Check the boxes for the ones you want to restore and click the Save button. Then select the folder on the PC where the files will be saved.

Upon completion of the process, we will see such a message. Now all recovered files are stored on your PC in the path you specified.
![]()
Deleted files can also be recovered using a PC and a program called Recuva, which is primarily designed for Windows, but it can also help an Android smartphone. you can from our website.
Instruction:
Download the program and install it on your computer.
We connect your gadget to the PC using a USB cable.

We select a specific type of files that we want to restore or "All files" and confirm the action by clicking the "Next" button.

In the next window, select "No, restore directly from disk" and click "Next" again.

Then select the media from which you want to recover the lost data. In our case, this is "On the memory card", that is, on removable media. Click "Next".

In the window that appears, check the box "In-depth analysis" to improve search performance and click "Start".

Upon completion of the scan, in the list that appears, we find the file that interests us, select it with a checkmark and click the "Restore" button. Then we still need to select the location where the file will be saved.
If everything went well, we will see such a message.