Hello! VKontakte has rich functionality for adding texts, pictures and videos. Despite this, not everyone uses them. In many cases, the reason for this is lack of knowledge, lack of need or lack of time to study the functionality.
As a result, I often hear one question - how did you do it? We are talking about publishing maps, surveys, graffiti and other information.
Today we’ll see how to add a post to a wall on VKontakte using standard functionality. Due to its convenience and high usefulness, it has already been appreciated by many users. High-quality design of materials is especially important in the field of competent business development.
Let's start looking at everything in order. I’ll ask one question right away due to the high relevance of financial prospects.
Where to begin?
First, you need to go to your page or community and find a special block. For clarity, I’ll show you using the example of this blog group.
This is where new materials need to be added. If you want to add them to other people’s pages or communities, this will work if they have not set restrictions on these actions.
Adding new text entries
There are three main types text entries in Vkontakte:
- classic text;
- formatted text;
- attached document.
The first option is simple to implement - write and send a message.

In the next case there will be more visual possibilities. To do this, select “attach” and “note”.
The note has a peculiarity - its contents are not visible on the wall. Therefore, you need to open it.

Additionally, it is possible to attach files. For example, they could be pictures or documents.


Once sent, it will appear on the wall.

Adding graphic, audio and mixed recordings
You can add the following elements to a post on Vkontakte:
- video recordings;
- photographs and pictures;
- audio;
- cards;
- graffiti.
See for yourself in the screenshot below.

I do not consider each point in detail, since there is nothing complicated there. The system interface is quite convenient and understandable.
By the way, do you know what was meant by mixed publications? For example, these include adding a card with text description.

Text can also be added to other elements of the post.
Assigning deferred publications
A very convenient opportunity when a VKontakte entry needs to be published not immediately, but in advance specified time.

To make a delayed publication, you need to select “timer” in the “attach” menu. You can also add available text and graphic information.
Conducting surveys
Do you need to know the opinions of your friends on VKontakte? The task is simple. There are surveys for this.

You will need to indicate the survey topic, answer options, you can add Additional information as text, graphics, and send new entry for publication.

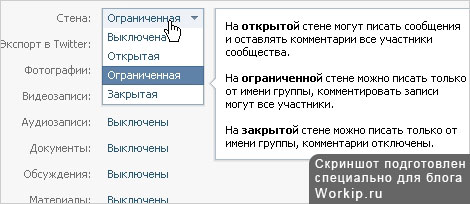
Restrictions on new entries
It’s not always possible to add new materials to other people’s pages or communities. This is due to restrictions that their administrators can set.
For example, I’ll show you what you can do in the settings of your page in the “privacy” section.

Communities can also be installed different types restrictions.
On the pages, instead of a form for adding a post, you may also find an information line. Look what she looks like.
If you click on “suggest news”, you can add new materials. There is one peculiarity - they will not be published until approved by the administrator.
Finally, I’ll briefly talk about the financial potential that opens up thanks to the existence of social networks.
Have you tried to make money?
Many people fail to achieve good results. A common reason for this is the wrong approach to business.
Earning money on social networks
Making decent money on the Internet consistently, easily and quickly is a myth. I don’t understand why some people still believe in this and hope for luck.
Good earnings- the result of work that requires specialized knowledge and skills. You can learn from scratch and for this you do not have to spend 5-10 years purely on theoretical education.
There are good training courses on the topic of making money on social networks and other professions in demand on the Internet. To begin with, you can achieve success in one direction, and then think about expanding your financial achievements.
You can spend just a few months, or even less, to actually get cool knowledge or try to learn on your own. I spent almost 2 years in vain. Although I could sign up for normal training in my field of activity and already enjoy good results. I realized that it was better to do things differently, and now I act differently. As they say, what to do in the end is up to everyone to decide for themselves.
I’ve already talked quite a bit about ways to earn extra money and earn decent amounts online on this blog. I am preparing new articles. Updates on the blog are regular. You can track announcements of new articles on social networks. There is also a subscription to email. See you later.
Today is an excellent day, today we will learn How to add VKontakte to your website. We learn 2 things, First: how to add a VKontakte button to a website and second: How to add a VKontakte group to a website.
The potential of VKontakte is enormous; if you learn to interact correctly with this resource, then through it you will get even more new people to your site.
This article will tell you in detail How to add VKontakte to your website and thus better use the capabilities of this incredibly popular social network.
First, let's add a VKontakte button: “I like it.” This is a very useful button - it shows how many likes certain people give. This indicates how much people like your content. The second value of the button is that thanks to this button you can share VKontakte links and thus create more attention for the site from the social network.
It's time to add social button In contact with!
To get the code and configure the button, go to this link. There we fill in: “Site name”, Site address and site domain.

First, select part of this code, as shown in the figure, and paste it within the tag

How it's done? If you work in wordpress, then go to the “Theme Editor”, there select the file header.php (Header) and place our code before the tag. Like this:

Great, now all that’s left to do is insert the “Like” button. To do this, select another part of the code, as shown in the figure:

And paste the code into the single.php file (Single entry) before any tag. There you will have to adjust where to insert the button, either at the top or at the bottom. You insert the tag and look after the update where the button is built in; if it looks great, leave it and be happy with the result.
I placed my button at the top of the page before the tag

Wow, the button looks quite good and now with the help of this magic button you can put “Like” and also share the link of the article you like on your page.
2. How to add a VKontakte group to the site
Now the moment of truth has come and we are ready to add a VKontakte group to the site. If you have a personal VKontakte group from your website, then you can place it directly on the site and anyone from your site will go to your VKontakte group to see what’s interesting there. If you don’t have a group in contact, create one. It's not difficult at all.
After creating the group, we need to get the code to install and configure the widget on the site. To do this, go to
Often, in order to diversify own page On VKontakte, users post various images, congratulations, polls or animations on their own page. In principle, this does not present any difficulty, but for completely new PC users, it can sometimes be difficult to figure it out. Therefore, today we will tell you how to add a post to a VKontakte wall.
First, consider the technique of adding a survey to the wall. A poll is an opportunity to start a discussion about something with your friends on your own page. Surveys have recently appeared on the site, and not everyone can use them.
VKontakte: how to add a poll to the wall
- Open your own page, where on the wall you will have a field with the inscription “What’s new with you?” Under this window on the right side there is the inscription “Attach”. Click on the inscription, and from the drop-down list select the “Other” item, at the end of which you will notice the inscription “Survey”.
- After clicking the “survey” button, you will be asked to fill out several fields.
- Let's say you want to create a survey on the topic: “Where is the best place to relax?” To do this, in the field labeled “Survey Topic,” enter the name of your survey, and in the “Answer Options” fields, enter the answer options proposed for the survey topic. In your case: “where is the best place to relax?”, answer options: “at the sea”, “in the mountains”, “on a safari”, etc.
- If there are more than 2 answer options, under the “Answer options” you will see the “Add” item, by clicking on which you can expand the number of possible options.
- When your friends start voting, the number of people who voted for that item and the percentage will be written next to each answer. This way you can find out what your friends think.
How to add a picture to the wall
- You can add a picture to the wall using one of the VKontakte applications. Also click on “attach” and select the right application, and then in the application itself everything is done automatically - select a picture, click “post” or “send”.
- You can also click “attach”, select “photo”, then you will see a window in which you can select a photo from your albums on the site, or click “upload photo” and select a photo from your computer. Then, when the photo has uploaded, simply click “send”.
How to add animation to a friend's wall
In addition to your wall, you can also post information on a friend’s wall. We'll tell you how to place animation.
- Copy the link to the animation in the address bar of your browser.
- Paste this link into the text input field on the wall.
- After this, the animation you need will appear in the window, and the link can be erased.
- Click the “send” button and the animation is posted.
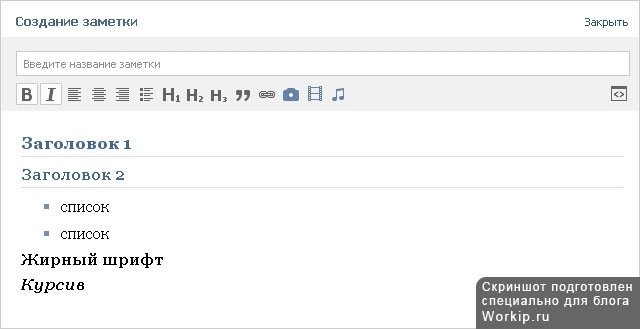
A note differs from a regular entry in being more presentable and larger in size. In a note, you can add images in the middle of the text, insert quotes, center, left, or right text, and highlight quotes.
Only the title of the note will be visible on your page, but the note itself will only be shown if you click on the title.
You can add a note only from your own home page in Vkontakte" . To do this, click in the field to create a record. An “Attach” button appears under the post; when you hover over it with the mouse, a drop-down menu appears.
In this menu, hover your mouse over “Other” and the entire list of additional elements appears. Point to “Note” and left-click.

A window opens for creating a note, or it can also be called a text editor. If you are already familiar with text editors, it will be very easy to figure it out.
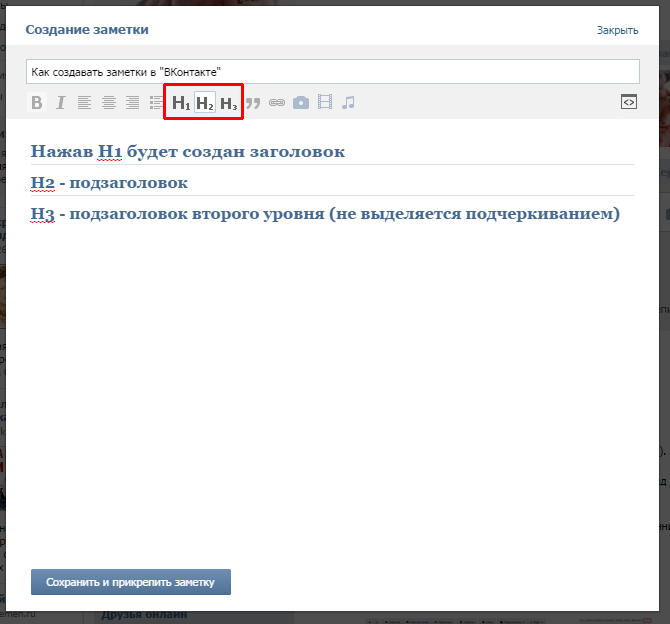
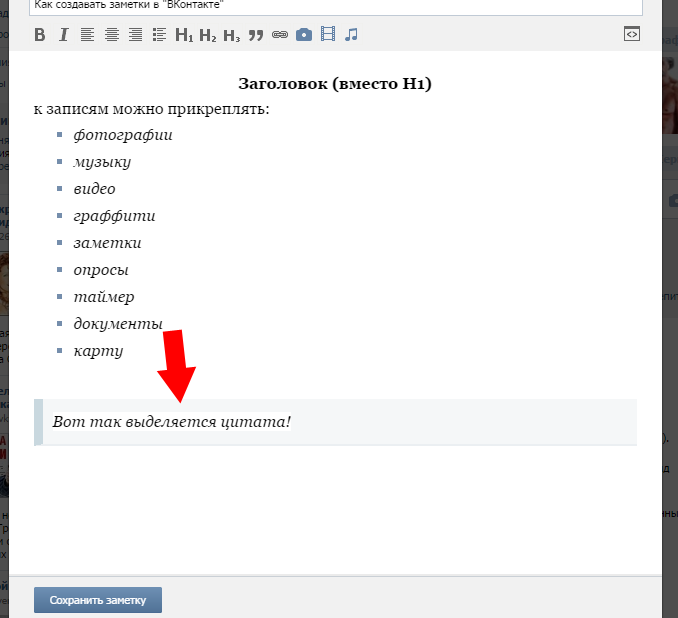
In the top field, enter the name of the note.

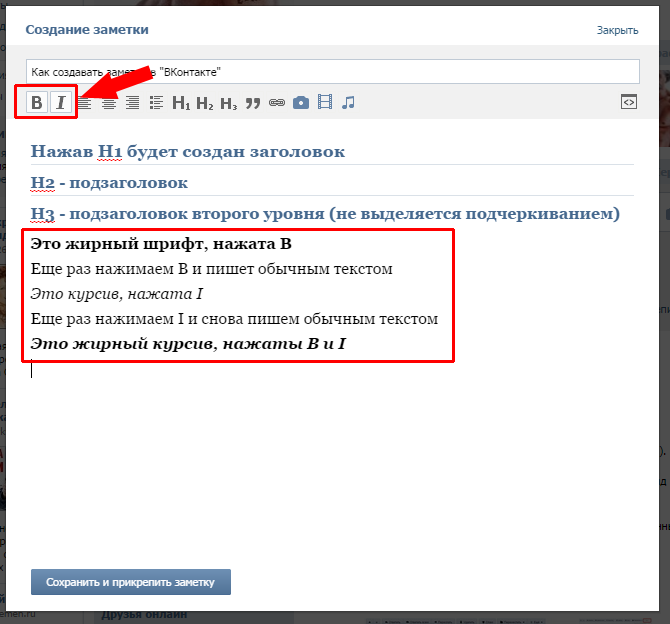
The “B”, “I”, “H 1”, “H 2” and “H 3” buttons are convenient to use with already written text - select the desired part of the text and press the button.
Next comes the creation of the header - for this, use the “H 1” button. The subheading is highlighted in blue and the entire line is separated by an underline. If necessary, create a subtitle (if you need to describe several topics in one note), press “H 2”. The subheading is also highlighted in blue and separated by an underline; it differs from the heading in that the font size is slightly smaller. “H 3” is a second-level subheading that differs from “H 2” in that it is not separated by underlining.
For subheadings, other text editing (alignment, making text bold or italic) is not possible.
Button "B" creates bold font, "I" creates italic font. When pressed again, the text returns to its original form.
If necessary, the text can be aligned to the right edge or in the middle of the field - text alignment buttons (left alignment occurs by default). The entire line or several lines are aligned. You can write the text first, then select and apply alignment, or set the alignment right away, and then type the text.

By the way, instead of the “H 1” button for the title, you can use bold font and center alignment.

A bulleted list is used to make a note more presentable and to highlight items in a list. Each list item is automatically preceded by a blue square. To create bulleted list, before listing, press the button, the cursor is moved to a new line, a blue square appears and behind it “List element”. Select the words “List element” and replace them with the first element of the list. After each element, press “Enter”, the cursor is moved to new line to write the next element. To finish the list, press “Enter” twice. Another option for writing a list is to create a list where each element is on a new line (via Enter), then select the entire list and press the button.
In the list, you can only change the font to italics or bold; no other actions can be applied to the list (alignment, adding photos or audio, etc.).

The quote button creates a quote. That is, not the quote itself, but highlights the desired expression in a separate block, thereby separating this expression from the main text.
In notes, unlike regular entries, photographs can be inserted in the middle of the text. We select a place for the photo, press the button with the camera icon and select the desired photo.

If the photo you need is not uploaded to the VKontakte social networking site, you can upload it from your computer or take a photo using a webcam. “Upload photo” - a window for selecting a photo to upload from the computer opens, and when you press the button with the camera icon, the video camera is turned on to create a photo.
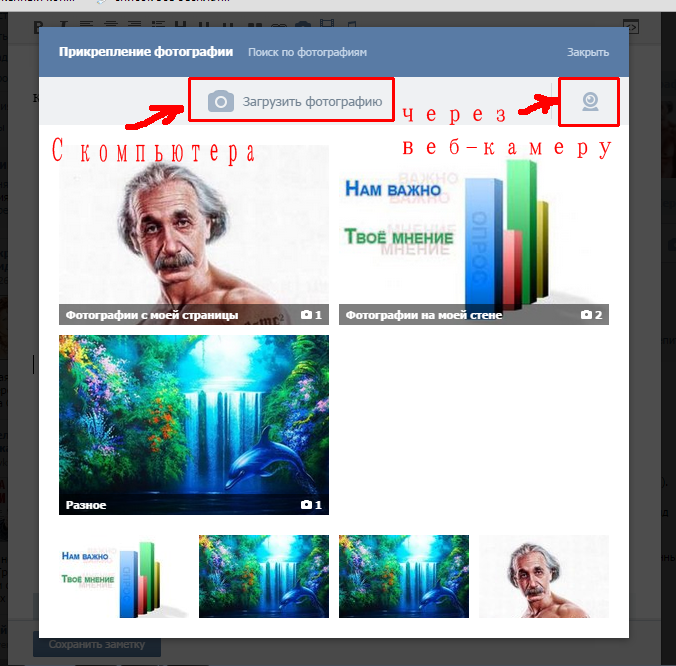
This picture appears in the middle of the post. This is much more convenient than when all the photos are under the text.

Using the button with a videotape icon, you can add a video.

If you don’t have a single video on VKontakte, then you can download a suitable one from those that have been uploaded by other users. Enter the description or name of the entry you need into the search and select from the results obtained.

Audio recordings are added using the same principle as videos. If you don’t have your own, you can add those that are already downloaded.