How many times have they told the world
What should be a backup; but it's just not all right...
Data loss on Android can happen in good and bad scenarios. A good scenario is when files were stored on a memory card mobile device. In this case, you can return them easily and even for free. Unfortunately, memory cards are becoming less and less common in smartphones, and data recovery from internal memory is a completely different story. Let's consider both situations.
How to recover data on an SD card
Everything is simple here. To get started, download and install a normal free data recovery utility on your computer. It can be the mega-popular Recuva, the open-source TestDisk or its offshoot PhotoRec, or any other similar program.
Then connect the SD card to the computer like a regular USB flash drive and run a scan on it using the installed utility. Save the rescued data and finally back up them and other valuable files to the cloud.
How to recover data from the internal memory of a mobile device
Unfortunately, the vast majority modern smartphones are connected to the computer using a special protocol, that is, not like a regular flash drive. Accordingly, all the utilities listed above are useless.
To recover data on Android, there are special programs, and most of them are shareware. This means that you can, without paying a penny, install the utility, scan your mobile device and see what was recovered from the lost. But in order to pull out and save the restored one, you have to buy a license.
On the one hand, this approach can be called fair. The user does not buy a pig in a poke, but gives money only after he is convinced that the utility works. On the other hand, parting with several thousand rubles is still difficult. In any case, the loss of information is usually the user's fault, and a powerful blow to the wallet is a great motivator to start backing up important data.
Utilities to recover data from Android internal memory:
- iCare Recovery (Free!!!).
- Undeleter (if you have superuser rights).
These programs work in much the same way. First, the client is installed on the computer, then the smartphone or tablet is connected to the computer via USB. It is enough to follow the instructions exactly, and you will surely succeed.
The only difficulty may be the lack of utility support specific model mobile device. That is why you first need to test the program in free mode and only then buy a license.
What to do so that data is not lost
Backup, backup and again. Almost all the data that is on your mobile device can and should be copied to cloud storage. It's almost always free, secure and takes place in automatic mode. For example:
- Google Mail backs up your emails.
- Google Contacts backs up contacts.
- Google Photos backs up photos, videos, and screenshots.
- Google Music backs up music.
- Google Office Suite backs up documents, spreadsheets and presentations.
- Universal storage like " Google Drive”, Dropbox and others back up everything.
Take any data type - for sure there is a simple and convenient way safe storage. Take advantage of this and protect valuable information.
Sometimes on Android devices, you have to carry out the procedure for restoring user data from memory. This may be required after full reset settings on your tablet or when you buy a new phone. Below we will consider a method that allows you to quickly return all settings and files from internal memory on any of your Android devices.
Preparing the device for information backup
IN Google Play various android applications are available for backing up and restoring after resetting all current data without exception. To do this, not so long ago, it was necessary to obtain superuser or Root rights to the device. However, this action involves some risk and voids the warranty..
For modern versions of Android in developer mode, you can transfer settings and applications to your computer. The creators of the Helium (Carbon) utility took advantage of this. It backs up data and applications without Root, and the saved files are stored in external, internal memory or in the cloud. Installation is carried out in the following order:
When running the app on a device, Helium will try to gain superuser rights. Since we do not have Root, the application will go into operation mode without using it, which will be notified in the corresponding window.
After a few seconds, the computer will display information about gaining control access. This means that the program has earned. Now you can disconnect the android device from the PC and start making a backup. After that, the files with all the parameters will be saved in the internal memory or on another drive - you can safely carry out the procedure for deleting and resetting any settings.
How to enable developer mode
Make sure you have USB debugging enabled in Android settings on your phone. The activation icon is located in the Developer Options folder.
If you don't find one, follow these steps:
- in the settings, open the “About device” item, which is usually located in the section with the names “General”, “System”, etc .;
- tap the last line of the section seven times in a row, which indicates the build number;
- when the developer mode is enabled, exit this section - in shared folder the corresponding options will appear.
All that remains is to go into a new directory and activate the USB debugging feature.
Working with the Helium app
Backing up information in Android using Helium can be done in three ways:
- Files are stored in Dropbox or Google Drive cloud services. This allows, after deletion, not only to restore data, but also to synchronize different devices on Android.
- Archives are stored in the external or internal memory of the device. This is the fastest way.
- The reserved files are transferred to the computer and are already stored in its memory, which allows you to save a lot of space on the tablet itself.
The latter recovery method, although convenient, takes a lot of time and requires a lot of free memory.
Backing up a hundred or two applications can take up to 1 hour, while excessive load on Android often leads to the fact that the program crashes.
We also note that some program (there are very few of them so far) can have protection against such copying, so even with the help of Helium, without having superuser rights, it will not be possible to reserve them in memory.
Creating a backup with Helium
Remove the cable from the USB connector when a message appears indicating a successful connection - the computer is no longer required. In this way, we have created a one-time connection that will be active exactly until the moment you turn off or restart Android. To restore the channel after the reset, you will need to do the above steps again.
Create a backup in Android:

In the settings, you can uncheck or check the box next to the item that specifies to save only application settings in memory without the installation files themselves.
If the function is active, then during the restoration, the program will prompt you to go to Google Play to download and install applications that the user has deleted, and then Helium will be able to completely restore their settings.
This saves time when archiving and significantly reduces the size of the save.. If you do not use this feature, then all data will be saved - both installation files and user parameters. Now, even after uninstallation, any Android program, even without access to the Web, can be extracted along with all settings, accounts, progress, etc.
Extracting data from a saved archive
To extract all saved files and data from the backup, you will also need the Helium program installed on your phone:
- Launch android application;
- Select the media with the recorded archive and mark the data to be restored in the list that opens;
- Depending on the backup method, you may need to go to Google Play to download the utility, then repeat the first two steps;
- Click on the restore button, after a while the system will notify you of the successful completion of the process.
The fact that the application works on devices without rights Root does not mean at all that it does not function on a rooted smartphone or tablet. On the contrary, in this case, the process of backing up to a computer is 3-4 times faster.. In addition, for devices with superuser rights, a lot of excellent applications are available with extensive functionality that allows you to reanimate any deleted, including system data.

If you are also tired of endless games on Android and want something serious and interesting in terms of software, then now is the time to eliminate all the obstacles that can distract you from reading the current review, focus and prepare for something interesting to come. Do you know that deleting a file from a memory card can still be restored?
Have you erased a photo or a video or a document or an archive or something else, made a mistake and now you regret the loss? It's really sad, because Android does not have a recycle bin from which you can retrieve inadvertently deleted files. But, as I wrote earlier, there is still a way to resuscitate. And the Undeleter application will help us with this.
In fact, by deleting a file from the trash or in Android from a memory card, we did not completely kill it, but only marked the sectors it occupied as free. Now, at the next recording cycle, some other information will be written to them. But until that happens, the deleted file can still be recovered.
As the name suggests, Undeleter is a data recovery application like Get Data Back, Easy Recovery or Recover4All for PC. Undelete's job is to scan your memory card, find anything that can be recovered and give you the opportunity to do so. Or it will allow you to nail the file completely so that it is no longer possible to get it.
After scanning, you can view all the results in bulk or by type: photos, videos, documents, archives. In the settings, it is possible to specify the folder into which we will pull out the deleted earlier, activate the use of previews, which greatly simplifies orientation in the found, you can also select full screen mode work and send a letter to the developers.
I don’t know how often you have misfires, that you understand that you literally just said goodbye to something important and necessary. It seems to me that Undeleter will not interfere with anyone, just like that, for every fireman. True, such software, which is not surprising, requires root rights in the system.
Peculiarities:
- Recovering deleted files on any partition
- Recognition of documents, photos, videos, music, archives and apk
- Save recovered files directly to Dropbox and Google Drive
Download Undeleter (Recover files deleted from SD cards and internal memory) for Android you can follow the link below.
Developer: Fahrbot
Platform: Android 2.3 and above
Interface language: Russian (RUS)
Condition: Full ( Full version) (Spanish medicine)
Root: Required
Having discovered the loss from Android important information(videos, photos, contacts, etc.), you must exclude the recording of new files on it and start returning the lost files as soon as possible. In this case, you will be able to reanimate the erased content in full with a high probability. Consider the procedure for data recovery on Android phone if they are accidentally deleted.
Ways to recover lost information
Special or unintentional erasing of user files from Android mobile devices does not lead to their complete removal. Data fragments will remain in the storage until they are replaced by new content. To exclude the irrevocable loss of personal information, you must refuse to copy any files to the same media. Otherwise, the chances of success will tend to zero.
To recover data from Android, you can use one of the following tools:
- Previously created backup;
- Synchronization with cloud service Google;
- Resuscitation program.
Each method of recovering deleted information has its own strengths and weaknesses, and also requires compliance with certain conditions. Therefore, we will consider these methods in more detail.
Recovering deleted data using a backup
To protect files on Android from accidental deletion, it is recommended to periodically write them to a safe place. If you want to save videos, photos and audio content, you can simply transfer them to your PC manually. In this case, when erasing data from the phone's internal memory or external card micro sd backup copy won't get hurt.
Despite the simplicity of this backup method, it does not allow you to make a duplicate phone book, SMS messages, personal settings and other specific information. They are copied using other tools, one of which is system backup.
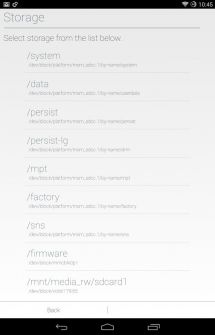
To create an Android backup with all user data, you can use the standard environment Recovery Mode:
The system backup file will be written to the phone's built-in card, but it can always be copied from there to a PC or to another location. Now, if necessary, you can restore data from the internal memory through the same Recovery environment by running the Restore function. 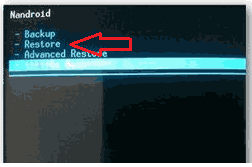
Another effective way file recovery on android is sync with google cloud storage. This procedure is available to all owners of mobile devices and is absolutely free. All you need is a stable internet connection and Mailbox gmail.
Synchronization with Google for Android is performed as follows:

After doing specified actions user data will be recorded in the Google archive and, if the Internet is available, will be available from any workplace. When auto-sync is activated, such copying will be performed continuously at certain intervals.
Now, when flashing your phone or resetting it to factory settings, you can restore files by going to the "Recovery and Reset" menu and activating the appropriate procedure. By using cloud storage it is also possible to reanimate certain types of data individually. For example, if your video or photo is missing, use the Google Photo tool. Google Contacts will help you get numbers back from your phone book. 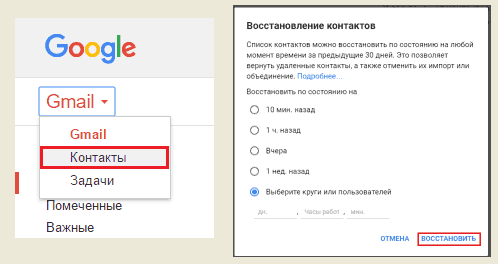
File recovery through additional software
Recovering data on Android using the methods described above is relevant in the case when you have a previously created backup system on hand or a smartphone is tied to Google service. If these conditions are not met, it is possible to reanimate the erased information only with the help of special software.
Data recovery programs are available online at in large numbers, however, the most effective utilities are:
- 7-Data Android Recovery;
- Undelete.
The specified software allows you to recover data from the internal memory of a mobile device, as well as from an embedded micro sd card. This is what distinguishes it from similar resuscitator applications that can only work with external storage.
Recovery of deleted files through 7-Data Android Recovery
All rescue programs that work with the internal drive need extended rights (root access). Therefore, before restoring data, you need to unlock the superuser profile on your phone. This can be done using the Framaroot utility:

After the Superuser profile is unlocked, you can proceed directly to resuscitation measures:

After you have succeeded in recovering deleted photos on Android and other types of data, you can transfer them to your phone or leave them on your computer.
Resuscitation of accidentally deleted files using Dr.Phone
Data recovery from the internal memory of the gadget by the specified application is also performed through the computer. Therefore, before starting the main work, you will need to install Dr.Phone on your PC, and then connect the problem smartphone to it. After that we do the following:

Hello dear friends and followers of my blog. In this article, I will describe several ways to recover erased information from your device using operating system Android. Yes, yes, we will consider how to restore deleted files on android.
The programs that I will talk about are designed for different cases, including the most difficult ones. Data can be recovered after formatting a memory card, clearing the memory of a smartphone or tablet, as well as when completely resetting the device to factory settings (Hard Reset).
Let's start with a little theory. First of all, I would like to say that this instruction that you will read today is relevant for this year. This is important because android work with the internal data storage has changed a lot. There have been some innovations in the update of the android itself. The way the computer and portable device also became different, hence, as you understand, new opportunities for information recovery.
Previously, a gadget connected via USB was recognized by the computer as a regular drive. That is, you could try to recover data using utilities designed for flash drives. Now you can also use such programs if the files were erased from the memory card, and not from the phone itself. For example, you can take a simple program Recuva, which I wrote about in other articles. Here is one such article for example.
As for modern devices, now most of them are perceived by the operating Windows system and Mac as a media player. In this case, the MTP protocol is responsible for the connection. We will not go into details with you, but you cannot change it, as a result, you will no longer be able to connect the phone as a USB device. Because of this, the methods of recovering information that were used several years ago will be irrelevant today. In addition, restoring data after a complete reset is now also extremely difficult, it all depends on whether they were deleted system files or not.
In any case, we will try to recover your information. Today, I receive just a ton of letters in my mail from many users who just ask questions - “How to recover deleted files on android?”, How to return all data from android? What to do and how to live now? All in all this question is relevant at the present time and therefore cannot be left unattended.
So, well, it's time to move on to the practical part of our today's article. I chose several programs, among which there are both free versions and paid options. I will inform you in advance about the method of distribution of the application.
IMPORTANT! There is no guarantee that file recovery will be successful - this also applies to hard drive on the computer.
If your computer does not see the phone, in this article you will find a solution to this problem:
1. We recover lost data using Wondershare Dr.Fone (the program is paid, there is a 30-day trial version)
Although the program is paid, the developers offer us a free 30-day version, you can download it from this site.
http://www.wondershare.com/data-recovery/android-data-recovery.html
A detailed video from this program can be found below.
So, we will restore data from a new phone where it is installed android version 4.4.2. Before you start working with the application, you need to perform a preparatory step - USB debugging, which differs depending on the version:
- For Android 4.2-4.4. You need to go to the "Settings" of the phone, then open "Device Information" and click several times on the "Build Number" section - you need to perform this step until the system reports that you are now a developer. Now go to the "Developer Options", which have become active, and start debugging via USB.
- For Android 3.0-4.1. Go to Developer Options and turn on USB Debugging.
For older versions. We go into the main "Settings", select the section "Applications - Developer" and turn on USB debugging.
Instructions for recovering deleted files
Debugging via USB is running, now you can proceed to recovery. We connect the device to the computer using a USB cable and run the application.

At the beginning, "Dr.Fone" activates automatic detection phone or tablet, then the program will ask for permission to download drivers from the Internet, confirm the action. The next step is to confirm debugging from this computer.

After that, the recovery process will start, you need to select the partitions from which important data was deleted.
IMPORTANT! There is a chance that the application will give the following error:

Don't be afraid in this situation. The program reports that it is impossible to recover data from this gadget, since there are no root rights. In this case, you will have to use another program, since Dr.Phone cannot cope with such a modern device. By the way, you can watch a video on recovering deleted data.
2. Data recovery using the application "Android Recovery" (there is a free version)
Do the same USB debugging as described above. In many cases, it is this program that allows you to basically recover deleted files on android.

So, we connect your gadget with a USB cable to the computer, and then run "Android Recovery". Click "Next" and go to the list of drives that are present on your device. It can only be inner memory or a memory card along with internal storage. Select the storage where you want to restore the data and click on the "Next" button.

This will start scanning the storage and identifying deleted information.

The scanning speed depends on the size of the memory card, so the process may take some time. It remains to be patient. After the scan is completed, you will see a list of all files that have been formatted, deleted, or lost for other reasons.

The found files and folders appeared in the window - you can try to restore them all at once or one by one. It is worth mentioning the function preview, which works with documents, audio and photo files. You can also open folders before starting recovery.
After selecting data for recovery, you must click the "Save" button to move this information to your computer.
3. EASEUS program Mobisaver (free).

It's pretty handy application, which differs from paid counterparts in a simple interface. It allows you to preview which files are on your Android device available for recovery. You can then save them to your computer. But in order to fully work with the application, you will need Root rights. For some users, formal hacking will be a minus, but for those who have already received Root rights, I recommend using, of course, "EASEUS Mobisaver".
Concluding today's post "How to recover deleted files on Android", I hope my instructions in this article were useful to you and you were able to easily recover your lost files on your phone!