For Windows installations necessary boot disk or bootable flash drive. In this article, I will talk about the simplest and most reliable ways to create bootable media that works with any version of Windows (XP, 7, 8, 10).
If you are reinstalling Windows on an old computer, I recommend running. Prepare in advance.
If you purchased Windows on a DVD and your computer or laptop has a DVD drive, then you do not need this article, go to the next article “”.
2. Selecting boot media
if you have installation disk c Windows, but your computer or laptop does not have a DVD drive, then you will need a computer with a DVD drive to create a bootable USB flash drive from the installation disk. Go to the "" section.
Sandisk Cruzer
If you received Windows as an image file, you need to create a boot disk or flash drive. If your computer or laptop has a DVD drive, it is easier and more reliable to use a DVD. Prepare 2-3 clean DVD-R disc 16x and go to the " " section.
If your computer or laptop does not have a DVD drive or you are too lazy to go to the store to buy discs, then take a flash drive with a capacity of 4 GB or more and go to the “” section.
3. Create a disk image
We use the program Daemon Tools to create an image file from the Windows installation disk, which will later be needed to create a bootable USB flash drive. You can download it at the end of the article in the “” section.
3.1. Installing Daemon Tools
3.2. Creating an image in Daemon Tools
Insert installation Windows disk into your DVD drive and close the AutoPlay window if it appears. Find the “DAEMON Tools Lite” shortcut on your desktop or START menu and launch the program. Click on the floppy disk icon “Create a disk image.”

Make sure that the drive you inserted the Windows installation disc into is selected. Drive letter in Windows Explorer and in the program window must match.

Uncheck the “Add to Image Catalog” option and click on the button with three dots “…” to select a folder to save the image file. Please note that it can take up to 3.5 GB.

I recommend saving the image file on a separate disk partition (for example, “D”). In the “File name” column, enter, for example, “Windows_7” so that you can later understand what kind of file it is. I recommend not using Russian letters and spaces in the title. In the "File Type" column, be sure to select "Standard" ISO image s (*.iso)" and click "Save".

Check that everything is specified correctly and click “Start”.

The image creation process takes only 3-5 minutes. At the end the message “Image creation complete” should appear. Click the “Close” button and exit the main program by clicking on the cross.

If an error message appears or the process is stuck in place, either the installation disc or the DVD drive is damaged. Try wiping the drive with a dry, soft cloth and try again, or use another computer.
4. Create a boot disk
We need the Astroburn program to burn an image file to a DVD. You can download it below in the “” section. If you plan to use a USB flash drive to install Windows, skip this section.
4.1. Installing Astroburn
Installing the program is quite simple. Run the installation file and click Next several times.
4.2. Burning a disc in Astroburn
Insert a blank disc into your DVD drive and close the AutoPlay window if it appears. Find the Astroburn Lite shortcut on your desktop or START menu and launch the program. Switch to the “Image” tab and click on the icon to the right of the “Path to image file” field.

Find where the file is located on your disk - Windows image, select it with the left mouse button and click “Open”. For example, all my disk images are located on drive “D” in the “ISO” folder.

Double check what you have selected correct file and check the “Check” box next to the name of the DVD drive. This will ensure that the disc was recorded without errors and that the Windows installation process will not be interrupted unexpectedly. I also recommend setting the recording speed to 8.0x, this is optimal for 16x DVD-R discs. Click "Start Recording".

The process of burning a disc along with checking takes up to 10 minutes. When you finish recording, close the program. If an error message appears or the process is stuck in place, it means that you either got caught bad disk, or the DVD drive is worn out.

Try recording again new disk, if it doesn’t work out, then use another computer.
5. Creating a bootable USB flash drive
5.1. Methods for creating bootable flash drives
There are many ways and programs to create bootable flash drives, from manually writing commands in command line, before using Linux boot loaders. The disadvantage of the command line is that it is difficult for beginners and prone to errors. The disadvantage of Linux bootloaders is that such flash drives do not boot on all computers.
There is also an official program from Microsoft for creating bootable flash drives “Windows USB/DVD Download Tool”. It is very easy to use and flash drives recorded with it can be loaded on most computers. But this program has a number of limitations. For example, to use it in Windows XP, you need to additionally install several more cumbersome add-ons (.NET Framework 2.0 and Image Mastering API v2), and in order to create a bootable USB flash drive for installing Windows 7 x64 in Windows 7 x32, you need to copy it to the folder with the program additional file or messing around with the command line. There are other problems with the program.
So I decided to give you just one, but simple and reliable way creating bootable flash drives that are suitable for any operating systems and computers using the Rufus program.
5.2. Using Rufus
The Rufus program is designed to create bootable flash drives for installing various operating systems, including Windows XP, 7, 8, 8.1, 10. It does not require installation and can be run on any operating system from Windows XP to Windows 10, regardless of bitness .
You can download this program in the "" section. Next you will need any computer with installed Windows and a flash drive with a capacity of 4 GB or more.
Transcend JetFlash 790 8Gb
Insert the flash drive into your computer and if there are valuable files on it, copy them to HDD. Immediately after creating a bootable USB flash drive or when you have finished installing Windows, you can return them back.
It is not necessary to clean and format the flash drive, just run Rufus program and make sure that the flash drive is selected in the “Device” field.


Find where the Windows image file is located on your disk, select it with the left mouse button and click “Open”. For example, my previously created image is located on drive “D”.

Now you need to select the type boot partition(MBR or GPT) and firmware motherboard computer (BIOS or UEFI) on which Windows will be installed. It's not as difficult as it sounds

MBR is a simpler and more reliable type of boot partition, but does not support hard drives larger than 2 TB. If you don't have a 3TB or larger drive, I recommend using this type of partition to avoid some possible problems in the future.
GPT is a more advanced type of boot partition that supports very large disks. If you have a hard drive with a capacity of 3 TB or more, then use this type of partition, otherwise the computer will only see about 2.3 TB. In other cases, I do not recommend GPT markup, as there are various problems with it.
The motherboard firmware can be BIOS or UEFI. This can be found in the manual or on the website of the motherboard or laptop manufacturer, as well as visually when entering the Setup boot program. To do this, you need to hold down the “Delete”, “F2”, “F10” or “Esc” button immediately after turning on the computer. You can read which button to press in the messages that appear immediately after turning on the computer.
In text form.

In graphical form.

If the Setup program looks like the picture below, then this is a classic BIOS.

If it’s like in the next picture, then it’s UEFI.

So, if you have a classic BIOS, then select “MBR for computers with BIOS or UEFI” in the “Partition scheme and system interface type” field. This is the most universal option and the flash drive can be used for installation on different computers, both with BIOS and UEFI.
If you have determined for sure that you have UEFI and the disk size does not exceed 2 TB, then select “MBR for computers with a UEFI interface.” If you have UEFI and a disk of 3 TB or more, then select “GPT for computers with a UEFI interface.”
Next you need to select “ File system" If in the previous step you selected “MBR for computers with BIOS or UEFI,” then select NTFS. If the second or third item is with UEFI, then select FAT32, since UEFI does not work with NTFS.

We leave the cluster size at default, and in the “Volume Label” field you can write, for example, “Windows7 x32” (or x64) so that you can later determine what’s on this flash drive.

Double-check all settings and the correct image selection. The selected disk image is displayed at the very bottom of the program. Instead of the name of the flash drive, it may be written “CD_ROM”; the drive letter must match the flash drive.

Click on the “Start” button and confirm the destruction of your flash drive along with your computer

Wait for the recording to finish, this can take from 3 to 20 minutes depending on the size of the image and the speed of the flash drive and should end with the green bar completely filling and the word “Ready” at the bottom of the program.

After that, you can add any files to the bootable flash drive and use it like a regular flash drive. If it is working properly, this will not affect its operation as an installation disk. But perform a safe removal of the flash drive using the system tray icon.
5.3. Possible problems and solutions
Problems can arise due to a bad flash drive, a bad USB extension cable, a damaged or incompletely downloaded image file from the Internet, or the computer itself on which the recording takes place.
Possible solutions:
- formatting and checking the flash drive for bad blocks
(there is a checkmark in the Rufus program) - inserting a flash drive into the rear USB port of the computer
- Windows image checksum verification
(for example, the Hash Calculator program) - burning a flash drive on another computer
- replacing a flash drive with another one
As for checking the checksum of an image, usually the site where you download the image has its checksum (or hash). The checksum also needs to be calculated for the downloaded file using special program Hash Calculator, which you can download below in the “” section. If the calculated checksum matches the one indicated on the website, then the file was downloaded without damage. If the hashes do not match, then the file is damaged and must be downloaded again. Otherwise, errors may occur during the disc burning or Windows installation process.
6. Links
That's all, in the next article we will talk about booting from an installation disk or flash drive.
Sandisk Cruzer
Transcend JetFlash 790 8Gb
Sandisk Cruzer
I will now write about how to burn an image of Windows 8 or Windows 8.1 onto a flash drive and install it on a computer. I have already installed Windows 8 on my computer next to the already installed Windows 7. I wrote about this in the article ““.
But, I did this on my old computer, and I deleted it later. A few days ago, I again needed to install Windows 8 on my laptop. It will decide to install in the same way, next to the installed seven, but this is not important.
I had an .iso image, I didn’t have a blank DVD at hand, but I had a 16 GB flash drive. I decided to burn the image of the figure eight onto it and install it from a flash drive. Before that, I created on my own SSD drive section for eight, created in this way.
I tried to create a bootable USB flash drive with Windows 8. I recorded it, rebooted the laptop, set it to boot from USB, but nothing happened. The cursor was just blinking on a black background. Strange, I thought, and decided to write the image to a USB drive in a different way. Created a flash drive using Windows utilities 7 USB/DVD Download Tool, which I wrote about in the article. But, anyway, nothing worked for me, a blinking white cursor just appeared on a black screen, and that’s it. Why? I still don’t understand.
Found it on the Internet a simple program Rufus, with which I recorded the .iso image of the eight on a flash drive, and everything worked out.
Before installing Eight on your computer, you can see what kind of system it is and whether it’s worth installing at all.
Create a bootable USB flash drive with Windows 8
Rufus is completely free. You can download it from the official website, or from this website via the link (version 1.4.6). There is no need to install the program. Just download and run the .exe file.
Connect the flash drive on which we will write the image (flash drive must be more than 4 GB). In the program window, in the first paragraph "Device", select our USB drive.
Below, in paragraph “Partition scheme and system interface type”, you can choose one of three options. I recommend leaving at this point “MBR for computers with BIOS, or UEFI” (it’s unlikely that you know what format your hard drive is in).
"File system"– leave NTFS.
“Cluster size”, also leave it as default.
Below, we set all the checkboxes as in my screenshot (by default). And click on the button in the form of a disk to select the .iso image of the operating system.

We check all the settings again and press the button Start to start recording.

A warning will appear that all data on your flash drive will be deleted. If necessary files not on the drive, then click Ok, thereby confirming the formatting of the drive.

The process of writing the image to the USB drive will begin. We are waiting for it to end.

When the recording ends and there will be a status "Ready", then the Rufus program can be closed. That's it, the flash drive has been created, you can start installing the operating system.
We start installing Windows 8 from a USB drive
First, we need to reboot the laptop, and .
Now, I’ll show you using my Asus laptop as an example.
We enter the BIOS, in Asus, this is usually F2.
Go to the tab Boot, and select the item.

Opposite the point Boot Option #1, select our flash drive.

Click Esc to return to the previous menu. We check that our flash drive is in first place in the download list, click F10 And Ok to save settings.

The laptop will reboot and boot from the flash drive should begin. When you see the inscription Press any key to boot from USB… then quickly press any button on the keyboard.
The installation of Windows 8 will begin.

That's it, follow the installation instructions, which can be found at the link at the beginning of this article. Yes, everything is clear there. Installation is very fast and simple.
Also on the site:
How to create a bootable USB flash drive with Windows 8 (8.1)? We start installing Windows 8 from a USB drive updated: April 3, 2014 by: admin
Increasingly, modern laptops and computers are produced without the usual optical disc drive. such devices can only be accessed from a flash drive, while operating systems are distributed on CDs or as ISO files. Finding themselves in such a situation, users often ask the question of how to burn Windows 8 to a flash drive.
There are several ways to burn Windows 8 to a USB flash drive. In this article we will look at the two most popular methods: using the program
Burn Windows 8 to a USB flash drive using the Windows 7 USB/DVD Download tool
The first thing you need to do is run the program Windows 7 USB/DVD Download tool(it is possible). After launch, you will see a window in which you need to select an ISO image to burn to a flash drive.
Click on the “ Browse" button and select the ISO file of the Windows 8 operating system. If you do not have an ISO file, but do have one, then you can then burn Windows 8 to a USB flash drive. After you have selected the disk image, click on the “Next” button.
After this, the Windows 7 USB/DVD Download tool will ask you to select the drive you want to use for Windows entries 8. Click on the “USB device” button.


After clicking on the “Begin copying” button, the program will warn you about deleting data on the flash drive. If the flash drive does not have the files you need, then click on the “Erase USB Device” button.

That's it, these simple steps are enough to burn Windows 8 to a USB flash drive. After the program finishes, you will receive a full bootable USB flash drive with Windows 8.

Create a bootable USB flash drive with Windows 8 onto a USB flash drive using the UltraISO program
You can also use the UltraISO program. In order to create a bootable USB flash drive with Windows 8 using the UltraISO program, we need to open the ISO file with Windows 8 in the UltraISO program. This can be done using the “Open” button on the UltraISO program panel or using the “File – Open” menu.


After this, the “Write Disk Image” window will appear. Here you need to select a drive to create a bootable USB flash drive with Windows 8.

After this, you can click on the “Record” button. Before you start creating a bootable USB flash drive UltraISO program will warn you that all data will be deleted.

If there are no necessary files, click “ YES" and the UltraISO program will start the process of creating a bootable USB flash drive with Windows 8.
Most modern laptops and computers are produced without DVD drive ov. This means that if you are going to reinstall the operating system, you will first have to create a bootable USB flash drive with Windows 8 on board, and boot from it to start installing the OS.
This article is primarily aimed at those who are new to creating a bootable USB flash drive to install Windows. For everyone else, we just note that the described technique is similar to the creation technique.
What do we need to create a bootable USB flash drive to install Windows 8?
- Windows 8 image in iso format
- Actually a USB flash drive (preferably USB 3.0). The size of the flash drive must be at least 4 GB, it is ideal to have an 8 GB flash drive, because... it is guaranteed to accommodate any Windows 8 distribution.
- Any program for creating a virtual CD/DVD drive (Daemon Tools, Alcohol 120%, etc.
Formatting a USB flash drive
Connect the flash drive to a free USB port computer. and run the following commands:
Please note that all information on the flash drive will be erased, so do not forget to copy important information from it.

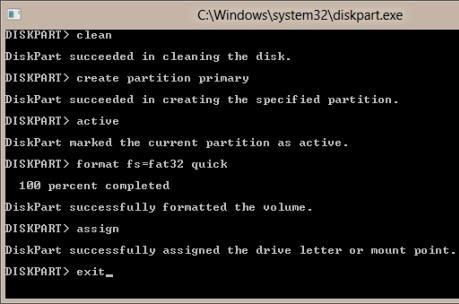 After all the operations performed, the reformatted USB flash drive should appear in Windows Explorer with the assigned letter (in my case G:).
Mount the Windows 8 ISO image to a virtual DVD-ROM
Using any virtual image mounting utility, “insert” the Windows 8 installation disc into a virtual DVD drive. Let us remind you that without using third-party software. Let's say that this drive has drive letter F:.
Let's make a USB flash drive bootable
Before copying installation files to a USB flash drive, you need to make it bootable. To do this we need the Boot Sector Registration Tool utility bootsect.exe– which can be found in the boot directory on the mounted Win 8 ISO image.
At a command prompt with administrator rights, run the following commands:
F: cd boot bootsect.exe /nt60 g:

If the command is executed successfully, the following command will appear: Bootcode was successfully updated on all target volume.
In case you are working on 32 bit Windows versions, but you mounted an image of 64-bit Windows 8, then you won’t be able to run bootsect, because. The version of bootsect in this image is 64 bit.
Copy the installation Windows files 8 per flash drive
Next, you need to copy the Windows 8 installation files to a USB flash drive. On the same command line, run the command
Xcopy f:\*.* g: /e /f /h
This command will copy all files from the virtual DVD image (F:) to the flash drive (G:).
It is advisable to disable the antivirus before starting the transfer, since all modern antiviruses, as part of the fight against autorun, block access to the autorun.inf file on removable media. If the antivirus is not disabled, access errors may occur.
This completes the procedure for creating a bootable USB flash drive with Windows 8, all that remains is to change the boot order in the BIOS, specifying boot from a USB drive and begin installing Windows 8.
Experienced Windows users may argue that the same thing can be done using a special Microsoft utility - Windows 7 USB/DVD Download Tool, which allows you to create a bootable USB disk to install Windows 8 or Windows 7. That's right, all these operations can be performed (it will be easier and faster) using this utility. However, the above technique allows you to thoroughly understand the procedure for creating a bootable USB flash drive without using third-party software.
Today, USB flash drives and portable hard drives are much cheaper than they were a few years ago, and their characteristics have improved significantly. As a result, they have become much more common. In the not too distant past, CDs and DVDs, but they are naturally being replaced by portable hard drives and flash drives. And this is quite logical - optical discs are fragile, quickly become unusable, operate noisily, take up space, may not be readable at the most crucial moment... in general, they are a lot of headaches.
In addition to the role of a regular drive, a flash drive can serve as a disk from which you can “clean” install an operating system on a computer. In this post, we will look at several ways to turn a regular flash drive into an installation disk.
The first utility that will be described today is the Windows USB/DVD Download Tool, which is freely distributed by Microsoft. In order for you to use it, you must have a “fresh” version installed on your computer. operating system(Windows XP with the second or third service pack and older), it must have a processor older than the first generation Pentium and at least 50 MB of unallocated space on the internal hard drive. You can make a bootable flash drive or portable disk with a capacity of 4 GB or more. To use the utility, do the following:
- Download from the Microsoft website Net platform Framework

- Run the downloaded file, when prompted, click on “Download and install this component”
 .
. - The following screenshot shows that the Net Framework installation was completed correctly.

- The preparatory stage is completed, now you can proceed to the actual installation of the Windows USB/DVD Download Tool. Download installation package from the manufacturer's official website

- Run the downloaded file and go through the necessary installation steps


- Find in the list installed programs Windows USB/DVD Download Tool and launch it. On the first screen, specify the path to the system image in Explorer, then press the “Next” key

- On the next screen, select “USB device”

- Next, select the letter that your flash drive is designated in the system and click on the “Begin copying” button

The copying process can take up to 3-4 hours (depending on the speed of the media). Upon completion, you will receive a bootable USB flash drive from which you can install a full-fledged operating system.
Ultra ISO
The second software package that we will look at today is the popular UltraISO “combine”. Compared to the previously described utility, its undeniable advantage is that in addition to creating bootable media, it allows you to edit disk images, supports big number their formats. To make bootable media when UltraISO help, you need to follow the specified path:
- Download the archive containing the utility and unpack it in any writable location
- Run the unpacked installation file, then click “Next”

- Select the program location directory

- Specify whether you want to create program shortcuts and install virtual drive optical disks

- On the next screen, you will only need to finally confirm the installation by clicking the appropriate button
 .
. - After installation is complete, you can immediately launch the program

- In the first step of creating a bootable USB flash drive, open the pre-loaded Windows image

- In the top menu, select “Bootboot”, in the menu that appears, click on “Burn image” hard drive»

- Select your flash drive, make sure that the “Recording method” field is set to “USB-HDD+” and click the “Burn” button
 .
. - After final agreement that absolutely all data on the media will be irretrievably erased, the recording process will begin.

- Upon completion, you will receive a ready-made bootable USB flash drive.
WinSetupFromUSB
The last way to write a bootable USB flash drive, which we will consider today, will be specialized program under the self-explanatory name WinSetupFromUSB. The utility has beta status, but works quite stably. All its advantages also include the fact that it is “portable”; it does not need to be installed in the system to use it. To use this method you need to do the following.