And this time I will tell you how to manually remove computer garbage yourself, using Windows tools and programs.
1. Where is garbage stored in operating systems
On Windows XP
We go and delete everything in the folders: Temporary Windows files:
- C:\Documents and Settings\username\Local Settings\History
- C:\Windows\Temp
- C:\Documents and Settings\username\Local Settings\Temp
- C:\Documents and Settings\Default User\Local Settings\History
For Windows 7 and 8
Windows temporary files:
- C:\Windows\Temp
- C:\Users\Username\AppData\Local\Temp
- C:\Users\All Users\TEMP
- C:\Users\All Users\TEMP
- C:\Users\Default\AppData\Local\Temp
Browser cache
Opera cache:
- C:\users\username\AppData\Local\Opera\Opera\cache\
Cache muff:
- C:\Users\username\AppData\Local\Mozilla\Firefox\Profiles\ \Cache folder
Google chrome cache (Chrome):
- C:\Users\ username \AppData\Local\Bromium\User Data\Default\Cache
- C:\Users\User\AppData\Local\Google\Chrome\User Data\Default\Cache
Or we drive in the address chrome://version/ and see the path to the profile. There will be a folder Cache
Temporary internet files:
- C:\Users\username\AppData\Local\Microsoft\Windows\Temporary Internet Files\
Recent Documents:
- C:\Users\username\AppData\Roaming\Microsoft\Windows\Recent\
Some folders may be hidden from prying eyes. To show them, you need .
2. Cleaning the disk from temporary and unused files using
Standard Disk Cleanup tool
1. Go to "Start" -> "All Programs" -> "Accessories" -> "System Tools" and run the "Disk Cleanup" program.
2. Select a drive to clean up:
The disk scanning process will begin...
3. A window will open with information about the amount of space occupied by temporary files:

Check the boxes next to the partitions you want to clear and click OK.
4. But this not all. If you installed Windows 7 not on a blank disk, but on top of a previously installed operating system, you probably have such space-consuming folders as Windows.old or $WINDOWS.~Q.
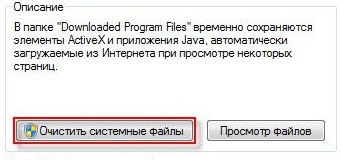
Also, it might make sense to remove checkpoints system restore (except the last one). To perform this operation, repeat steps 1-3, but this time click "Clear system files»:
5. After the procedure described in paragraph 2, the same window will open, but the “Advanced” tab will appear at the top. Go to it.

Under System Restore and Shadow Copy, click Clean.
3. Files pagefile.sys and hiberfil.sys
The files are located in the root system disk and take up quite a lot of space.
1. The file pagefile.sys is system paging file(virtual memory). It cannot be deleted (it is not recommended to reduce it either), but it can and even needs to be moved to another disk.
This is done very simply, open "Control Panel - System and Security - System", select "Advanced system settings" in the "Performance" section, click "Settings", switch to the "Advanced" tab (or press the win + R key combination, the command will open and there type SystemPropertiesAdvanced) and in the "Virtual Memory" section, click "Change". There you can choose the location of the paging file and its size (I recommend leaving "Size at the choice of the system").

4. Removing unnecessary programs from the disk
Good way to free up disk space (and as an added bonus to increase system performance), this is to remove unused programs.

Go to the control panel and select "Uninstall programs". A list will appear from which you can select a program. which you want to delete and click "Delete".
5. Defrag
defragmentation hard drive, carried out by the defragmenter program, allows you to organize the contents of the clusters, that is, move them on disk so that clusters with the same file are placed sequentially, and empty clusters are merged.
This leads to an increase in the speed of access to files, and hence to some increase in the speed of the computer, which, when high level Disk fragmentation can be quite noticeable. The standard disk defragmenter program is located along the path: start> all programs> standard> system utilities> disk defragmenter.
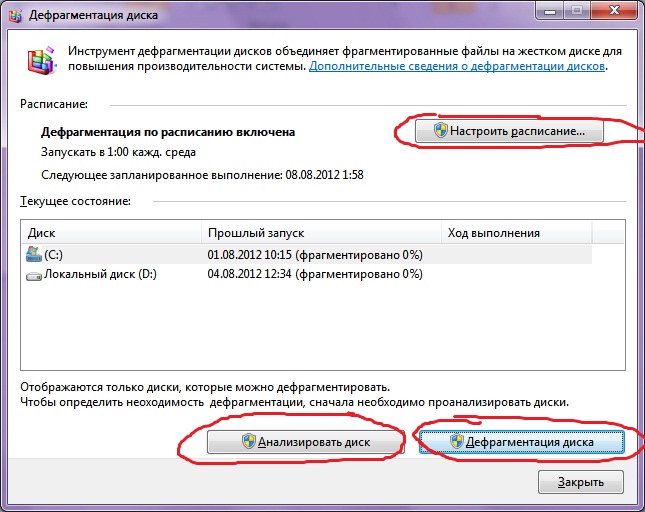
This is what the program looks like. In which you can analyze the disk, where the program will show a diagram of disk fragmentation and tell you whether or not you need to defragment. You can also set a schedule for when the disk will be defragmented. This is a program built into Windows, there are also separate disk defragmentation programs, for example, which you can download here:

Its interface is also quite simple.

Here are its advantages over the standard program:

- Analysis before disk defragmentation.
- Do a disk analysis before defragmenting. After the analysis, a dialog box is displayed with a diagram of the percentage of fragmented files and folders in the disk and a recommendation for action.
- Analysis is recommended to be carried out regularly, and defragmentation only after the appropriate recommendation of the disk defragmenter. Disk analysis is recommended to be performed at least once a week. If the need for defragmentation is rare, the disk analysis interval can be extended up to one month.
- Post Add Analysis a large number files.
- After adding a large number files or folders, disks can become excessively fragmented, so in such cases it is recommended to analyze them.
- Availability check at least 15% free space on disk.
- For a complete and proper defragmentation using Disk Defragmenter, the drive must have at least 15% free space. Disk Defragmenter uses this volume as an area for sorting file fragments. If the amount is less than 15% of free space, then Disk Defragmenter will only perform partial defragmentation.
- To free up more disk space, delete junk files or move them to another drive.
- Defragmentation after installation software or Windows installation.
- Defragment drives after installing software, or after performing a Windows update or clean install. Drives often become fragmented after software is installed, so running Disk Defragmenter helps ensure the best file system performance.
- Saving time on disk defragmentation.
- You can save a little time required for defragmentation if you remove garbage files from the computer before starting the operation, and also exclude from consideration the system files pagefile.sys and hiberfil.sys, which are used by the system as temporary buffer files and are recreated at the beginning of each Windows session .
Open the "Computer" library by double-clicking on its shortcut on the desktop with the left mouse button. Also this folder can be opened by launching the "Start" menu and selecting the line "Computer" on the right side of it.
In the upper left part of the window that opens, expand the list under the Arrange button by clicking on the arrow next to it once with the left mouse button. A list of file actions and display options for Windows Explorer windows opens.
In the list that appears, move the mouse cursor over the line "View". An additional list of settings for displaying various window elements will open.
In the additional list, select the line "Navigation area" by clicking on it with the left mouse button once. The Navigation Pane (Windows Explorer) will no longer appear on the left side of the window. Also, the navigation bar will not be displayed in all newly opened folders.
Users are advised to remove the navigation area when the monitor screen is at a low resolution, and therefore the visibility of the folders is reduced. This is due to the fact that at a low screen resolution, all elements on it are reflected larger than at a high resolution, therefore, there are fewer elements per unit area of the screen. By removing the navigation bar, the user frees up additional space in the viewport for various items such as files, folders, picture thumbnails, and so on.
If you want to increase the viewing area in the windows, the user does not have to remove the navigation bar completely. It is enough to move the mouse cursor over the right border of the navigation area until a double-sided arrow appears and, by pressing and holding left button mouse, drag the border of the conductor all the way to the right.
Access to the display settings of the navigation area is carried out from any open in this moment folders. The display settings and the size of the navigation area set by the user are remembered by the system. And in the future, all Explorer settings will be used in all newly opened folders.
In order for the navigation bar (navigation area) to be displayed again, go to the "Organize" list in the upper left corner of any open folder, hover over the line "View" and check the box next to the line "Navigation area" by clicking on it with the left mouse button one once. The explorer bar will be displayed on the left side of the window and will be present in all opened windows.
Windows 10 is the most used operating system for computers in the world which comes with many features. While they are all useful, some of them can work against you at times. One such feature is File Explorer History. For those of you who are not aware of this, let me take a moment to explain to you exactly what the history of the conductor is. Every time you access files and folders on a computer under Windows control 10, the system takes note of this and saves these files and folders as temporary storage.
Now, when you launch File Explorer from your computer's Taskbar or anywhere else, your computer will display the most recent and frequently used files. While this feature can be a real time saver, sometimes you don't want someone else to be able to see the files you've opened or accessed the most. That is, this is the moment when you want to clear the explorer history on your computer.
Clearing history through file manager very simple. You can not use only this, you can also disable this feature so that the system does not show used files and folder history in Lately. So let's get to it.
Clear explorer history
- Launch File Explorer. You will find it pinned to the Taskbar by default.
2. Once File Explorer opens, click on the “File” menu, then select the “Change folder and search options” option.
3. Then a dialog box will appear. In this window, uncheck the box "Show recently used files in quick access" and "Show frequently used folders in quick access" if you do not want the computer to not show your explorer history again. Click on the "apply" button to apply these changes.

4. Then click on the "Clear" button to clear the history.
You can now return to File Explorer to see that all files that were previously displayed are no longer displayed.
So that was our tutorial on how to clear File Explorer History in Windows 10. This is a simple tutorial, but in case you encounter any of the problems or have any doubts about it, feel free to write a comment below .
Lists open files and connected by USB devices, browser history, DNS cache - all this helps to find out what the user was doing. We have compiled step by step instructions how to remove traces of your activities in different versions Windows, Office and popular browsers. At the end of the article, you will find some scripts that will help you keep your machine clean automatically.
1. Clearing lists of recent places and programs
Let's start cleaning with lists of recent places and programs. The list of recent (in Windows 10 - frequently used) programs is in the main menu, and the list of recent places is in File Explorer.

How to turn off this mess? In Windows 7 - right-click on the "Start" button, select "Properties" and in the window that appears, uncheck both checkboxes in the "Privacy" section.

To clear the list of recent places and documents, you need to delete the contents of the %appdata%\Microsoft\Windows\Recent directory. To do this, open command line and run two commands:
Cd %appdata%\Microsoft\Windows\Recent echo y | del *.*
It also doesn't hurt to delete the contents of the %appdata%\microsoft\windows\recent\automaticdestinations\ directory. It stores the latest files that appear in the jump list:
cd %appdata%\microsoft\windows\recent\automaticdestinations\ echo y | del *.*
To have recent files cleared automatically on exit, you need to enable the "Clear recently opened document history on exit" policy, which is located in User Configuration\Administrative Templates\Start Menu and Taskbar.
Now let's move on to Windows 10. You can turn off the list of recently added and frequently used applications through the "Settings" window. Open it and go to the "Personalization" section, the "Start" item. Turn off everything in there.

It seems that the problem is solved, but, alas, this is not entirely true. If you enable these options again, then all lists in the same composition will appear again. Therefore, you will have to disable this feature through group policy. Open gpedit.msc and navigate to User Configuration\Administrative Templates\Start Menu and Taskbar. Enable the following policies:
- "Clearing the list of recently used programs for new users";
- "Clear the history of recently opened documents on exit";
- "Clear notification log on tile on exit";
- "Remove the list of programs pinned to the start menu."

Clearing recent places in Windows 10 is easier than in the "seven". Open File Explorer, go to the "View" tab and click the "Options" button. In the window that appears, turn off the options "Show recently used files in the Quick Access Toolbar" and "Show frequently used folders in the Quick Access Toolbar". Don't forget to click the "Clear" button.

As you can see, a task as simple as clearing the last objects has a rather difficult solution. Without editing group policies- nowhere.
2. Clearing the list of USB drives
At some secure facilities, only flash drives registered in the log are allowed to be connected to the computer. And, as usual, the magazine is the most common - paper. That is, the computer itself does not in any way restrict the connection of unregistered drives. Does not limit, but records! And if during the check they find that the user connected unregistered drives, he will have problems.
By no means do we advise you to try to steal military secrets, but the ability to clear the list of recently connected drives can come in handy in other life situations. To do this, look in the following registry keys:
HKEY_LOCAL_MACHINE\SYSTEM\CurrentControlSet\Enum\USBSTOR\ HKEY_LOCAL_MACHINE\SYSTEM\CurrentControlSet\Enum\USB\
Here they are - all the drives that you connected to your computer.

It would seem that you just need to take it and clean everything. But it was not there! Firstly, the permissions for these registry branches are set in such a way that you won’t delete anything even in the “seven”, not to mention the “ten”.

Secondly, assigning rights and permissions manually takes a long time, especially if there are a lot of drives. Thirdly, admin rights will not help. The screenshot above was created when I performed the delete operation with just admin rights. Fourth, in addition to these two partitions, there is a long list of partitions to clean up. Moreover, they must not only be deleted, but correctly edited.
If for some reason you need to do everything manually, then look for keywords MountPoints, MountedDevices, DeviceClasses, and RemovableMedia. But it's much easier to use finished program who will do everything for you. Some forums recommend USBDeview for this. However, I tested it and declare that it does not clean out information from all the necessary sections. USBSTOR And USB continue to contain information about connected media.
I can recommend the program. Run it, check the "Perform a real cleaning" checkbox. You can turn on the “Save .reg-file of the cancellation” parameter or not, but if the goal is not to check the program, but to prepare for the upcoming computer inspection, then it is better to turn it off.

The program not only cleans the registry, but also displays a detailed log of its actions (see below). When it finishes, there will be no mention of connecting drives to the computer.

3. Clear cache and browser history
The third item in our tudu is clearing the cache and browser history. There are no difficulties here - each browser allows you to reset the list of recently visited sites.
Continued available to members only
Option 1. Join the "site" community to read all the materials on the site
Membership in the community during the specified period will give you access to ALL Hacker materials, increase your personal cumulative discount and allow you to accumulate a professional Xakep Score rating!
If personal computer is used by more than one person, it is worth cleaning the history of Windows Explorer from time to time.

For Windows 7, for example, open your folder, say Documents, from the Start menu. By placing an arrow on "Search: Documents", as in the picture, you will see a list of recent search queries. We move the cursor to any request, it will be highlighted in blue and click "Delete". We do the same with all requests.
For Windows 8 and Windows 10, cleaning is done in a slightly different way. Open the explorer and put the arrow on the "Search: Quick Access Toolbar" on the top right. "Search" opens, opening various options, among which there will be "Recent searches". We go down and find there "Clear search history".
Windows stores not only search queries, but also the order in which folders were opened. We can clean up the other history of the explorer like this - open the personal folder and right-click on the top field with the path, then enter "Delete log" in the context menu. That's all - contact our service center laptop repair -