Good day, dear readers of the site!
The time has come when the ability to work Microsoft package Office and word in particular has become as much a necessity as reading and writing. Consider one of the many questions on working with this wonderful program and learn how to make a frame in word, which will make the text more beautiful.
In this article, we will work on Microsoft Office 2013.
How to make a beautiful frame in Word
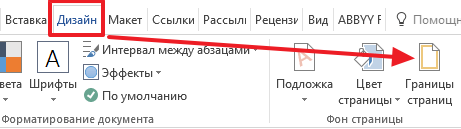
First of all, open a Word 2013 document with the text in which you need to make the appropriate changes. Go to tab Design.

After that, in the upper right corner, click on the icon Page borders. A window opens Borders and shading. There are a bunch of all sorts of settings here, at first we’ll make everything simple - we’ll learn how to make a frame for the entire text of the page.

Choose a type Frame, then set Apply to entire document (if we want to apply to the entire document) and click OK.
Now let's start to pervert and make a more beautiful version (especially since there are a lot of settings - choose according to your taste and color).

Now let's improve. Let's make a colored outline of the paragraph. We do everything in the same way: open the document, go to the bookmark Design. We put cursor to the paragraph that we want to format. In the window that opens, go to the tab Border.

Pay attention to the lower right corner, which shows that all changes will be applied to the paragraph. On this tab you can choose.
- no - there will be no frame;
- frame;
- shadow;
- bulk;
- another.
Please note that all changes are immediately visible on the diagram on the right. Choose Frame. Select the type (click on the corresponding icon)

Choose a color. For this, in the section Color, click on the small triangle. In the menu that opens, click with the mouse and select the color we need (for example, red).

In section Width choose the size in points. For this, in the section Width click on the corresponding item. Look at the changes on the right. if everything suits us, then press the button OK.

That's all, where the cursor was, there was a beautiful stroke of the paragraph.
And what is needed in order to do all this not to one paragraph, but to several? To do this, select the text we need.

Back on the tab Design click the icon Page borders. Go to tab Border and press type Frame. 
Choose a color and width and click the button ABOUT TO.

All these actions can be seen in the video.
Often the need to format the text arises not only as a result of the personal initiative of the author of the document. When creating manuals, manuals and preparing creative works, information material is often framed by a frame.
The most popular text editor that every PC user is familiar with is MS Word. It is not only convenient and easy to use, but also allows you to create artistically designed works. How to prepare a colorful postcard or booklet using this editor?
How to insert a frame in Word - Word 2003
This version of the editor is currently quite rare, but it is still present on some computers.
- Create a new Text Document(Word) or open an existing one.
- On the toolbar, find the "Format" menu and click it.
- In the list that opens, select the item "Borders and Shading".
- A window will appear in which you are interested in the "Page" tab.
- Now all that's left is to choose appearance and the style of your frame.
Frame type: choose how your frame will be - flat, voluminous, with a shadow or artistic (item "Other"). Set the type of contour - a solid line or a dashed one, its color and thickness.
Artistic frame. If you want a more colorful design, use the "Other" frame type. Next, go to the item "Drawing" and among the options offered in the list, select the one that suits you.
- In the right half of the window, you will see a preview of the frame.
- If everything suits you, click "OK".
- The frame is ready.
How to insert a frame in Word - Word 2007, 2010
These versions of the editor are very similar to each other, so the frame creation algorithm will be identical.
- Open a text document or create a new one.
- Find the "Page Layout" tab on the toolbar and go to it.
- Among the sections that appear, select the "Page Background" block.
- Next, click on the "Page Borders" icon.
- A window with several tabs will open. To create a frame, you need a "Page".
- Click on it and select the border style and color (in the same way as in the case of the Word 2003 version).
- Evaluate the result in the field on the right.
- Click "OK".


How to insert a frame in Word - Word 2013
- Open ready word document or create a new one.
- Find the "Design" tab and click on it.
- You will see a lot of sections, among which you select the "Page Background" block.
- Click on "Page Borders".
- The "Borders and Shading" window will open, in which you specify all the parameters for the future frame in the "Pages" tab (in the same way as when working with the Word 2003 version).
- Further, if the result suits you, click the "OK" button.

How to insert a frame in a Word - the scope of the parameters
The frame resulting from working with the "Page" tab will appear only on the page that was active at the time of work. If you need to create a similar border on each page of the document, the steps should be as follows:
- Go to the "Borders and Shading" window (how to get into it is described above for each version of Word).
- On the right side of the section, select "Apply to".
- In the above drop-down list, select the pages on which the design in the form of a frame will be present.
You can choose not only the style of the frame and its location within the document, but also the borders of the outline within the page. For this:
- Go to the “Borders and Shading” window (how to get into it is described above for each version of Word).
- If desired, your frame may not have 1 or 2 sides, as well as a top and bottom border. To do this, click on the corresponding icons in the "Sample" section.
- Next, in the right part of the block, select the item "Settings".
- You click on it.
- You will be taken to a table in which you must, if desired, change the size of the fields and specify the location of the frame.
- When the changes are completed, click the "OK" button.

Working with a text editor will not cause any difficulties, and as a result you will get the necessary text frame.
Borders (frames) can be set not only for individual fragments of the document, but also for the entire page.
To set page borders, run the command Format/Borders and Shading and go to the tab Page dialog box Borders and shading (rice. 10.17).
Rice. 10.17. Setting page borders in the Page tab of the Borders and Shading dialog box
For the page, you can select the type, color, and width (thickness) of the line. In the tab section Type, except regular frame, you can also select a box with shadow. To set an arbitrary frame from different sides, you can use the buttons located in the section Sample. Pressing the button once sets or removes a paragraph border. Instead of using buttons, you can simply left-click on the border of the paragraph(s) in the tab section Sample. Drop Apply to You can select the part of the document to which the border will be applied. You can set the frame for all pages of the document, or only for the section in which the cursor is currently located. You can set the same frame for all pages of a document or section, or you can frame only the first page or, conversely, all pages of a given section, except for the first.
To frame pages, you can use not only lines, but also any picture from the drop-down list Picture. For any selected pattern in the counter Width You can set the desired size from 1 to 31 points. You can't change the frame color for all pictures. You can frame the pages of the document with drawings on all sides or, using the buttons located in the section Sample, only from some. Different patterns for framing on different sides cannot be used.
To remove the border of pages, regardless of their type and location, follow in the section Type tabs Border dialog box Borders and shading(cm. rice. 10.17) choose no.
Shading paragraphs and text
A fill is a change in the background color of the text on a page. Filling can be set only for those parts of the page that contain text or at least empty paragraphs. Parts of the page without text cannot be filled with a background in any way. Don't try to use the command Format/Background followed by a choice of a color. You can see this background, but it doesn't appear when the document is printed.
Shading is used to highlight parts of a document, design headings, and in some other cases.
The fill can be set both for paragraphs and for "text". As with the setting of the border, here "text" is understood to be any fragment less than a paragraph in size, and, most importantly, not including the non-printing end-of-paragraph character. It can be one or more characters, a word or several words, a sentence, a line, or several lines. Unlike framing, filling paragraphs and text is done in exactly the same way.
When pouring, it is convenient to use the toolbar Tables and Borders(cm. rice. 10.12). Bring this panel to the window Microsoft Word you can team View/Toolbars/Tables and Borders, but the easiest way is to use the button border panel toolbar Standard(cm. rice. 10.1).
To set the fill, select a fragment of the document, click on the arrow on the right side of the button Fill color(cm. rice. 10.12) and in the palette that appears, select the desired color ( rice. 10.18). Keep in mind that the same button located in the toolbar Drawing, cannot be used to fill text fragments. Shades of gray from 5% to 35% are recommended for filling document fragments. Against the background of darker colors, the text becomes difficult to read. If the font color is set Auto, you can also use dark fills: from gray 80% to black, while the font color will automatically change to white.
 Rice. 10.18. Fill setting
Somewhat large, but usually unused, fill options will appear when you click on the button border color toolbar Tables and Borders(cm. rice. 10.12) or run the command Format/Borders and Shading. In the tab fill dialog box Borders and shading (rice. 10.19) in the section palette fill you can choose the color of the main fill. In addition to the main fill, you can also select a pattern that is superimposed on this fill. In section Pattern select type from the drop-down list type pattern (density in percent or type of hatching), and in the drop-down list background color you can choose the color of the dots or lines of the pattern.
 Rice. 10.19. Setting the fill in the Fill tab of the Borders and Shading dialog box
Regardless of how the fill is set, to remove it, just select the fragment, click the arrow on the right side of the button Fill color toolbar Tables and Borders(cm. rice. 10.12), and in the panel that appears, press the button No fill.
If there is a need to make a frame in Word, most users go the most obvious way - they create a huge table on the entire page, inside which they place text. But, despite its simplicity, this way of creating a frame is not very convenient. Especially if there are other tables in the text.
Instead, it's better to use a tool called Page Borders. With it, you can make a frame in Word for all pages of a document, only for individual pages, or even for individual paragraphs of text. You can find out how this is done in this article.
How to make a frame in Word 2007 and 2010
If you are using Word 2007 and 2010, then in order to make a frame you need to open the "Page Layout" tab and click on the "Page Borders" button. If you have Word 2016 then the "Page Borders" button should be found on the "Design" tab.
This will bring up the Borders and Shading window. Here Select a frame and click OK. After that, each page of the document will be framed by a frame.

If necessary, you can make the frame the way you want. In the "Borders and Shading" window, you can choose the type of frame, its color and thickness.

If you only want to add a border on certain pages, then you can split your Word document into several sections and then apply the border only to the pages you need.

How to make a border around text in Word
If you don't need to make a border around the entire page, then you can make one around the paragraph of text you've chosen. For this place the cursor on the paragraph around which you want to make a frame, click on the "Page Borders" button and go to the "Border" tab.

A quick way to make a border around text
There are also more fast way make a frame around the text in Word. There is a button on the Home tab that users usually don't notice.

This button allows you to quickly draw frames around the text. To do this, just place the cursor on the desired paragraph of text, click on this button and select the appropriate frame.

How to make a frame in Word 2013 and 2016
If you have Word 2013 and 2016, then the frame is added in exactly the same way as described above. The only exception the "Page Borders" button will not be on the "Page Layout" tab, but on the "Design" tab.
Otherwise, the process of creating a frame is exactly the same as in Word 2007 and 2010.