Why is it necessary to share a hard drive in Windows? First of all, for the security of your personal data. When a hard drive has only one partition, then all the files that are on this drive: programs, documents, photos, files of the Windows OS itself are stored in one place.
Now imagine that the system fails. All your personal files (photos, documents) will most likely be lost. It is much more correct when system files and user files are stored separately from each other.
Physically, they will still remain on the same hard drive, but will be on different partitions. There may be several sections. One, as a rule, is allocated for the operating system and programs (system partition), the other (or others) for user files.
One of the simplest and most affordable ways is to partition your hard drive when installing Windows. We discussed how to do this in great detail and with a specific example in . What to do if the system is already installed and there are user files in it, how to partition the disk in such cases?
How to partition a disk with Windows installed without losing data
Today we will look at how to divide a hard drive into two or more partitions with an already installed OS. And it doesn’t matter at all what edition of Windows you use. This method will be relevant for any version, be it Windows 7 or Windows 10. In addition, if you already have two partitions, but need to create a third, both methods described below are also suitable.
Essentially, our task comes down to “pinch off” from a large partition (and in our case this is the only partition - system drive C) some part, say 200 GB, and make a separate partition from it.
This can be done in several ways, including using the Windows operating system itself, which has a special Disk Management tool. This method requires a minimum of effort and in most cases solves the problem without third-party software. Let's start with him.
Before you begin partitioning your Windows hard drive, you need to take some precautions. If there are important files on the system, copy them to external storage media (flash drive, external hard drive) in advance.
How to divide a hard drive into two or more partitions? Method 1 - using Windows
Let's use the Disk Management tool. In Windows 10, just right-click on the icon My computer, select item Control - Disk management.
In other versions of Windows, this tool can be found using a regular search or using a hotkey combination Win+R, and enter the command diskmgmt.msc.

We see the Disk Management window, which displays the user’s disk, which in this case has a size of 465.76 GB (Disk 0). Almost all of the HDD space is allocated to one partition - Disk C. There is also a partition (500 MB) that is reserved by the operating system at the installation stage.
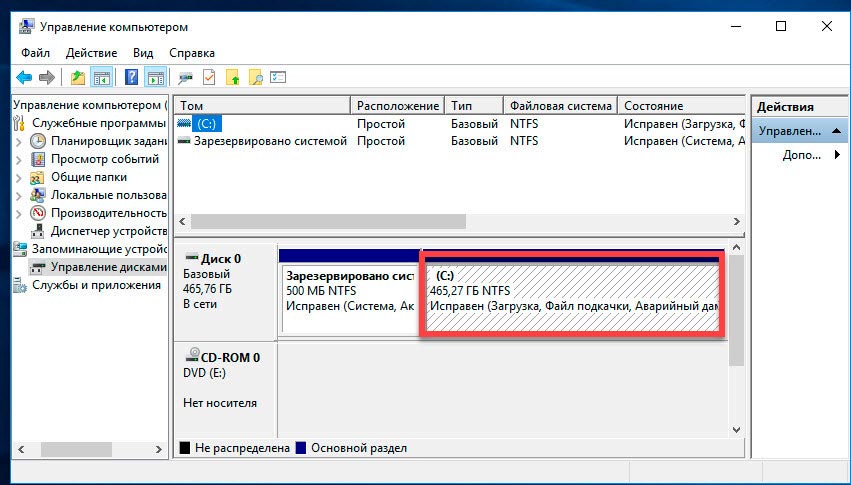
In our case, 465 GB (the entire hard drive) for one system disk is not an affordable luxury, so we will “pinch off” the maximum possible (as much as the system will allow) number of GB from it and make a new partition from this free space.
As a rule, about 100-150 GB are allocated for the system disk. It all depends on the individual user. 100 GB is quite enough if Windows and the most necessary software are installed on the system disk. If you plan to install modern games in addition to the system and software, then a size of 100 GB will clearly not be enough.
Before performing any operation on a specific hard drive partition, do not forget to select it. Just click on it with the left mouse button and the section will be selected. Only then proceed with the operation.
Let's move on to practice. Let’s select the partition from which we want to “pinch off” space. Right-click on the selected partition and select the command Shrink Volume.

All sizes are in megabytes, please be careful. In a specific example, the maximum number of MB that the system “allows” to be compressed is 237.656 MB (232.09 GB). This means that after compression we will get Disk C with a size of 232 GB and Disk D with a size of 238782 MB (233 GB). Not the best option. If you are not satisfied with it, and you need to “pinch off” more than what the system offers, then you will have to use third-party software, but more on that later.
![]()
When all calculations are completed and the sizes of future partitions are set, click OK(or click Enter). We have a new unrecognized partition (200 GB). Don't rush to exit Disk Management. The procedure for dividing the disk into two partitions has not yet been completed. Select a new partition (200 GB), and right-click and select Create a simple volume.

Launch Create Simple Volume Wizard. In principle, everything else is simple, you just need to follow the instructions of the master himself. Check out the screenshots. You are required to give the future partition a letter (in my case it is D) and a file system - NFTS.


Let's see what happened. We have one hard drive and divided it into two partitions: system Disk C (265 GB) and New Volume D (200 GB) for storing personal data. By the way, the new volume is now displayed in Windows Explorer.

Now you know how to divide a hard drive into two or more partitions using Windows. If you are satisfied with this method, and it coped with your task, then you can stop there. However, if you are looking for a more optimal option, and, for example, you need to “pinch off” a larger size than the system itself offers, we use third-party software. True, first we need to return the hard drive to its original state.
Let's delete the created partition and return it to the system disk. We highlight New volume and right-click on the item Delete volume.

Read the warning and click OK. We get 200 GB that are not distributed.


Carefully check all the numbers and click Further.

We have returned to the original state, when the system has one hard drive and it is almost entirely dedicated to one partition (system).
How to divide a hard drive into two or more partitions? Method 2 - Partition Master Free
It's time to move to third-party software. There is a lot of choice here. There are paid and free options. I recommend stopping at . Why? Time-tested, intuitive interface, free. Unlike the Disk Management tool that Windows offers, Partition Master allows you to shrink a disk partition as long as physically possible.

The official website of the program is www.partition-tool.com. Go to the website and select the Products - Partition Master Free - section in the top menu Download.
Since the program is free, during its installation you will be prompted to install additional unwanted programs. Many free products work great and perform their tasks perfectly, but since they are free, developers try to somehow make money from them. Be careful and timely uncheck the checkboxes offering promotional products.
1. Start installing the downloaded program. Select the language English and press OK.
2. In the next window, we agree that we will use this software only for our family, check the box and click OK.
3. In the next window (at your discretion) leave only one checkbox - Create a desktop icon(create a desktop icon) and click NEXT.
Installing Partition Master Free in screenshots. Click


5. In the next window, enter your Name And Email. You can enter fictitious data.
6. After installation, click Finish.
The program should start. The interface is entirely in English, but it is quite simple and using these instructions, dividing a disk in Partition Master Free will not be difficult.
The main program window displays Disk C, which is what you want to split. Its main information is also presented here: file system (NFTS), size - actual (465.27 GB) and used (17.10 GB). Pay attention to the graphic scale of the disk, which is located at the bottom of the window. You can work and execute commands using both options. With a graphic scale, this is a little easier and clearer.

Select the section (left click) that you want to divide (from which you need to pinch off a place), and select (Resize) from the drop-down list of commands.

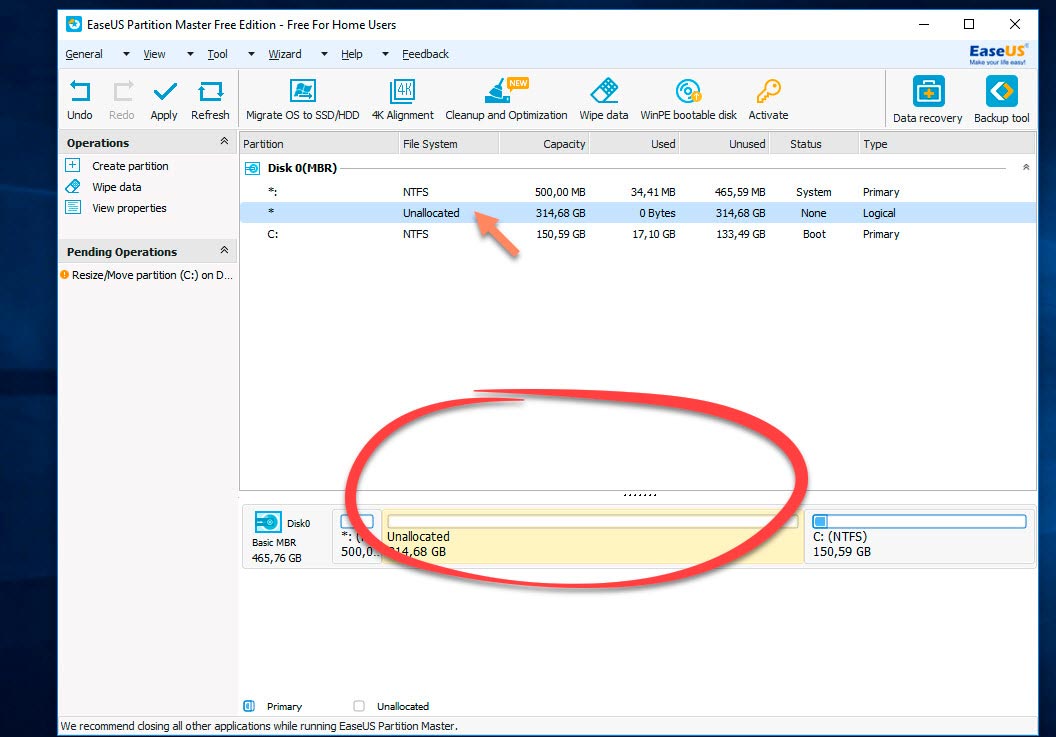
In the window that appears, grab and move the special slider. It is responsible for the set size of the future partition. We indicate how many GB we need to pinch off. In this case, 322.242 MB (or 314.69 GB) was selected for the new partition.
Pay attention to the bottom of the window. While moving the slider, you, in real time, see how your Disk C will change after compression, and how much will be allocated for the new partition.
I set the size of the new partition to 314 GB, and the size of Drive C will become 150 GB. After that, click OK.

An unrecognized partition (314 GB) appeared. Now we need to make a partition out of this unrecognized space.
Click on it with the mouse and select the command (Create section) from the drop-down menu.

In a new window, I am prompted to enter a partition label and give it a name (Partition Label). Let's say I call it Multimedia. Next, you need to specify the partition letter (Drive Letter). Don't forget about the point Optimizefor SSD, but only if you have an SSD drive. If you are using a regular hard drive, then do not check this item. File System - NFTS. Click OK.

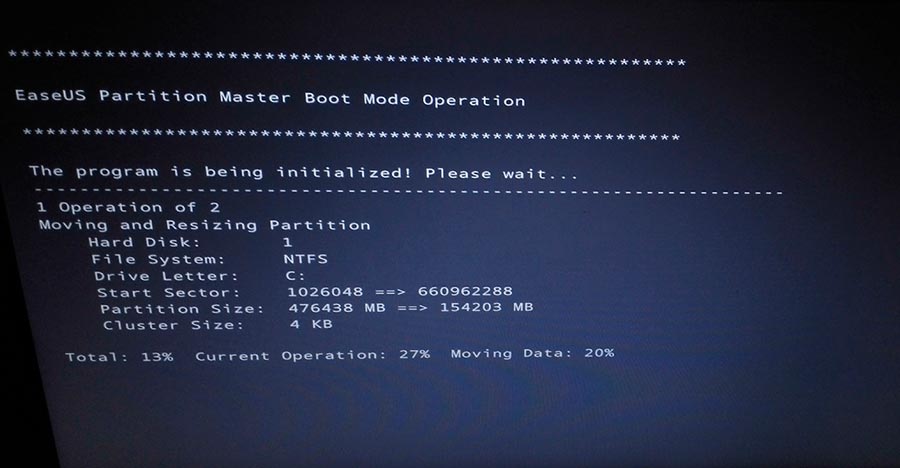
Let's see what happened. System Disk C for which we allocated approximately 150 GB and a section for storing files (Multimedia). This is not the final result yet, but rather a sketch. For the program to perform all operations, you need to click on the button Apply in the top menu.

A pop-up window will appear containing information about the operations that will now be performed. Click YES and the program will begin executing them. The computer will restart and start in download mode. Wait for the operation to complete.
After the process is completed, a window will appear with information that two operations were successfully completed. If you open File Explorer, you can see the new partition created.

Now system files and user files will be stored separately. The task has been completed. As you can see, both described methods work and allow you to partition the disk without losing data. Which one to choose is up to everyone to decide for themselves. I hope this article was useful and helped you finally understand this issue.
If you are assembling a computer and looking for the best prices on components, then option number one is computeruniverse.ru. Time-tested German store. Coupon for 5% euro discount - FWXENXI. Happy building!
The problem of improperly formatting SSD drives has been discussed many times since these drives entered mass production. And although modern Windows operating systems have already learned to work correctly with solid-state drives, when formatting drives with third-party utilities (or in Windows XP), performance problems are possible, which will be discussed below.
The reason for conducting tests and writing material was not only the desire to personally check the result, but also, to a greater extent, the need to obtain specific numbers, since too many Internet resources, when describing the problem, instead of accurate data on changes in performance, provide vague formulations and refer to other articles, which in turn are sent somewhere else. Ultimately, after finding several negative reviews about the impact of partition alignment on SSD performance, it became clear that the situation needed to be sorted out on its own. The material outlines the theoretical foundations and guidance for checking the correctness of partition shifting on an SSD, as well as performance tests.
A little theory
Modern drives are presented to the operating system and programs as memory divided into 512-byte sectors, however, at the physical level, the size of each disk sector is 8 times larger and amounts to 4 KB. To maintain compatibility with older applications, another layer is created above all this, in which each sector is also 4 KB. Microsoft operating systems prior to Windows Vista reserve the first 63 sectors at the beginning of the disk for the MBR (master boot record), and this causes the logical (top-most) and physical (bottom-most) layers of the drive to move relative to each other, and therefore, one logical sector is located on two physical ones at once. It follows from this that all I/O operations will be performed twice, which not only reduces the performance of the SSD, but also consumes its resource faster (as you know, SSDs have a limited number of write cycles). As you might guess, in order for the sectors at the physical and logical levels to coincide, the shift at the very beginning of the disk must be a multiple of 4 KB (4096 bytes).
How to know if a partition is shifted correctly on an SSD
As mentioned above, modern Windows systems can correctly shift partitions when formatting, however, if the initial partition was done in a third-party utility or in Windows XP, then even reformatting in Windows 7 will not correct the situation. In this case, either completely deleting the partition(s) and creating a new one, or shifting the entire disk area using special utilities will help.
To find out whether you need to do all this at all, you need to run the msinfo32 utility, go to the Components->Storage->Disks section and find the Partition Starting Offset value for your SSD drive. 
If dividing this value by 4096 results in a non-integer value, then the first section is not shifted correctly. In our case, 32,256/4096 = 7.875, which is what you would expect after formatting the disk under Windows XP.
An alternative way to obtain the same information is to run the following command at the command prompt:
wmic partition get BlockSize, StartingOffset, Name, Index
As you can see, on one drive (SSD in our case) the first partition is shifted incorrectly, but on the second (HDD) it is shifted correctly, since 1048576/4096 = 256 (integer).
How to move a section
If nothing important is stored on the disk, then the fastest way to fix the error is by deleting all partitions and creating them again under Windows Vista/7. Simple formatting is not enough here, since the area does not shift.
If the disk is bootable and the operations described above are undesirable, then you should move the partition. Let's look at how this is done using the free GParted utility.
1
. bootable GParted ISO disk (115 MB) or use one of the Linux distributions in which GParted can be available as a separate utility.
2
. We burn the image to a CD or flash drive and boot from the media.
3
. In GParted, select the first partition of the SSD drive and the Resize/Move command.
4
. Uncheck the box next to Round to cylinders, put “2” next to Free space preceding, click Resize/Move and then Apply.
5
. We repeat the previous point, but instead of “2” in the Free space preceding we put “1”. Click Resize/Move and then Apply.
6
. If there are several partitions on the SSD, then operations 3-5 must be repeated with each of them, which may take several hours.
GParted performs the shift operation without deleting data, but when working with hard drives, it is always recommended to save important files on another medium.
After a reboot, the system will most likely refuse to start, but Windows can quickly be restored to functionality by using the Repair Your Computer command in the first dialog of any boot disk with Windows 7.
After the Desktop appears, check the correct alignment in Msinfo32: 
2,097,152 / 4096 = 512 – the section is shifted correctly.
Performance
Before directly measuring performance, an attempt was made to count I/O operations before and after formatting the disk. According to Microsoft Help, the I/O Reads and I/O Writes parameters in Windows Task Manager show the number of corresponding read or write operations for each specific process.
Five times before using GParted and five times after, the same 700 MB ISO file was copied to an SSD using the Altap Salamander file manager. In each case, the number of read and write operations was exactly 22.3 thousand. The lack of difference is most likely due to the fact that Windows Task Manager only works with the top level of the disk and is not able to display the actual number of operations at the base level.
HD Tune and Crystal Disk Mark programs were used to directly measure performance. The Kingston HyperX SH100S3B/240G SSD drive was first tested on a computer with SATA 2.0, and then on a platform supporting SATA 3.0, where it was able to fully reveal its potential: the drive’s performance is at the level of 500+ MB/s, but when using SATA 2.0 it is limited at 200+ MB/s. All measurements were carried out 5 times, and the size of the test file in CrystalDiskMark was 1000 MB.
In HD Tune's Benchmark mode, only the read speed was measured, since writing testing required deleting all partitions from the disk (for the utility to directly access the drive), and this, of course, made the whole test meaningless.
SATA 2.0
It would be logical to assume that a drive whose performance is 2.5 times higher than the throughput of SATA 2.0 would simply be limited by the capabilities of the interface and would not show any improvement on an outdated platform, but this turned out to be completely wrong. An increase, quite significant, was recorded even in this configuration of the test system.
As can be clearly seen in the diagram, the read speed in SATA 2.0 mode remained virtually unchanged, and the determining factor here (with the exception of the last two tests with small block sizes) was the bottleneck of the interface.
A completely different picture emerges in the write speed tests, where in each case an obvious difference in performance was recorded. The minimum performance increase was 12%, and the maximum was 450%.
SATA 3.0
This mode made it possible to reveal the full potential of the drive, and in tests it demonstrated exactly the speeds that the manufacturer indicated on the box (about 500 MB/s in read and write mode).
The reading test again did not bring any special sensations, except that HD Tune in Benchmarks mode seemed to correct the result in the previous test, where instead of a slight increase in performance, a slight, but still strange decrease in performance was recorded. The result of CrystalDiskMark (4K QD32) also stands out, where the difference in speed was not a couple of MB, as in other tests, but much larger.
The recording results are also very similar to those obtained in SATA 2.0 mode. The gain in each test (except for the first and last) is almost identical, and this is easily explained by the fact that the SSD performance in these tests did not depend on the version of the SATA interface. If you do the calculations, the minimum increase was 18%, and the maximum was 310%.
Conclusion
The test results were somewhat unexpected. Firstly, in theory, the drive’s performance should have increased during reading as well, but an obvious improvement in the tests was recorded only during write operations. Secondly, before the start of testing, much more modest growth rates were expected (if expected at all), but despite this, in some tests a 3-4 times increase in recording speed was obtained.
Since checking whether the partitions on an SSD have been correctly shifted takes literally less than a minute, we recommend that all owners of such drives, just in case, check their solid-state drive and, in case of incorrect formatting, configure it correctly to obtain maximum performance. Interestingly, incorrect shifting is also relevant for conventional drives, and there is evidence that the negative impact of this factor is manifested on R.A.I.D. arrays. Therefore, it also makes sense for owners of such storage systems, especially those configured for maximum speed rather than excessive security, to optimize their system.
Nowadays, when buying a computer, many people have a question: a PC with which drive is better to buy, HDD or SSD. To answer this question, you first need to understand what the main difference between an SSD and an HDD is. HDD hard drives appeared back in the seventies and are still used today in millions of computers. Basic operating principle of HDD hard drive is in writing and reading information on special magnetic plates. Reading is recorded using a head movement lever, while the magnetic disks themselves rotate at very high speeds. Due to the mechanical component of the HDD hard drive and the write and read speed, it is inferior to SSD solid state drives.
How does an SSD drive work? built on recording and reading information from special high-speed memory chips included in its composition. The very speed of writing and reading information from an SSD is several times higher than that of an HDD. In addition, thanks to the microcircuit design, the SSD is less susceptible to damage from impacts and falls, and also has miniature form factors that allow it to be installed in tablets and ultrabooks. Main disadvantages solid state drives are price and life cycle. But progress does not stand still, so we can already see how the price of SSDs is gradually falling, and their rewriting cycle is increasing. In this article we will look at all aspects of working with a solid-state drive and describe their characteristics, so if you decide to switch from an HDD to an SSD, then this article will be very useful for you. In addition, we will look at problems when the BIOS does not see the SSD and many others.
What types of SSD drives exist and which one is better?
When choosing a solid state drive first of all you should pay attention to its form factor and different types of interfaces, through which they connect to the PC. The most common form factor, as with HDD hard drives, is the 2.5-inch case form factor. This solid state drive can be found in many laptops and personal computers. Below is a list that lists all the types of form factors available in SSDs today:
- Form factor type 2.5 inches;
- mSATA form factor type;
- Form factor type M.2.
Below is a picture of 2.5-inch solid-state drives, which is the most common and familiar to many users.
The drives listed above are quite popular models and are labeled as follows: GOODRAM CX200 240 GB, Kingston HyperX FURY SHFS37A/120G and Samsung 850 EVO MZ-75E250B. Such drives are connected using a standard SATA interface, which is used on most computers.
The second type of mSATA device, presented below, has been used mainly in laptop computers since 2009.

It is extremely rare to see mSATA on desktop motherboards, but it is not uncommon in ultrabooks and tablets.
The third form factor M.2 represents a new development that should replace mSATA devices. Below is a picture showing an M.2 disk from Samsung.

We've sorted out the formats of solid-state drives, now let's try to figure out the type of memory used in them. Now on sale you can find devices with SLC, MLC and TLC types of NAND memory. The table below shows the memory characteristics relative to NAND chips.
| NAND chip specifications | SLC | MLC | TLC |
|---|---|---|---|
| Number of bits per cell | 1 | 2 | 3 |
| Number of rewrite cycles | 90000 - 100000 | 10000 | 3000 - 5000 |
| Chip read time | 25 us | 50 us | ~ 75 us |
| Programming time | 200 – 300 us | 600 – 900 us | ~ 900 – 1350 us |
| Erase time | 1.5 - 2 ms | 3ms | 4.5ms |
From the characteristics of the table it can be seen that disks built on SLC chips have 90,000 - 100,000 rewrite cycles. It follows from this that such discs will last longer. But buying an SLC drive nowadays is a very expensive pleasure, so most users prefer MLC and TLC drives. To give our readers an idea of the lifespan of an SSD, we have prepared a table that describes it.
| Resource of SSD drive on TLC memory | ||
|---|---|---|
| Number of rewrite cycles | 3000 | 5000 |
| Memory | 120GB | 120GB |
| Average recording volume per day | 12GB | 12GB |
| 10x | 10x | |
| One cycle = 10 * 12 | One cycle = 10 * 12 | |
| SSD resource formula | SSD resource = 3000/120 | SSD resource = 5000/120 |
| Estimating the life of an SSD drive | 8 years | 13.5 years |
It is noticeable from the table that we took as a basis the cheapest drive with TLC memory chips. The formula shows that our SSD goes through one rewrite cycle per day, and this is not so little. For example, a PC user can rewrite much less information, 120 GB per day. But even under such unforgiving conditions, this disk is capable of working for 8 or 13.5 years.
Below is a table for a drive with SLC, MLC memory chips.
| Calculation | Resource of SSD drive on SLC memory | Resource of SSD drive on MLC memory | ||
|---|---|---|---|---|
| Number of rewrite cycles | 90000 | 100000 | 9000 | 10000 |
| Memory | 120GB | 120 GB | 120 GB | 120 GB |
| Average recording volume per day | 12GB | 12GB | 12GB | 12GB |
| Increasing the volume of recorded information | 10x | 10x | 10x | 10x |
| Formula for rewrite cycles per day | One cycle = 10 * 12 | One cycle = 10 * 12 | One cycle = 10 * 12 | One cycle = 10 * 12 |
| SSD resource formula | SSD resource = 90000/120 | SSD resource = 100000/120 | SSD resource = 9000/120 | SSD resource = 10000/120 |
| Estimating the life of an SSD drive | 750 years | 833 years | 75 years old | 83 years old |
Of course, the user can use more rewrite cycles per day, but then the table indicators will be different. For example, if you rewrite an SSD on MLC memory chips 10 times a day, then the life cycle of this disk will be 7.5 years. Judge for yourself, with a 10-fold rewrite on this disk, you need to rewrite 1200 GB of information per day, which is quite a considerable amount.
Based on the information described above, an SSD with TLC memory chips is quite enough for the average PC user.
We solve problems by upgrading old SSDs
All new drives have a built-in SSD a special subroutine that removes garbage as it becomes full. This garbage removal mechanism is needed to maintain SDD performance. Solid state drives have been on the market for quite some time. In older versions of SSDs, some models do not have a mechanism to protect against garbage cleaning, as a result write speed on such disks drops noticeably. You can solve this problem by completely erasing the information on the disk and subsequently reinstalling Windows. In order not to reinstall Windows or split new partitions on the disk, below we will describe a method that preserves the previous state of the system.
First of all, you need to download the image from http://clonezilla.org Clonezilla, which will help us save all partitions. You can also use other means of system cloning and recovery. The process of creating a system image using Clonezilla It is simple and can be handled by both an experienced user and a beginner. After creating a full backup, you can start cleaning the disk. For this we need an image Linux Parted Magic and utility UNetbootin. You can download this software from the following sites: https://partedmagic.com And http://unetbootin.github.io. Using the utility UNetbootin You can write our image to a USB flash drive, creating a bootable drive from it. After creating a bootable USB flash drive, you can boot from it.

Now on the desktop we will find the program “ Erase Disk" and let's launch it.

In the program window that opens, find the item “ Internal Secure Erase" and click on it. After this, a window should open asking you to select your SSD. Having selected the required disk, the overwriting process will begin. After cleaning, restore the system using Clonezilla. The restored Windows should function as if you had a new SSD.
With the help Linux Parted Magic the user can split and create new partitions on the SSD. You can partition and create a partition on a solid-state drive in the same way as on an HDD hard drive.
We solve problems with performance, BIOS and SSD firmware
The most common problem malfunction, or when the computer does not see the SDD, is old version of motherboard BIOS microcode. You can update the BIOS on any released motherboard. Most often, the problem with SSDs occurs with older versions of motherboards with a new UEFI BIOS. In most cases, updating the BIOS is done using a downloaded microcode file and a USB flash drive. The BIOS file is placed on a flash drive and is used to update. Each motherboard manufacturer has detailed instructions on their website for updating the BIOS.
Be careful when updating the BIOS, as an incorrect update can damage the motherboard.
You can find out which BIOS version is installed on a Windows PC using the CPU-Z utility.

Many PC users buy SSDs to significantly speed up Windows. But with such an upgrade, you should take into account that most older PCs only support the SATA-2 connector. When connecting a solid-state drive to SATA-2, the user will receive a data transfer speed limit of 300 MB/s. It follows that before purchasing, you need to find out whether your motherboard supports the SATA-3 connector, which provides a throughput of 600 MB/s.
To make the SSD more stable, you can get rid of most errors using firmware. The firmware for an SSD is a microcode similar to the BIOS, thanks to which the drive functions. The firmware, as well as the BIOS, can be found on the official website of the SSD manufacturer. Instructions for updating can also be found on the manufacturer's website. Such firmware can solve the problem on some motherboards when the SSD does not see them.
The computer does not see the SSD due to cable or drivers
In addition to the problems described above, very often the motherboard does not see the SSD due to a problem cable or connector. In this case it will help cable replacement SATA to working order. Also, in many cases, the motherboard does not see due to a faulty SATA port, so you can solve this problem connecting to another port.

If you connect an SSD to a computer running on an HDD, you may encounter a situation where it does not see it. The system does not see the installed SSD due to old drivers. This problem can be solved by updates such drivers, like Intel Rapid Storage Technology Driver and AMD AHCI Driver.
SATA AHCI
AHCI is a required mode for the controller to work properly with your SSD. This mode allows the SATA controller to enable new functions, including increasing the speed of the SSD. Unlike the old IDE mode, AHCI mode provides the following advantages:
- AHCI mode support for hot swapping of connected drives in Windows;
- AHCI improves productivity when using NCQ technology;
- AHCI mode allows you to use a transfer speed of 600 MB/s (relevant for SSD drives).
- AHCI mode includes support for additional commands such as TRIM.
When installing Windows on a modern motherboard, it is not necessary to enable AHCI mode in the settings, since it is the default, but if you previously used an older Windows, for example, Windows XP, then you should switch the operating mode from IDE to AHCI. The figure below shows the BIOS settings of an MSI motherboard with AHCI mode enabled.

It is also worth noting that if you installed Windows 7 after XP, then after switching to AHCI mode, the BIOS firmware sees the installed seven in IDE mode, and subsequently you will get a blue screen. In this case, reinstalling Windows 7 in AHCI mode will help.
How to properly partition an SSD disk
Many PC users on forums often have this question: how to properly partition an SSD disk. The answer to this question is quite simple - there is no fundamental difference when partitioning disks between SSD and HDD. Therefore, if you have experience in partitioning HDDs, then you can also partition SDDs. The only point that needs to be taken into account is the capacity of the SSD and HDD, which is much higher for the latter. For example, the volume of the system disk must correspond to the size of the software installed on it and the free space for its proper functioning.
Let's sum it up
After reading this material, each of our readers will be able to see what the advantage of modern solid-state SSDs is over hard HDDs. Also in this material, our readers will find ways to solve problems related to SSDs. It is also worth noting that solid-state drives must be configured correctly in the operating system. For these purposes, we have an article “How to set up an SSD for Windows 7, 8 and 10”, which will help you configure the SSD correctly.
Video on the topic
When purchasing a computer or installing Windows or another OS, many users want to split the hard drive into two or, more precisely, into several partitions (for example, drive C into two drives). This procedure makes it possible to store system files and personal data separately, i.e. allows you to save your files in case of a sudden system crash and improve the performance of the OS by reducing fragmentation of the system partition.
Update 2016: new ways to split a disk (hard or SSD) into two or more have been added, a video has also been added on how to split a disk in Windows without programs and in the AOMEI Partition Assistant program. Corrections have been made to the manual.

There are several ways to partition a hard drive (see below). The instructions discuss and describe all these methods, indicating their advantages and disadvantages.
- In Windows 10, Windows 8.1 and 7 - without using additional programs, using standard tools.
- During OS installation (including how to do this when installing XP).
- Using free programs Minitool Partition Wizard, AOMEI Partition Assistant, and Acronis Disk Director.
How to partition a disk in Windows 10, 8.1 and Windows 7 without programs
You can partition a hard drive or SSD in all the latest versions of Windows on an already installed system. The only condition is that there be no less free disk space than you want to allocate for the second logical drive.
To do this, follow these steps (in this example, the system drive C will be partitioned):
After these steps, your disk will be divided into two, and the newly created one will receive its own letter and will be formatted into the selected file system. You can close Windows Disk Management.
Note: You may later want to increase the size of your system partition. However, it will not be possible to do this in the same way due to some limitations of the considered system utility.
How to partition a disk using the command line
You can split a hard drive or SSD into several partitions not only in Disk Management, but also using the command line in Windows 10, 8 and Windows 7.
Be careful: the example shown below will work without problems only in cases where you have a single system partition (and possibly a couple of hidden ones) that needs to be divided into two partitions - for the system and data. In some other situations (MBR disk and already have 4 partitions, when shrinking the disk, there is another disk "after" it) this may work unexpectedly if you are a novice user.
The following steps show how to split the C drive into two parts at the command prompt.
Done, now you can close the command line: in Windows Explorer you will see the newly created disk, or rather, the disk partition with the letter you specified.
How to partition a disk in Minitool Partition Wizard Free
Minitool Partition Wizard Free is an excellent free program that allows you to manage partitions on disks, including dividing one partition into two or more. One of the advantages of the program is that a bootable ISO image with it is available on the official website, which can be used to create a bootable flash drive (the developers recommend doing this using Rufus) or to burn a disc.
This makes it easy to perform disk partitioning in cases where this cannot be done on a running system.
After loading into Partition Wizard, you just need to right-click on the disk you want to split and select “Split”.

The next steps are simple: adjust the partition sizes, click OK, and then click the “Apply” button at the top left to apply your changes.

You can download the Minitool Partition Wizard Free bootable ISO image for free from the official website https://www.partitionwizard.com/partition-wizard-bootable-cd.html
Video instruction
I also recorded a video on how to partition a disk in Windows. It shows the process of creating partitions using standard system tools, as described above, and using a simple, free and convenient program for these tasks.
How to partition a disk during installation of Windows 10, 8 and Windows 7
The advantages of this method include its simplicity and convenience. Partitioning will also take relatively little time, and the process itself is very clear. The main disadvantage is that the method can only be applied when installing or reinstalling the operating system, which in itself is not very convenient; in addition, there is no possibility of editing partitions and their sizes without formatting the HDD (for example, in the case when the space of the system partition has run out and the user wants add some space from another hard drive partition).
If these shortcomings are not critical, consider the process of disk partitioning during OS installation. These instructions are fully applicable when installing Windows 10, 8 and Windows 7.
Attention! When you delete disk partitions, all data located on them will be deleted.
Partitioning a hard drive when installing Windows XP
During the development of Windows XP, no intuitive graphical interface was created. But although control occurs through the console, partitioning the hard drive when installing Windows XP is as easy as when installing any other operating system.
Step 1. Delete existing partitions.
You can repartition the disk while defining the system partition. You need to split the section into two. Unfortunately, Windows XP does not allow this operation without formatting the hard drive. Therefore, the sequence of actions is as follows:
Step 2. Create new partitions.
Now you need to create the necessary hard disk partitions from the unallocated area. This is done quite simply:
Step 3. Determine the file system format.
After the partitions are created, select the partition that should be system and press Enter. You will be prompted to select a file system format. FAT format is more outdated. With it you will not have problems with compatibility, for example, Windows 9.x, however, due to the fact that systems older than XP are rare today, this advantage does not play a special role. If you also consider that NTFS is faster and more reliable and allows you to work with files of any size (FAT - up to 4GB), the choice is obvious. Select the desired format and press Enter.
Then the installation will proceed in standard mode - after formatting the partition, the installation of the system will begin on it. You will only be required to enter user parameters at the end of the installation (computer name, date and time, time zone, etc.). As a rule, this is done in a convenient graphical mode, so it is not difficult.
Free AOMEI Partition Assistant
AOMEI Partition Assistant is one of the best free programs for changing the structure of partitions on a disk, transferring a system from HDD to SSD, and, among other things, you can use it to split a disk into two or more. At the same time, the program interface is in Russian, unlike another good similar product - MiniTool Partition Wizard.
Note: despite the fact that the program claims to support Windows 10, on my system it did not partition for some reason, but no failures occurred (I think it should be fixed by July 29, 2015). Works without problems in Windows 8.1 and Windows 7.
After launching AOMEI Partition Assistant, in the main program window you will see the connected hard drives and SSDs, as well as the partitions on them.

To partition a disk, right-click on it (in my case on C), and select the “Partition Partition” menu item.
At the next step, you will need to specify the size of the partition to be created - this can be done by entering a number, or by moving the separator between the two disks.

After you click OK, the program will display that the disk has already been partitioned. In fact, this is not the case yet - to apply all the changes made, you must click the “Apply” button. You may then be warned that your computer will restart to complete the operation.

And after the reboot, you will be able to observe the result of disk separation in your Explorer.
Other programs for creating partitions on your hard drive
There is a huge amount of different software for partitioning a hard drive. These are both commercial products, for example, from Acronis or Paragon, and distributed under a free license - Partition Magic, MiniTool Partition Wizard. Let's look at dividing a hard drive using one of them - the Acronis Disk Director program.
How to partition a hard drive in MacOS X using standard means
You can partition your hard drive without reinstalling the operating system or installing additional software on your computer. In Windows Vista and higher, the disk utility is built into the system, and this is also the case in Linux systems and MacOS.
To partition a disk on Mac OS, do the following:
After this, after a short (for SSD anyway) partition creation process, it will be created and available in the Finder.
I hope the information is useful, and if something doesn't work as expected or you have questions, please leave a comment.
Partitions divide one physical disk into multiple logical drives (partitions). Each of them uses its own portion of an assigned portion of the physical hard drive and is treated by the operating system as a drive with its own drive letter.
Technically, every physical drive already contains a logical one, without it you won't be able to write files. And if you bought your PC with Windows pre-installed, it probably already has two or three partitions. Only one of them, C:, usually fills almost the entire physical disk - for regular use. Others, each of which is quite small in size, are used for maintenance and restoration purposes.
So, why do you need to split your C: drive into several partitions?
The first reason is the use of multiple operating systems.
Another reason, which in my opinion is the main one for most users, is the need to separate system and application data. This way, you can place the operating system on one disk, and all your data on the other. This is very convenient if you have to reinstall your OS in the future. And in this case, creating an image of your system partition is much easier.
Believe me, there is no greater nightmare than seeing a user have a 1 TB (or even more) hard drive with only one partition, and, as a rule, more than half filled with all sorts of rubbish, which when reinstalling the OS you are asked to save, and at the same time you simply do not have additional space.
The work of reinstalling the OS in this case can take almost a whole day instead of the standard hour.
How to crash your hard drive?
In this article we are looking at a computer running Windows 8.1
To access Disk Management, you need to press Alt-X and select Disk Management.
Figure 1 Shrink volume
As you can see from Fig. 1, you can shrink your volume (partition) in order to then create a new partition in the free space.
As you can see, creating a new section is not at all difficult.
So, the disk partitioning algorithm is:
- Perform a disk cleanup
- Carry out defragmentation
- Shrink the corresponding volume
- Create a new partition in the free unallocated space.