Introduction
Text formatting
Setting Paragraph Options
Entering characters
List Maker
Working with styles
Practical part
Introduction
Any office software package needs a good text editor, and Microsoft Word is among the best. The standard text layout tools available in it make it easy to format it, customize margins, create enumeration lists, styles, create indents and drawings, graphics, headers and footers, etc.
Getting to the first acquaintance with the Microsoft Word word processor, you should perform a number of initial settings. Some of the automation tools available in the program can distract the novice user from the main task - mastering the basic techniques. In some cases, due to the work of automatic means, the results of operations are unexpected - this prevents the establishment of feedback and the effective assimilation of practical techniques. Diagram
The purpose of the test is to study the functionality of the word processor Word, namely:
Formatting characters and paragraphs;
Format copying (format brush);
Enum lists;
The basic principles of practical work are related to the version number of the program. The basic principle here is that the more features a program has, the stricter one must be in choosing those functions that can be used in each specific case. A convenient approach is when the set of acceptable means of designing and formatting a document is determined by its customer.
Starting with the seventh version, Microsoft Word supports the ability to self-configure toolbars. The setting is performed by the user by connecting the functional panels necessary for him by the type of activity (View>Toolbar). The expansion of the general toolbar is accompanied by some reductions in the area of the working document window. The movement of functional panels is carried out by dragging the rib located on the left edge of the panel.
In the latest version of the word processor, the toolbars are not only customizable, but also context sensitive. So, when you select an object in the document field, it automatically opens a toolbar designed for editing it.
General information about Microsoft Word
The general name for software tools designed to create, edit and format simple and complex text documents is word processors. People
The original version of the Microsoft Word word processor belongs to the MS-DOS operating system. This system is not graphical and cannot comply with the accepted principle of matching the screen image to the printed one (the WYSIWYG principle).
The WYSIWYG principle was first implemented by a version of a program called Microsoft Word for Windows. Thanks to this principle, document formatting techniques have become much simpler and clearer.
The next version of the program was called Microsoft Word 95. It was focused on the Windows 95 graphical operating system. The main achievement of this system was that after it the word processor was not considered only as a separate application. As part of a powerful office suite Microsoft office includes several applications (with each new version of the package, this composition is expanding), and the Microsoft Word processor is assigned additional functions for integrating other applications. It occupies a central position in the system and allows organizing effective data exchange between component applications, which has made it possible to automate the development of office documents of various content and complexity to a large extent.
Another important innovation in this version was the management of the interaction of text with embedded objects, which greatly expanded the range of possibilities when formatting documents. And the special success of this version of the program in Russia was won by the built-in means of supporting the Russian language (Automatically check spelling and grammar).
A later version of Microsoft Word 97, included in the Microsoft Office 97 package, made relatively few practical changes to everyday office work. Schedule
Starting with this version, the Microsoft Word word processor can be considered as a means of automating authoring. When using this program, you should clearly define the target object - an electronic or printed document. For different types of documents, different means, techniques and methods are used. The use of inadequate means significantly complicates the subsequent stages of working with documents.
An improved version of the word processor is Microsoft Word 2000, which is part of the Microsoft Office 2000 package. It has significantly improved the management system and introduced powerful tools for supporting network modes of operation.
This is a set of programs of about 25 MB, located in a separate folder or in a shared folder of the MS Office package.
You can start Word from the panel
To work with a previously created file containing a Word document. You can call a text editor. By double-clicking the left mouse button on the name of this file.
To exit Word, close its window in any known way. If the modified document has not been written to a file, Word will ask you to save the document or confirm the need to exit without saving it.
Text formatting
Text formatting is the procedure for designing a page of text.
It is carried out by means of the Format menu or the Formatting panel. Basic formatting techniques include:
Selecting and changing typeface fonts;
Font size control;
Font style and color management;
Alignment method control;
Create bulleted and numbered lists;
Paragraph control.
Setting Paragraph Options
Paragraph - a piece of text, the input process of which ends with pressing the enter key
the amount of indent to the left (from the left margin);
the amount of indent to the right (from the right margin);
the indent value of the first line of the paragraph (red line);
the amount of spacing (space between paragraphs) before and after a paragraph.
For printed documents, the amount of indentation for the main text, as a rule, is not set (the required position of the text is determined by the width of the margins), but it is set for additional materials and headings if they are not centered. At the same time, for Web pages, the amount of indentation is of great importance. It is one of the very few formatting options allowed for Web documents, so it is widely used.
The role of spacing between paragraphs, like the role of indenting the first line of a paragraph, is to visually highlight the paragraph. It should be remembered that these tools are not compatible. That is, when indenting the first line of a paragraph, you should not use spacing between paragraphs, and vice versa. A combination of these styles is allowed only for bulleted and numbered lists (the main text is indented with the first line indented, and lists without it, but with a space between paragraphs).
The usual practice of setting the format is that for documents of a simple structure (fiction) they use the indentation of the first line (this is especially important for texts in Russian and German), and for documents of a complex structure (technical) and documents in English, spacers are used between paragraphs . An intermediate position is occupied by documents related to the natural sciences and humanities - in their preparation, in addition to the point of view of the author, they are guided by established practice and established traditions.
Web documents only use spacing between paragraphs. The indentation of the first line is usually not used in them, and due to the increased difficulties in creating it.
Entering characters
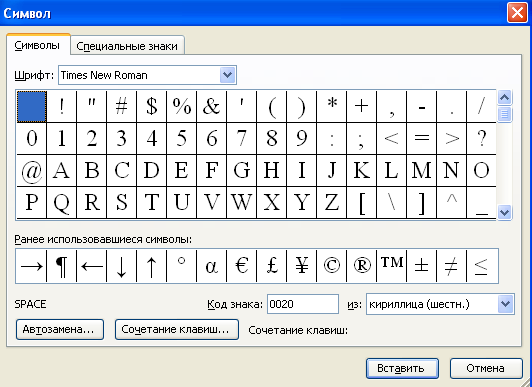
When entering text, there is often a need to enter special characters that do not have a corresponding key in the keyboard layout, as well as arbitrary characters for which the layout is unknown.
The main tool for entering symbols, as well as for assigning them to favorite keys, is the Symbol dialog box (Insert>Symbol). In the same window, there are AutoCorrect and Key buttons that allow you to either enter special characters with regular characters and automatically replace them, or assign a special character to your favorite key combination.
Symbol insertion and replacement modes. The word processor provides the ability to choose between two text editing modes (insert and replace) In insert mode, typed text<раздвигает>existing text that was at the insertion point. The insert mode is used when developing the main content blocks of text documents, and the replacement mode is used when editing standard forms and standard elements (headers, footers, service records, letterheads).
List Maker
In text documents, enumerations of different types of design in the form of lists. When creating lists, each paragraph is considered a separate list item and is assigned a corresponding number or marking. So the way the list is styled is the paragraph formatting option.
The numbering of paragraphs of the list is performed automatically, and editing in case of a change in the location of a paragraph, it is automatically renumbered.
There are the following types of lists.
Numbered - list items (paragraphs) are numbered in order.
Marked - the elements of the list are marked with some specially designated symbol.
Multilevel list - list items are numbered with their level displayed.
List Views
The special design of bulleted and numbered lists is rarely used in artistic documents and personal correspondence, but in official documents, especially in Web documents, it is used very widely. In Web documents, the design of bulleted lists is especially enhanced by the use of specially graphic markers, the styles of which should be thematically combined with the content and design of documents.
To create lists, you must first configure, then enter the list, and finally exit it. Customization is performed in the List dialog box opened by the Format>List command. This window has three tabs: List, Numbered List and Bulleted Multilevel List. Lists are presented here as controls. To select the desired one, just click on the selected sample.
Entry into the list can be done automatically or by command. To automatically create a bulleted list, it is enough to start writing a line by entering a character<*>. At the end of the line and pressing the ENTER key, the character<*>is automatically converted to a marker, and on the next line the marker will be set automatically. To automatically create a numbered list, just start the line with a number followed by a dot and a space, for example<1.>, <2.>etc. This method allows you to start numbering from any point (not necessarily from one).
To create a list on command, use the Numbering and Bullets buttons presented on the Formatting panel.
For lists with very deep nesting of levels (more than three), you can customize the appearance of each level. To do this, use the Modify command button on the Multilevel tab of the List dialog box.
Copying and moving sections of text
When developing business documents, the same words and target phrases can be used in the text. In order not to re-enter text, use the copy operation. Also, when editing text, you have to move its individual fragments from one place to another. These operations are performed in two ways - without using the clipboard and using the clipboard.
The clipboard is a section of RAM in which text or graphic information is temporarily placed.
The contents of the clipboard are pasted into the document as needed. When new information is placed on the clipboard, the old data in it is deleted.
Moving text without placing it on the clipboard is done using the Drag and Drop method (drag and drop), for which you need:
highlight the selected text;
place the mouse pointer on the selected section of text, press the left mouse button and do not release it (i.e., grab the text). In this case, the text cursor will take the form of dashed vertical lines, and a small rectangle will appear at the lower end of the mouse pointer;
not letting go left button and moving the mouse pointer, set the dashed text cursor to the place where you want to move the selected section of text;
Release the left button and deselect.
Copying text without moving it to the clipboard is performed in the same way as moving it, only you need to press and hold the (Ctrl) key in this position. The sign will appear at the top of the mouse pointer.<+>.
To work with the clipboard, you must use the buttons that duplicate the commands: Cut, Copy, Paste from the Edit menu, which, when Word is installed, is automatically displayed on the toolbar. If these buttons are missing for some reason, they can be installed using the Toolbar command from the View menu.
When using the clipboard, text sections are moved in the following order:
Select text;
Click on the button (Cut);
Copying a section of text is done in the same way:
Select text;
Click on the button (Copy);
Set the text cursor to the desired location;
Click on the button (Insert).
Working with styles
A paragraph is an elementary design element of any document. Each document heading is also treated as a separate paragraph. Above we can see that the Format>Paragraph menu has the start of various Controls, and setting them up on a per-paragraph basis is an inefficient and tedious task. It is automated by using the concept of styles.
A design style is a named set of settings for font, paragraph, language and some paragraph design elements (lines and frames).
The use of styles ensures that paragraphs and headings of text are easily formatted, as well as the uniformity of their design throughout the document.
A feature of Word word processors is that they support two types of styles: paragraph styles and character styles (character styles). Paragraph styles are used to format paragraphs, and character styles can be used to change the appearance of selected text fragments within a paragraph. The presence of two styles allows you to implement quite complex formatting techniques, for example, when a paragraph in one font contains fragments of text in a different font.
Working with styles consists of creating, configuring and using styles. A number of standard styles are present in the default settings of the program, immediately after installation. They are used by selecting the desired style from the drop-down lists on the Formatting control panel.
Style setting. Style settings are performed in the Style dialog box (Format>Style). To change the style, use the Modify command button, which opens the Style Changes dialog box. Each of the style components is configured in a separate dialog box. Component selection is performed in the menu opened with the Format command button.
When customizing a style, it is important to select the correct source style. It should be as close to what you want as possible to minimize the amount of tweaking required.
Style creation. To create a style, use the New command button in the Style dialog box (Format>Style) - it opens the Create Style dialog box.
This window should:
enter the name of the style in the Name field;
select the type of style (paragraph style or character style);
select the style on which the new style is based;
specify the style of the next paragraph;
start customizing the style elements by clicking on the Format button.
An important feature of the program is the principle of style inheritance. It consists in the fact that any style can be based on some of the existing styles. This allows, firstly, to reduce the style setting to a minimum, focusing only on its differences from the base one, and secondly, to ensure the principle of unity in the design of the entire document as a whole. So, for example, when the base style changes, the inherited elements will automatically change in the styles created on its basis.
The style of the next paragraph is specified to ensure that the style is automatically applied to the next paragraph after the previous paragraph is closed with the ENTER key.
The development of new styles and their customization are quite complex technological operations. They require careful planning, thoughtfulness, and care, especially since, according to the principle of style property inheritance, desired changes in one style can lead to undesirable changes in many other styles.
Due to the complexity of studying and mastering the techniques of practical work with styles, novice users often neglect them. Indeed, when developing small documents, you can do without setting up and using styles by doing all the necessary formatting manually using the Format menu. However, when developing large documents manually, it is very difficult to ensure uniformity of design, especially if different sections of the document were developed by different authors.
Therefore, it is necessary to come to the use of styles as early as possible. The correct and rational use of these tools is the key to high efficiency of work with the Microsoft Word processor and high quality of the developed documents.
Practical part
Table created using Word.
Table 1
Excel table. Payroll.
Table 2.
Chart based on Excel spreadsheet data
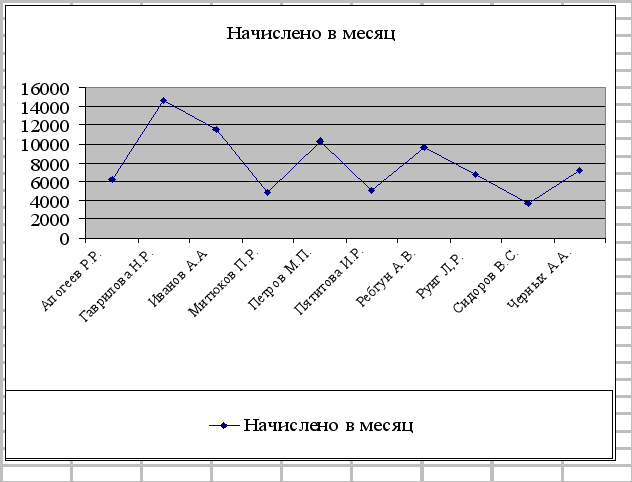
Diagram 1. Payroll indicators
List of used literature
Bezruchko V. T. Practicum on the course< Информатика>.l: Proc. allowance. - 2nd ed.-, 2003.
Workshop on Informatics / A. A. Zemlyansky; G. A. Kretova; Yu.R. Stratonovich; Ed. A. A. Zemlyansky. -M.: KolosS, 2003.
V. F. Lyanovich, S. O. Kramorov. Fundamentals of Informatics. 3rd edition. - Rostov-n / D: publishing house<Феникс>, 2004.
Informatics: Textbook. -3rd revision Ed./ Under the editorship of N. V. Makarova. –M.: Finance and statistics, 2003.
Microsoft Word 2000: Per. from English / J. Kreinak. – M.: OOO<Издательство АСТ>,2004.
Stratonovich Yu. R., Yashkova E. A. Text editor MS Word: Proc. Benefit. – M.: MSHA, 2005.
The basic rules for working with the Word text editor: launching the program, opening and saving a document, describing the capabilities of the toolbar. Inserting footnotes, drawings, diagrams, building tables, creating lists. Text formatting technique.
General information about the text editor Microsoft Word. Basic operations of the editor for working with documents. Launching the program, editing tools. Entering and correcting text, using the clipboard, formatting paragraphs, working with fonts.
Processing of text information in automated systems. Text editors and word processors. Document presentation methods.
Using the Word Wizards. Saving, closing, creating, editing a document. Type, add new, delete, highlight, copy, align and move text. Checking, printing a document. Additional features. Creating a table.
Appearance of the window, moving around the document window, selecting text. Dialog boxes"Font", "Paragraph". Paragraph formatting with a horizontal ruler. Page Setup dialog box, use and change styles, tabs, auto text.
Basic elements of text editors. Entering and editing text. Inserting special characters. Moving and copying text. Paragraph formatting. Indents and spacing.
Acquaintance and study of automation tools for formatting and designing structured documents. The sequence of steps required to change an existing document style. Table of contents formatting options. The concept of cross reference.
Word 2000 word processor. Professional document design features Text editor Word for Windows is a powerful tool for professional document preparation, but effective use of all the variety of its functions. The Word editor allows you to create a huge number of ...
1.1. BASIC TEXT OPERATIONS
Most documents intended for printing on paper, as well as many electronic documents, are textual, i.e. are blocks of text with pictures, tables, formulas, etc.
Operations editing(edits) allow you to change an existing electronic document by adding or deleting its fragments, rearranging parts of the document, merging several files into one or, conversely, splitting single document into several smaller ones. Thus, when entering and editing, a content text document. Registration document is specified by formatting operations. Teams formatting allow you to accurately determine how the text will look on the monitor screen or on paper after printing on the printer. Programs that allow you to both edit and format a document are called word processors . Part Windows systems includes a simple word processor WordPad, which is a simplified version of the professional word processor Microsoft Word.
^1.1.1. Structure of the Microsoft Word window
Most of the necessary commands and tools are easy to find on the toolbars Standard and Formatting or in Menu Microsoft Word. If you need help during work, call an assistant. If the assistant is not on the screen, press the button Assistant.
^
1.1.2. Working with a document
Saving a new document
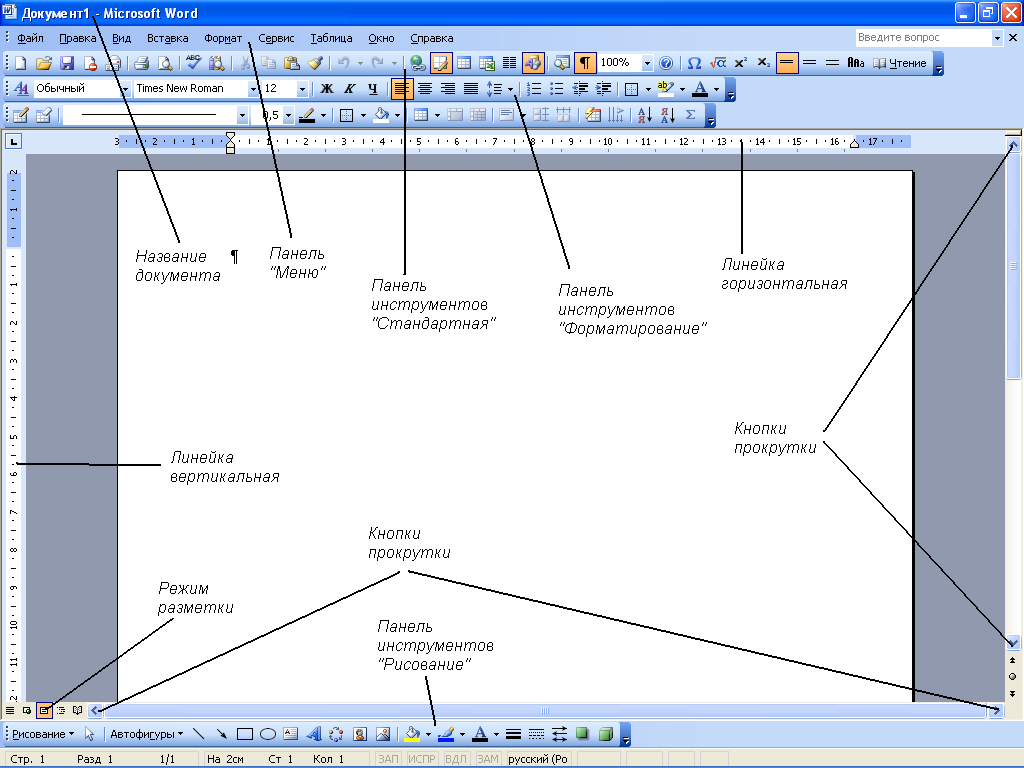
Rice. 1.1 - Appearance of the working window Microsoft editor Word
^
Opening a document on a hard or floppy disk
Note. To open a document created in another program, select the appropriate format from the list File type
, and then double-click the document name in the list. In addition, the file name extension can be specified in the field File name
.
^ Council. To open a document that you have worked with before, select its name from the list at the bottom of the menu File .
Move text can be done in several ways:
Cursor keys: UP?, DOWN?, RIGHT?, LEFT?;
Keys:
End - to the end of the current line;
Ctrl + Home - to the beginning of the document;
Ctrl + End - to the end of the document;
PageUp - up one screen;
PageDown - down one screen;
Ctrl + PageUp - one printed page forward;
Ctrl + PageDown - one printed page back;
ctrl + ? - one word back;
ctrl + ? - one word ahead;
ctrl + ? - one paragraph ahead;
ctrl + ? - one paragraph back.
^ Mouse by left-clicking on the desired location.
Inserting new text into existing text
Position the keyboard cursor where you want the new text to appear and type it. To quickly set the keyboard cursor to the desired place in the text, click in this place with the mouse.
Inserting a new line
Position the cursor at the end of the line after which you want to insert new line, or to the beginning of the line before which you want to insert a new line, and press the key Enter.
Cancel actions
To cancel any operation (transfer, delete, paste, etc.), press the button Cancel located on the panel Standard. Pressing this button again will cancel the earlier operation, and so on.
Redoing undone actions
Press the button immediately after canceling Return panels Standard.
Highlight A piece of text can be done in several ways:
At the beginning (or end) of the fragment, press left mouse button and, without releasing it, drag until the entire fragment is selected, then release the button. This method is not convenient when you need to select either a very large or a very small fragment.
Text can be selected using keyboard: position the cursor at the beginning (or end) of the fragment, press Shift + ? (or Shift + ?) and don't let go until the part you want is selected.
^ Mouse and Keyboard Combination . To highlight one word- execute double click left mouse button; one sentence– Ctrl + click; one paragraph- triple click; entire text- the same methods as when selecting a sentence or paragraph, only the mouse pointer should be to the left of the text and look like an arrow from left to right. If you need to select several words in a row, you need to click at the beginning, and then at the end while pressing the Shift key. If you need to select several fragments of text located in different places in the text or on different pages, it is necessary to hold the Ctrl key and select the necessary fragments with the left mouse button.
Cut, copy and paste
Cut, copy and paste operations are used so often that developers Office programs provided several ways to execute these commands at once. Four ways of cutting, pasting and copying fragments are supported. The corresponding commands are available in the menu. Edit and in the context menu (Fig. 1.2). Content editing command buttons can always be found on the toolbar Standard. Alternatively, the same commands can be executed by pressing the following keyboard shortcuts:
cut - Ctrl + X or Shift + Delete;
copy - Ctrl+C or Ctrl+Insert;
Paste – Ctrl+V or Shift+Insert.
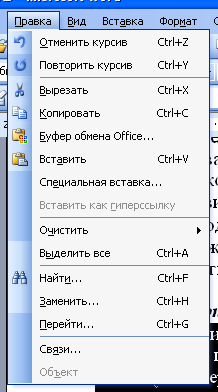
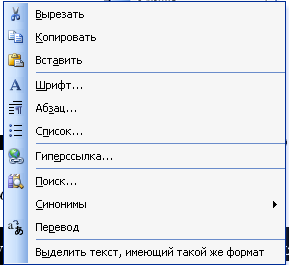
a) b)
Rice. 1.2 - Cut, copy and paste commands in the menu Edit (a)
and in the context menu ( b)
1.2. FORMATTING MICROSOFT WORD DOCUMENTS
^
1.2.1. Basic operations on a document
You can start creating a document by clicking the button Create panels Standard or using the menu File commands Create . Wherein Window document will be cleaned and prepared for input.
Formatting operations serve to give the document the proper look. Text formatting is carried out by means of the menu Format or panels Formatting .
The main objects for formatting a Microsoft Word document are:
page;
paragraph;
symbol.
setting page parameters;
setting paragraph parameters;
setting font parameters;
leveling method control;
creating lists.
pages are:
paper size;
fields;
orientation.
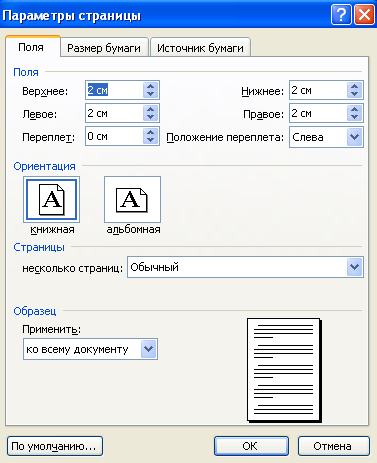
Rice. 1.3 - Setting page parameters
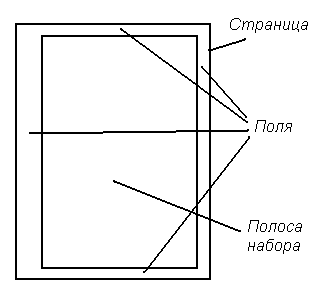
The page size depends on paper size on which the document will be printed, and on the orientation of the document ( bookstore or landscape). fields are empty areas at the top, bottom, right and left of the page. The rest of the page is occupied dialing strip- the place where the contents of the document will be displayed.
Margin sizes can also be set using the formatting rulers. To do this, place the mouse pointer on the border between the light and dark parts of the ruler so that it takes the form of a double-headed arrow and, pressing the left mouse button, drag this arrow in the desired direction.
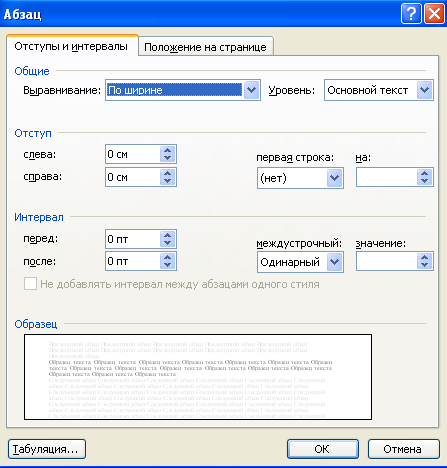
Paragraph setting
Paragraph a fragment of text is called, at the end of which there is a non-printing sign "¶" - a sign of the end of a paragraph, visible in display mode Non-printable characters.
Basic formatting options paragraph are:
indents;
tab stops;
text alignment;
intervals.
Indent values are specified in the dialog box Paragraph by command: Format ? Paragraph(Fig. 1.4) . Suggested Changes appearance paragraphs are displayed in the window Sample.
You can also set the paragraph using the horizontal ruler. To do this, move the paragraph marker to the desired position.
Rice. 1.4 - Paragraph setting
For heading text lines, the "red line" indent should be absent. To delete it, you need to set the paragraph marker to zero (border of light and dark fields) or use the command Paragraph menu Format , while in the field First line: install (No).
Before you format a paragraph, you must place a text cursor in it.
The left indent can also be changed using the buttons ^ Increase indent and Decrease indent on the Formatting panel, the indent measurement step is 1.25 cm.
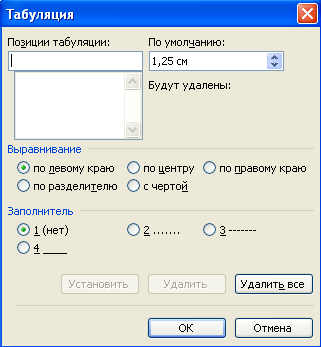
Tab stops allow you to automatically set the cursor to a specific line position when you press the Tab key on your keyboard.
Tab stops are set in the dialog box Tabulation on command Format ? Paragraph ? Tabulation(Fig. 1.5).
By default, tab stops in Microsoft Word documents are spaced at 1.25 cm intervals. These tab stops are marked with gray dashes at the bottom of the ruler ![]() .
.
Rice. 1.5 - Setting tabs
Text alignment
paragraph horizontal can be set using the buttons on the Formatting toolbar:
Text alignment in a document can also be done using the command Paragraph
menu Format
(field alignment
).
Intervals determine the interval before paragraph and after it, as well as the spacing between the lines of the paragraph.
The interval values are set in the dialog box Paragraph(see fig. 1.4).
To set the same formatting options for multiple paragraphs, you must select those paragraphs.
Basic formatting options characters are:
font (typeface);
the size;
inscription.
Character formatting is set in the dialog box Font
on command Format ? Font(Fig. 1.6) or using the drop-down lists on the Formatting panel (for example, ![]() ).
).
^ Font is a family of characters that have a similar style. Each such family has its own unique name - headset.
The size font is measured in units called paragraphs. One inch equals 72 points. The easiest way to change the font size is using the drop-down list in the Formatting panel.
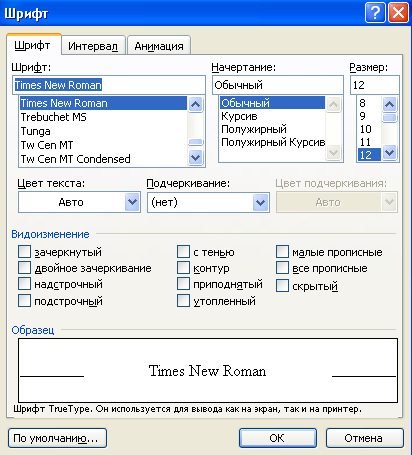
Rice. 1.6 - Font Formatting
By default, Microsoft Word uses the 12 point Times New Roman font. Typewritten text corresponds to the size 14.
Set bold, italic, or underline
Select a piece of text and click one of the buttons (bold), (italic), (underlined) located on the Formatting toolbar. Changing the style of the text can also be done using the command Font menu Format (field inscription ).
Removing bold, italic, or underlined writing
Select a fragment of text and press one of the buttons , , , which is pressed by the moment of cancellation.
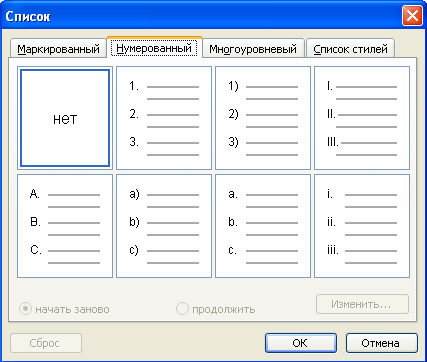
Create bulleted or numbered lists
In some cases, the text you enter needs to be formatted as a list. There are several types of lists in Microsoft Word:
- numbered(point numbers are set);
For example,
1. Simplicity of designs
2. Operational reliability
3. Minimum number of service personnel
4. No electricity costs
- marked(markers of various types are set for list items);
For example,
Varieties of bioplato structures:
Ruslovoe
Coastal
Estuary
floating
artificial and natural
Infiltration blocks
- multilevel(for complex lists in order to automatically set the numbers of subsections, paragraphs, etc.). In multilevel lists, each paragraph is bulleted or numbered depending on the level of indentation. A multilevel list can have up to 9 levels of nesting.
To format text in the form of a list of any kind, you must perform the following steps:
1. Select the text to be formatted
2. Enter the menu Format
3. Choose a team List… (Fig. 1.7)
4. Select the bookmark corresponding to the desired type of list
5. Select a list of the desired type
6. If necessary, press the button Change… and set the desired list formatting options
7. Confirm the selection of the desired list
Rice. 1.7 - Formatting text as a list
Text coloring
For colorful design of the document or for the semantic highlighting of special elements of text, highlighting is used. To highlight with color, you need to select the text to be formatted, and then, using the button Font color panels Formatting, set the desired color. A similar operation can be performed using the command Font menu Format (field Text color ).
Using non-printable characters
In Microsoft Word, there are a number of service non-printing characters used in the competent professional drafting of a document. These characters allow you to see the end of a paragraph, the end of a table cell, the number of spaces, etc. Paragraph character ¶ is one of those characters. To view such characters in a document, click the button Nonprinting characters panels Standard. Unnecessary (extra) non-printable characters, including the paragraph symbol ¶ , are removed as regular characters using the keys backspace or Delete .
^
1.2.2. Techniques for working with text
Spelling and grammar control
To check the correctness of typing and automatically correct spelling and grammatical errors, special service features are used as follows:
1. Enter the menu Service
2. Run command Spelling
3. Analyze the error found by the editor, depending on its “status”, perform the following actions:
if a grammatical error is found, analyze it; correct the text in the window if necessary Grammar mistake and press the button Change, or do not correct the text and click the button Skip ;
if a spelling error is found - in the window Options select the desired replacement option and click the button Replace ;
if in the window Options there are no words to replace, correct the text manually and press the button Change .
Inserting symbols
Sometimes, when preparing documents, it becomes necessary to use Special symbols, which are not in the standard font, for example, the arrow symbol.
To insert the desired character into the text, do the following:
In addition to standard characters, you can also enter Special characters. To do this, select the tab of the same name (Fig. 1.8).
Rice. 1.8 - Symbol Dialog Box
^
1.3. WORKING WITH TABLES
Table is a set cells, organized as lines and columns. Typically, tables are used to present data in an organized way. Each cell of the table may contain information of the following type: textual, numerical, graphic.
Working with tables in Microsoft Word is carried out in two main ways:
1.3.1. Create and format a table
To create a table, follow these steps:
Similar actions can be performed using the menu Table
commands Add table.

Rice. 1.9 - Creating a table
Table selection
Selection, as well as creating a table, can be done in two ways:
Iway : find the table control icon located in the upper left corner above the table and click on it with the left mouse button.
IIway : set the mouse pointer to any table cell, enter the menu Table and run the command Select table .
Select rows, columns, table cells
The selection of the structural components of the table can also be carried out in two ways:
Iway : set the mouse pointer above the selected column, to the left of the selected row, in the lower left corner of the selected cell so that the pointer takes the form of an arrow (normal in the case of a row and a certain type in the case of a column or cell) and click the left mouse button .
IIway : set the mouse pointer to the highlighted line (column or cell), enter the menu Table and run the command Select line (Select column or Select cell ).
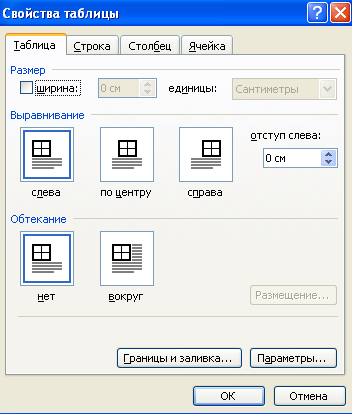
Setting table sizes
Using the menu Table commands Table properties (Fig. 1.10) you can set the size of the rows and columns of the table, the location of the table on the page, etc. Consider the mechanism for setting the exact width of the table columns:
Highlight table
Enter menu Table
Choose a team Table properties
Make sure you are on the tab Table
Call table parameters (button Options…)
Cancel table autosizing (uncheck)
Confirm table parameters change
Go to tab Column
Consistently set the required width of each column, use the buttons to navigate between columns Next column and Previous column.
Confirm table dimensions
Rice. 1.10 - Setting the size of the table
Table text alignment
To center tabular text, both horizontally and vertically, do the following:
Aligning the table with respect to the page:
Highlight table
Using standard alignment buttons ^ Left, Centered, Right, By width located on the panel Formatting, set the required alignment for the table.
Changing the table layout
Very often there are situations when it is necessary to add rows, columns, cells to a previously formed table or, conversely, remove extra rows, columns or cells from the generated table.
Adding Rows, Columns, Cells :
Highlight row, column, cell next to which you want to add a similar table element
Enter menu Table
Run command Add… and select the table element you want to add and its location relative to the selected row (column, cell)
Highlight row, column, cell to be deleted
Enter menu Table
Run command Delete… and select the table element you want to delete (rows, columns, cells)
Table breakdown
In some cases, situations arise when it is necessary to split the original table into several or insert an empty line at the beginning of the document, in the case when the document was started from a table. To do this, you must perform the following steps:
Set the mouse pointer (or select) the line before which you want to insert a break (in the case of inserting an empty line at the beginning of the document, this is the first line of the table)
Enter menu Table
Run command split table
Table text direction
By default, text in a table is in the horizontal direction. But there are times when the text does not fit within the given column width. In this case, you can change text direction using the panel Tables and Borders button ^ Text direction . The text to be changed must first be selected.
Decorating Table Cell Borders
To decorate the borders of table cells, it is convenient to use the toolbar ^
Tables and Borders
. Therefore, the first stage of design is activation this panel if it is not already active. To set the linetype of table borders, do the following:
In some cases, it is required to make table cell borders invisible. To do this, you need to follow the above action while choosing line type – no border.
To change the line thickness, the same actions are performed as when changing line type, only in this case the line thickness selection pointer is used, located on the toolbar ^ Tables and Borders .
In some cases, it is necessary not only to select a specific line type for the borders, but also to set a specific color for the borders of table cells. To do this, you must perform the following steps.
For faster design of table cells, you can use the menu Format option Borders and shading...(Fig. 1.11). You must first select the cells to be drawn up!
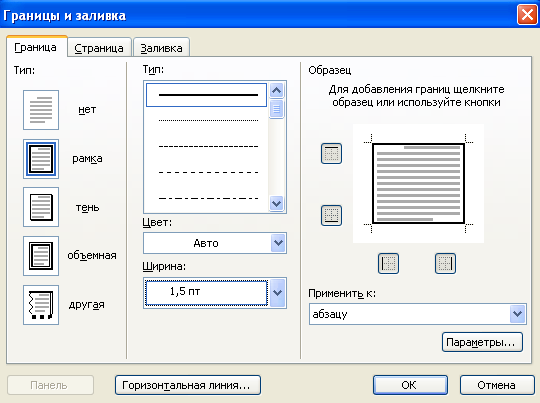
Rice. 1.11 - Borders and shading
Table color scheme
To fill table cells with a certain color, do the following:
^
1.4. WORKING WITH MATHEMATICAL FORMULA
1.4.1. Creating mathematical formulas
Each mathematical formula is inserted into Microsoft document Word as a separate specific object. Creating Math Formulas Using the Formula Editor Microsoft Equation 3.0 Quite convenient and effortless. To create mathematical formulas, follow these steps:
Enter menu Insert(because we need to insert a new object)
Run command An object
In the list of objects that appear, select Microsoft Equation 3.0(Fig. 1.12)
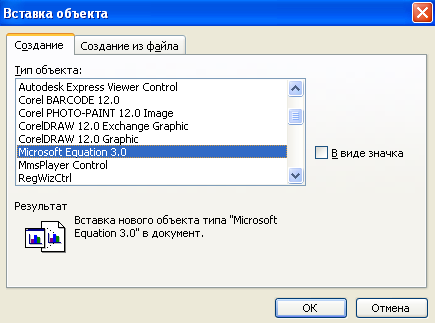
Rice. 1.12 - Selecting the formula editor Microsoft Equation 3.0
Using the toolbar

in the outlined area to enter the formula sequentially create a formula of the required form, templates or structures, including symbols such as fractions, radicals, sums, integrals, products, matrices, or various brackets, or appropriate pairs of symbols such as round and square brackets. Many templates contain special fields for entering text and inserting characters.
^ All characters that can be entered from the keyboard, enter from the keyboard, and do not try to look for a similar pattern!
The following is a description of the Microsoft Equation 3.0 formula editor templates:
Use the button to enter relationship symbols. « Relationship symbols» ;
Use the button to insert spaces and ellipsis. « Spaces and dots» ;
Use the button to insert various superscript characters. « Superscripts» ;
To insert symbols of mathematical operations that are not available on the keyboard, use the button « Operators» ;
To insert various arrows into the document, use the button « Arrows» ;
To insert logical symbols into a document, use the button « Logic symbols» ;
To insert set theory symbols, use the button « Set theory symbols» ;
To insert various characters not found on the keyboard, use the button « Miscellaneous symbols» ;
Use the buttons to enter uppercase and lowercase Greek characters. « Greek letters (lower case)» and « Greek letters (capital)» ;
To enter brackets of various configurations, use « Parentheses» , then in the input window that appears, enter the expression in brackets;
To enter a fractional expression, use « Fraction and radical patterns» , then enter them into the input windows for the numerator and denominator (to move between the input windows, use the keyboard arrows to control the cursor up , down , right , left or use the "mouse" to place the cursor in the desired input window);
To enter subscripts (powers, superscripts, subscripts) and create formulas with substrings, such as  , use « Superscript and subscript patterns»
, then select the desired index type and enter it in the index input window that appears. To continue entering the formula at the base level and not at the index level, press the right arrow
on the keyboard, also use other cursor keys to navigate through the formula;
, use « Superscript and subscript patterns»
, then select the desired index type and enter it in the index input window that appears. To continue entering the formula at the base level and not at the index level, press the right arrow
on the keyboard, also use other cursor keys to navigate through the formula;
To enter the desired sum symbol, use « Amount Templates» , then in the appeared windows for entering enter lower, upper summation limits and expression under the sum sign;
To create formulas with integrals, use « Integral Templates»;
To create expressions with an overbar or underbar, use « Underline and underline patterns» ;
To create labeled arrows, use « Arrow templates with inscriptions» ;
 - to insert product symbols and set theory templates, use " Patterns of products and symbols of set theory
»;
- to insert product symbols and set theory templates, use " Patterns of products and symbols of set theory
»;
To create vector columns and matrices use « Matrix Templates».
At the end of the formula input, click the "mouse" outside the formula input area (on the working field of the document) - you will exit from Formula Editor and you can continue working with the main document.
^
1.4.2. Formula Editing
Editing formulas in case of making changes or additions to them is performed as follows:
Place the mouse pointer on the desired formula and double-click the left mouse button - the formula editor toolbar will appear on the screen and the application menu bar will be temporarily replaced by the formula editor menu bar;
Make the necessary changes. You can add, change, or remove formula elements. To remove formula elements, use the standard keys backspace and Delete);
After finishing work, place the pointer outside the formula window and press the left mouse button to return to the document.
After entering the formula editor, the editor's own menu appears, in which you can edit the character sizes, font, font thickness, etc. . For example, to change the size of symbols, click on the button of the same name.
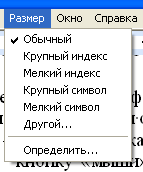
Here you can change each parameter individually or by pressing the button Define… you can set several parameters at once (Fig. 1.13).
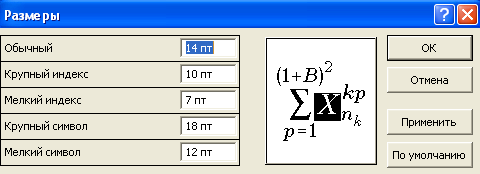
Rice. 1.13 - Setting dimensions in the formula editor Microsoft Equation 3.0
^
1.5. DRAWING WITH MICROSOFT WORD
1.5.1. Working with graphic objects
Microsoft Word has several tools that allow you to add pictures to your worksheet. You can insert a graphic created by another program, or create new, using the functions of the panel Painting or add finished picture supplied with Microsoft Word (Fig. 1.14).
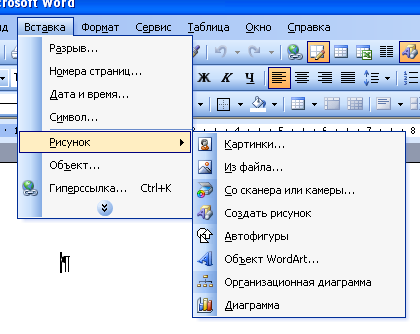
Rice. 1.14 - Inserting pictures and drawings through the menu Insert
See Section 3 for details on drawings.
1.5.2. Working with the panel Painting
Using panel tools Painting you can create a variety of drawings, diagrams, drawings within the capabilities of this editor (for example, Fig. 1.15).
To activate the panel Painting, click on the corresponding icon on the panel Standard. A panel will appear at the bottom of the working window.
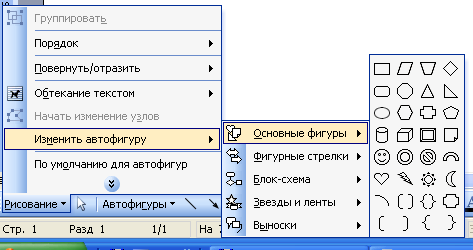
Adding a shape
![]()
Rice. 1.15 - Sample diagram created using the panel tools Painting
Adding Multiple Shapes
To add a line, circle or square, click on the toolbar Painting button Line, Oval or Rectangle. To insert several of these shapes into a document, double-click one of these buttons.
^
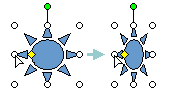
Reshape a polyline or curve
to change the shape of a polyline, drag one of the nodes that form its shape;
to add a node to a polyline, click where you want to add it, and then drag the line;
to delete a node, press the Ctrl key and click the node you want to delete.
Adding and Removing Arrows
Instead of inserting and deleting arrows on lines, you can change the line type.
Select the line you want to change.
Change the shading, color, or fill pattern
To use a pure color, select the desired color from the list or click the button Other fill colors.
To use artistic fill, click the button ^ Fill methods, and then open the tab gradient, Texture, Pattern or Picture. On these tabs, you can select the desired options.
Changing the contours of a graphic object
To use a solid color, select the desired color from the list or click the button ^ Other line colors .
To use a curly line, click the button patterned lines. Select the required options.
object reflection
Change the position of the shadow
Each time you press the button Move shadow the shadow moves 1 point.
To move the shadow in 6 point increments, click the button ^ Move shadow while holding down the SHIFT key.
Adding a caption and inserting text into AutoShapes
Adding an inscription
On the toolbar Painting press the button Inscription. A frame will appear with a cursor inside
Enter text inside the box. To prevent the borders of the frame from interfering with placing text on the created figure or diagram, you can remove the borders of the frame and the fill. To do this, right-click to call the context menu on the frame and press the button ![]() . In the dialog box that appears (Fig. 1.16) on the tab Colors and lines make the appropriate choice.
. In the dialog box that appears (Fig. 1.16) on the tab Colors and lines make the appropriate choice.
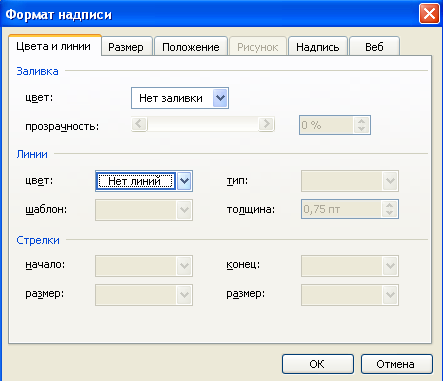
Rice. 1.16 - Formatting the inscription when drawing
Inserting text into an autoshape
Select an autoshape.
Perform one of the following actions.
To add text, right-click any shape (except for straight lines and polylines), in the context menu select the command Add text, and then enter the desired text.
To change or add to existing text, right-click any shape (except for straight lines and polylines), select the command from the context menu Change text, and then make the necessary changes.
Create a callout or label with a callout line
On the toolbar Painting press the button AutoShapes and select command Callouts, and then the desired callout type.
Click where you want to insert the leader, and then type the text for the leader.
The callout is resized by dragging it resize handles. The position of the callout is also changed by dragging.
Changing AutoShapes
Reshaping a Shape
Select the desired autoshape.
Hover your mouse over the yellow reshape handle.
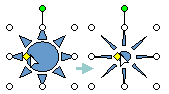
Hold down the mouse button and drag the handle to reshape the shape.
Shape change
Rice. 1.17 - Modifying an AutoShape
Grouping, ungrouping, and regrouping objects
Grouping objects
Ungrouping objects
Rearrange the objects
Note. After grouping objects, to select any one object within the group, you must first select the group, and then click the object you want to select.
Office programs are applications for creating, editing and printing electronic documents on a personal computer. Office applications are distributed, as a rule, in a set - as part of a package office programs. Currently, there are several office suites, both free and paid. The most popular software was Microsoft Office - an office suite of applications for Windows operating systems and some others. The package comes in several editions, differing in composition and price. Mandatory components of the package are a Word text editor and an Excel spreadsheet.
Word text editor, Microsoft Word, MS Word or, simply, Word is a program for creating, viewing and editing files with text data. We all have to type and edit text, print it out. The best way learn Word - start working in the application. When creating new documents, we choose the typeface and font size, line spacing, paragraph alignment and indents. We decorate the text with the necessary illustrations in the form of drawings, photographs, tables or diagrams. The program allows you to prepare printing projects of any complexity, from newsletters to magazines and books.
This is not a big task detailed review and scrupulous study of the numerous functions of Word. This topic contains only some interesting and helpful tips in the form of small guides - lessons that will help beginners to better master this vast program.
Consider first the concept of a document template in Word. The template is an already partially prepared document, in which it remains to enter the necessary data. The template contains a set of specific parameters: styles, autotext elements. macros, keyboard settings. Templates can also save formatted text fragments, graphics, frames, and other design elements. By default, documents in Word 2007 and Word 2010 are based on the Normal.dotm common template file. This means that when Word starts, it opens the Normal.dotm template file.
Now let's see how you can change the "Normal" template - Normal.dotm. Many people work in this one template developing different documents and each time they re-edit each new document. Creating and applying templates greatly simplifies and speeds up the production of relevant documents. The use of templates is one of the signs of skilled work in Word.
It also happens that the settings of the standard template suddenly change and instead of the usual font and its size (Times New Roman, 12 points), some other one is installed, for example, Calibri11.
How to return the default settings and how to create a new document template, and we'll talk in the lesson: Word templates.
When creating text in a Word, words that do not fit completely into the end of lines, by default, are completely transferred to the beginning of the following lines. Lines of different lengths do not look very aesthetically pleasing on the page. If you align such text in width, that is, both left and right, the spaces between some words will increase. This also looks bad. To correctly format line endings, you need to place hyphens in words. Let's see how to do it in the lesson: word hyphenation in Word "e.
When editing text, it happens that inserting a letter into a word to correct a spelling mistake, for example, results in a substitution. The inserted letter, as if eating the next letter. It is practically impossible to edit the text. How to change the settings and set the replacement and insert options correctly, read and watch the lesson: Word options.
It happens that while working in the editor, in a hurry, or out of absent-mindedness, we type entire paragraphs, forgetting to turn it off or accidentally pressing the "Caps Lock" key. And it turns out that all the words of the text consist of capital letters. In order not to interrupt the entire fragment again and quickly correct such an annoying oversight, we use a special keyboard combination. How to quickly change the case of text letters, read and watch a video tutorial: change text case.
Like other software The office suite receives periodic updates from its publisher. Updates are additions to programs that fix problems that improve security or performance. Default MS Office 2007 and MS Office 2010 important updates receive automatically.
It so happens that Word application 2007 was not closed before installing the next update and then restarting the computer. In this case, we can get a number of problems. The mouse does not work in the editor. When you try to close or save a document, the application crashes the session. Practically in a Word it becomes impossible to work. Reinstalling the program will not help here. This behavior in Word 2007 is a confirmed bug in Microsoft products.
And everything is solved quite simply. You need to delete the HKEY_CURRENT_USER\Software\Microsoft\Office\12.0\Word\Data registry subkey.
The registry is the central database of settings and settings for the Windows system. Close all MS Office applications and enter the registry. To do this, in the "Run" window, type in the "Open:" line the word "regedit" - the registry and confirm "OK".
In the "Registry Editor" window, sequentially open the folders and find the HKEY_CURRENT_USER\Software\Microsoft\Office\12.0\Word\Data subkey. Select it and in the "Edit" menu, select the "Delete" command:
In the confirmation dialog, click "Yes". Close the registry editor.
Do not forget that incorrectly changing registry settings can lead to serious problems. Therefore, when editing the registry, you must follow the instructions exactly. For safety net, it will not be superfluous to create a backup copy of the registry. Then, in case of system failures, the registry can be restored.
For creating backup section or subsection of the registry in the "Registry Editor" window, select the desired folder and in the "File" menu, select the "Export ..." command:

In the "Export registry file" window, name the file and save it in the selected directory. It could be a folder hard drive or removable media. It will be possible to restore a deleted or modified registry branch using the "Import ..." command in the "File" menu.
And a few more words about support. Microsoft extended mainstream support Office suite 2007 for another six months - until 10/09/14. After that, Office 2007 will be in extended support until 10/09/17. In this phase, the office suite receives security updates for free, and all other support for a fee. Timely switch to the new version - Office 2010.
Text editor WORD for WINDOWS
In the wake of the Windows craze this environment was
Microsoft's well-known word processor, Word, has also been ported.
Once in a new environment, Word, while retaining the power of its DOS counterpart
also acquired new qualities characteristic of Windows applications, which
further developed in Word version 6.0 for Windows 3.1-3.11, version 6.0 and
7.0 for Windows95 and the latest Russian localized version of Word97
for Windows98. In particular, instead of cryptic key combinations,
most commands are available through the Tool-Bar. Naturally, the editor
complies with the WYSIWYG principle, and uses True-Type fonts. In addition to that
Word supports OLE, which makes it a full-fledged Windows application,
fully using the capabilities of the system, and allowing you to do the work
over the created document in the most convenient and natural way. Possibility
import of many graphic formats, formula editors, business programs
graphics and the possibility of multi-column layout bring Word closer to
DTP systems. The undoubted advantages include the presence of the Thesaurus and
spell-checking systems that make Word beautiful text
editor. Built-in Word Basic language - makes the editor exceptional
flexible and convenient when processing documents of the same type, and allows him,
like AutoCAD to tune in to the subject area in which it
used. The ability to calculate in tables makes Word related to Excel
and similar programs.
Computers are devices that allow
conduct a dialogue with the user, the form of this dialogue is determined
operating system. An operating system is a program that
automatically loaded when the computer is turned on and presents
user a basic set of commands with which you can run
other programs, format disks, copy files, etc. After
MS-DOS systems appear further extended operating systems
Windows 3.1-3.11 and new build ideology operating system
Windows95. It has changed radically and is as close as possible to
real world, focused on the user who is used to working
at a table with real documents. User Perspective
Windows3+ graphical shell and Windows95 operating system have
a lot in common, as well as programs running in them from the Microsoft package
Office which contains text word editor.
A text editor is a word processing program
which is used to create new documents (letters, reports,
bulletins) or changes to existing ones. Modern text
editors (including the Word editor) are sometimes called text editors
processors, since they contain a very large number of functions
text processing. Early text editors for DOS were divided into
inline and screen, such as EDLIN, MULTIEDIT, and EDIT.
Microsoft Word allows you to enter, edit,
format and format the text and correctly place it on the page. With
This program allows you to insert graphics, tables, and
charts, as well as automatically correct spelling and
grammatical errors. Word text editor has many
other features that greatly facilitate the creation and
editing documents. The most commonly used functions are:
when you enter text, you hit the end of a line, Word automatically
makes a transition to the next line;
if a typo is made when entering text, the auto-correct function
automatically corrects it. A function automatic check
spelling highlights misspelled words in red wavy
line to make them easier to see and correct;
if using hyphens to highlight list items, use
fractions, trademark mark or other special characters, function
auto-formatting will correct them itself;
to present the text in the form of a table, you can, of course, use
tabs, but Microsoft Word offers much more efficient
facilities. And if the table contains numerical data, then it is easy to
turn into a diagram;
preview mode allows you to see the document in the form
in which it will be published. In addition, it makes it possible to display
all pages at once, which is convenient for making changes before printing.
The program also offers a number of features that save time and effort. Among
them:
autotext - for storing and inserting frequently used words, phrases or
charts;
styles - for storing and setting entire sets of formats at once;
merge - for creating serial letters, printing envelopes and labels;
macros - to execute a sequence of frequently used commands;
"Wizards" - for creating professional-looking documents.
Every personal computer has a control board
monitor, or a graphics adapter that is used to output
images on the monitor screen. The image on the screen consists of
individual points. Most adapters can operate in two modes:
text and graphics.
In text mode, all characters have the same size and do not
can be displayed anywhere on the screen. Character image
located in internal memory the adapter itself. Due to the fact that
the positions of all the points that make up the symbol are known in advance and cannot be
can be changed, text output to the screen is fast. However, in
text mode, it is impossible to implement the principle of WYSIWG (What You See Is
What You Get - what you see is what you get), in which the page
text on the screen looks exactly the same as on paper. Peculiarities
text mode:
the number of characters per line is usually 80, and the number of lines is 25;
the number of characters is limited to a set of 256 ASCII codes;
a single, strictly fixed font is displayed on the screen;
a character can only be underlined, but not italicized or
using bold;
images cannot be displayed at the same time as text.
In graphics mode, the adapter does not use images
characters stored in its memory, and controls each individual point
on the screen. Any colored dot is formed by mixing several colors
in various proportions (usually three: red, green and blue).
An image of the symbol, consisting of colored dots, must be kept and
be played on the screen by the program itself, and not by the graphics adapter.
This requires more computer time than when working in
text mode. The advantage of graphics mode is that
There are no restrictions here text mode. headset, size,
the font weight is displayed on the screen, and the drawings can be seen
along with the text. Thus, in graphics mode, the screen
the presentation of the document matches the printed one.
There are three main stages in working on a computer:
input of information, processing, output of results. When typing (typing
information) using the keyboard. To change content or
text formatting (perform processing), you must give the command
computer processor. This can be done with the mouse. The effect of their
actions can be seen on the monitor screen or after printing the document
on the printer (result output). So mouse and keyboard
are input devices, the processor is a device
processing, monitor and printer - output devices. Windows environment
focused on working with the mouse: many commands are faster and more convenient here
execute with the mouse than with the keyboard.
INSTALLING WORD FOR WINDOWS
The word processing program Word for Windows comes with
or on 3.5" floppy disks (version 6.0) or on a CD in
part of the Microsoft Office package (version 7.0). To use Word
Windows requires:
computer with a processor no worse than 80286 (80386) - for version 6.0 and no worse
80386(80486) - for version 7.0;
established Windows versions 3.1, Windows95 or Windows98 versions;
minimum volume random access memory 4MB (preferably 8 and above);
EGA, VGA, or SVGA graphics adapter compatible with Windows 3.1 (VGA
or SVGA for Windows 3.11, Windows95, Windows98);
hard drive with free space from 6 to 28 MB for full or
partial Word installation for Windows;
drive for 3.5-inch floppy disks (version 6.0);
CD-ROM drives (version 7.0).
Version 7.0 exists in two different versions: as a separate
software product and as part of the Wicrosoft Office package.
WORD EDITOR COMPONENTS
Microsoft Word - This option installs all
software Word files. Installation of this component is required. If a
to refuse it Word will not work.
Graph, Equation, WordArt - thanks to this group of programs
it is possible to insert various diagrams (Graph) into the document,
math formulas (Equation - formula editor) and text effects
(WordArt). These programs are installed in the MSAPPS subdirectory under the
WINDOWS, i.e. to the drive where Windows is installed. This is
especially important when the bulk of the Word package
installed on a different drive. Both disks should have enough
free space.
Proofing Tools - these programs
designed to check spelling, correct typos and select
synonyms.
Envelopes, filters and ODBC (Converters, Filters and Data
Access) - documents created in other text editors have formats
files are different from the format used by the Word editor.
In order for Word to work with such files, you need special programs
format conversions, or converters. Word 6.0 will "understand" the document
created in another program, only if the corresponding
converter. In addition, Word can import graphics created in
other programs, and export drawings in the format of other programs.
This is convenient for sharing between different programs. For conversion
image formats, special programs - filters are used.
Help and examples (Online Help, Examples and Demos) -
The Word help system takes up about 5MB of hard disk space.
disk. It contains information about each command and describes the steps
that need to be done to get the desired result. AT
In particular, it contains information about WordBasic (the built-in
programming to create new word processing functions), descriptions
which is not in the printed documentation.
Wizards, templates and letters (Wizards, Templates and
Letters) - wizards and templates save time when designing
standard documents. Using Word templates, you can quickly create
letters, faxes, inscriptions on envelopes, etc. This component takes
hard disk about 3MB.
Tools (Tools) - this group includes the program
installation that allows you to change the configuration of MS Word, the program Dialog
Editor, a MS Info program designed to obtain information about
current system Windows configuration, and the Dialogue Editor program,
which is used to create macros (macros).
Graphics (Clip Art) - in the graphics library is
more than 50 drawings that can be used for paperwork.
BEGINNING OF WORK
Any program in the Windows environment is represented by
monitor screen as a separate window. Each window has a line
header and menu with a set of commands. There may be others in the window
elements: toolbars with buttons (toolbars), scrollbars,
dialogues, etc. - everything that the developer has provided for the convenience of working with
program.
ENTERING AND EDITING TEXT
Before a document becomes a document, it must
type. In computer-aided preparation of texts, this procedure
is carried out in several stages. First enter the text
edit it (correct errors and typos), execute
formatting (specify the size, style and type of font, highlight
headings, determine how lines are aligned and paragraphs are highlighted,
insert pictures, arrange columns and headers and footers, define
page dimensions, etc.), then print the document on the printer and
write the created document to HDD or diskette (this operation
is called write to file).
After launch Word programs window appears on the screen
the program itself, and in it is an empty document window, which is assigned
name Document1. Flashing vertical bar in the upper left corner of the window
called a text cursor. Registers are switched using the key
shift. Keyboard layout into languages using Ctrl + Shift keys or
Alt + Shift. On the right and bottom sides of the Word window are
called text scrollbars.
The whole difficult process of editing a document
reduced to a few simple operations: deletion, addition,
copying and moving. You can delete, add, move and
copy individual characters, words, lines, sentences, paragraphs,
fragments of text, or even the entire document both within one
document, and between multiple documents.
To move or copy sections of text with
Word has two different techniques: the new and the elegant
Drag-and-Drop, or "drag and drop", which is especially useful for
moving text small distances within the visible text, and
technique using the right mouse button. The last method is used
when copying or moving sections of text over long distances.
To move or copy sections of text, you can
use the so-called Windows clipboard. The clipboard is
a section of memory in which a cut or
copied portion of text or graphics. The contents of the buffer can be
inserted into the same program or another. When buffering a new
section of text or graphics, the old contents of the clipboard are lost.
When working with Word for Windows, you can repeat or
undo the last command. However, the redo and undo functions are not applicable.
to all teams.
FORMATTING THE DOCUMENT
Word text editor for Windows is a powerful tool for
professional preparation of documents, but effective use
the full range of its functions. The Word editor allows you to create
a huge number of special effects. To give text
readable, usually use no more than three fonts and
for text highlights, signatures, headings change the style or
font size. The format of the document must comply with its
content. The text is perceived better if there is little left on the page
free space, margins at the edges of the page, free space between
columns of text and before headings. On the readability of the text in large
degree also affects right choice typefaces, styles and sizes
font, spacing between lines of text, spacing, paragraph indents and
etc.
TABLES AND CHARTS
With Word for Windows, you can create tables with two
ways. The first way is to create an empty table and then
filling cells. The second is to transform the existing
text into a table. You can change the number and size of columns in a table, and
rows, merge cells or insert new ones anywhere in the table.
Word allows you to present data not only in the form
tables, but also as a diagram. From the point of view of the Word editor diagram
is the object that the OLE method is used to work with. Creates
and the Microsoft Graph program processes this object.
SPELLING
Word for Windows gives you the ability to check spelling.
When checking, each word in the document is compared with patterns in
special dictionary. If the word is not found in the dictionary, it will open
dialog box where you can make the necessary corrections.
Repetitive or typical spelling errors can be
correct using the auto-correct function directly when typing
text, and the search and replace function allows you to make changes to the spelling
individual words at once in the entire text or in a selected area. This same
function allows you to change text and paragraph formatting settings –
both throughout the document and in the selected area.
Word has a module for separating words into syllables. He
designed to translate words correctly.
There are three types of dictionaries in the Word editor:
standard, exceptions and special (custom). Via
standard dictionary, you can check the spelling of a document containing
text on different languages. The exception dictionary contains words that
the standard dictionary recognizes as spelled correctly. This dictionary
created by the user, and it includes those words that you
want to stop when checking spelling. If you write articles on
specialty, such as chemistry or physics, you may need a separate
a dictionary for terms, the so-called user dictionary.
The program offers options for replacing frequently repeated in
words in the document, which allows you to make the language of the document more vivid and
expressive. The list of synonyms is in the menu Tools-Synonyms
(Tools-Thesaurus).
The Edit menu contains the Find and Find commands.
Replace (Replace) designed to find and replace fragments
text.
When working with documents, you often have to repeat input
the same sections of text. In Word, it is enough to enter them once, and
then make it an autotext element with a unique name and after that
insert at any place in the document the required number of times.
The auto-correction program checks and corrects typical
errors after entering a single word. For word fixes uses
list of common mistakes.
Grammar Check - This feature only exists in
versions of Word 7.0 for Windows95 and above. It allows you to check and
eliminate grammatical and stylistic errors. Check program
scans the text for errors. If an error is found, it
opens the Grammar dialog box.
To get statistical information about the number
characters, words, lines, paragraphs, and pages in a document, you need to
menu command Service-Statistics (Tools-Statistics). will also be output
indicators - level of education, ease of reading, number of complex phrases,
euphony.
DOCUMENT REGISTRATION
Word allows you to save time when compiling standard
documents, representing a set of standard forms, or templates. If a
standard templates do not suit you, you can use the Wizard,
which will create a blank document for you in accordance with the parameters,
which are indicated in the dialog boxes. To select a template, complete
command File-Create (File-New).
DOCUMENT STRUCTURE
When working with complex documents containing a large
the number of chapters, sections, and possibly subordinate documents, can be
take advantage powerful tool Word for Windows - Create Outline
document. Structure is a hierarchy of documents, sections, and headings
various levels. To enable structure mode, execute the command
View-Structure (View-Outlining).
MACRO COMMAND
When working with the program, you often have to perform
a sequence of the same actions: open various menus and
execute certain commands. Instead of pressing every time
the same key sequence, you can record a macro,
which will be executed by pressing one single key. For this
the Macro command from the Tools menu is executed.
GRAPHICS EDITOR
WORD
Most documents contain various illustrations:
brand names, diagrams, graphs, drawings. Using Word for Windows
you can create such objects because Word contains a built-in
graphics editor. With this editor you can create drawings
in the text of the document, using the functions of drawing primitives or
elementary geometric objects: lines, rectangles, circles and
etc. To insert a picture into text as an object, execute the command
Insert-Object (Insert-Object).
E-MAIL AND
CONNECTION
Word for Windows provides
user Merge Assistant - a special module for preparing
a large number letters of the same content, but to different recipients.
You can send faxes directly from Word for Windows. For a call
the menu command Service-Merge (Tools-Mail Merge) is selected.
AUTOMATION OF DOCUMENT OPERATIONS FOR
WORD97
Part new version WORD97 wide set included
automation tools that simplify the performance of typical tasks. Majority
of which, in one form or another, was presented in previous versions
editor, but now the possibilities of automation have become much wider. To
such means include:
autocorrect, which allows you to automatically correct typical mistakes
when entering;
autocomplete, with which you can automatically continue typing
word or piece of text after typing the first few letters. Now
the editor from the very beginning has some base of such blanks;
automatic spell checker now includes check
spelling and grammar;
abstract: in Word97, the ability to automatically generate
document abstract. The editor analyzes the text and highlights it
key provisions on the basis of which the abstract is drawn up;
automatic creation and preview styles
autoformat as you type, designed for automatic formatting
document immediately upon entry or after it is completed. In version
Word97 autoformat tools have gained especially many new features.
ASSISTANT
New tool in Microsoft Office 97 - Assistant,
designed to automatically give advice and
provide background information that you may need along the way
task execution.
TABLES, BORDERS AND
FILLING
Word97 has new tools that make it easier to work with
tables, borders and shading:
use the mouse to draw tables of any shape, individual cells can
have any width and height, you can merge adjacent cells;
table cells can be aligned on all sides, text inside cells
can be placed vertically
over 150 different border types included;
around each page you can create a frame, the editor has 160
types of graphic page borders.
PAINTING
The editor has a new set of graphic tools for decoration
texts, adding volume, shadows, texture and transparent fills, and
also more than 100 customizable autoshapes, 4 types of fill, etc.
WEB AND
INTERNET
The editor is connected to the WEB, installation with any file
hosted on an internal or external Web site or file server.
The Web Page Wizard allows you to automate the creation process
Web documents. Sound design, video recording, placement of drawings on
Web pages, ticker, use of HTML codes to
Ease of creating Web pages.
VIEWING ELECTRONIC
DOCUMENTS
Word97 includes special tools that make it easy to
viewing electronic documents:
electronic document mode;
document layout allows you to quickly access any part
document;
document background, used different kinds background and texture fill;
text animation, adding animation effects to the text;
navigation through objects.
MULTIPLE USER COLLABORATION
There are new opportunities and tools that increase
performance of working group members working together on a common
document. Versioning, merging documents, notes, and
tooltips, review panel.
MULTILINGUAL SUPPORT
Already implemented in Word95 automatic changes
font and language when switching keyboard layouts. In Word97 creation
and viewing texts in various European languages, even more
simplified. In addition, it is possible to view documents,
created with other localized (national) versions of Word.
Enhanced tools for editing Web pages and
message editing Email. Create hyperlinks, access
to data address book, formatting WordMail messages, templates
wordmail.
63. Text editor Word. Elements of automation when working with large documents and / or with a large number of documents of the same type. Consider the examples provided by the teacher
64. Excel spreadsheets. Worksheet functions. Examples of logical functions. Consider examples.
Excel spreadsheets. Worksheet functions. Examples of logical functions. Consider examples.
Altogether, Microsoft Excel contains more than 320 worksheet functions (built-in functions) that allow you to perform a wide variety of calculations. All of them, in accordance with the nature of the calculations, are divided into 11 groups:
mathematical functions;
text functions;
logic functions;
information functions;
view and link functions;
date and time functions;
financial functions;
engineering functions;
statistical functions;
DDE/external functions;
database and list management functions.
65. Excel spreadsheets. Generalization of data: filtering, consolidation, subtotals, pivot tables. Consider examples.
Excel spreadsheets. Generalization of data: filtering, consolidation, subtotals, pivot tables. Consider examples.
Using an autofilter allows you to easily and quickly find data to work with in a range of cells or a table column. You can create three types of filters using autofilter: by list values, by format, or by conditions. They are all mutually exclusive within a cell range or table column. For example, you can filter by cell color or by a list of numbers, but you can't use both at the same time; similarly, you must select one of the two types if you want to filter by icons or based on a user-specified filter.
Consolidating data combines values from multiple data ranges. For example, if you have an expense sheet for each regional office, you can use consolidation to convert that data into a corporate expense sheet. There are several ways to consolidate data in Microsoft Excel. The most convenient method is to create formulas that refer to the cells in each range of the combined data. Formulas containing references to multiple sheets.
Microsoft Excel can automatically calculate subtotals and grand totals in a list . When you insert automatic subtotals, Microsoft Excel changes the list layout to show and hide rows for each subtotal. Before inserting subtotals, you must sort the list to group the rows you want to sum up. After that, you can calculate the subtotals of any column containing numbers. If your data is not organized in a list, or if you want to add a single subtotal, you can use AutoSum instead of automatic subtotals.
66. Excel spreadsheets. Entering and formatting data. Calculations by formulas. Consider examples.
Electronic Excel spreadsheet consists of 256 columns and 1048576 rows. In Excel, tables are called worksheets. Worksheet (spreadsheet) is the main type of document used in Excel for storing and processing data. By default, sheets are numbered “Sheet 1”, “Sheet 2”, etc.
To enter data into one cell, it is enough to make it active and start typing, while we enter the data editing mode in the cell.
To exit edit mode, press "Enter" or "Tab" ([+Shift]). If there was data in the cell before, they will be erased;
To enter the same data in many cells, select the desired cells, write the text, and, without leaving the edit mode, press "Ctrl + Enter";
To change the data in a cell, make it active and double-click on it;
To change data in a cell, make it active and press "F2";
To change the data in the cell, make it active, click in the formula bar, and change the contents of the cell in it, to complete, press "Enter", or the green checkmark on the left.
Data alignment. By default, text is left-aligned (horizontally) and numbers are right-aligned (horizontally). Vertically, the data is bottom-aligned. Horizontal alignment can be changed using the buttons on the "Formatting" toolbar:
67. Excel spreadsheets. Building and formatting charts. Consider examples.
An Excel spreadsheet has 256 columns and 16384 rows. In Excel, tables are called worksheets. Worksheet (spreadsheet) is the main type of document used in Excel for storing and processing data. By default, sheets are numbered “Sheet 1”, “Sheet 2”, etc.
Tables with numerical data are not clear enough and give little idea of the dynamics of the process. For graphical representation of data in Microsoft Excel, there are special objects- charts that help compare and analyze data, as well as decorate the document. In addition, choosing suitable type charts, you can plot a function of one or two variables. Creating a data source for plotting is a rather laborious and lengthy process. Operating with another Excel object - a lookup table, you will greatly simplify this task. Moreover, by building a graph based on the lookup table and placing it next to the data, you can observe how changing the lookup formula affects the result.
To work with text information very effective are special text preparation programs: the so-called word processors and text editors. Unlike a printing press, word processors make it possible to prepare any document in a much shorter time and with better quality.
Today there are hundreds of different text editors, and their number continues to grow. Functionality various programs preparation of texts differ significantly, at the same time, most of them have many common properties.
Common functions that can be implemented by word processors include the following:
1) entering text into a computer;
2) text editing (replacement, insertion, deletion, etc.);
3) search for the necessary information in the text;
4) text formatting (setting the left border of the text, aligning the right edge, setting the indent position of the first line of the paragraph, etc.);
b) transfer and copying of text fragments;
6) highlighting parts of the text in a specific font;
7) splitting the text into pages with a certain number of lines and intervals between lines;
8) work with several documents at the same time;
9) printing text with a given density, quality, etc.; 10) saving text on disks.
The Word text editor is one of the most common text editors, which is largely due to its many advantages, which include, first of all, wide functionality. It is difficult to find such a task in working with texts that could not be solved using Word. This editor is part of the Microsoft Office group of programs. In addition to it, it includes an Excel spreadsheet and an Access database management system, that is, the main programs that can be used to form workflow in institutions. The widespread use of Word is also facilitated by its built-in tools for converting files created by other text editors into Word format files and vice versa.
There are several versions of Word for Windows, each successive version is generally pre-release compatible and has additional features. Further material will be based on work with the Russified version 7.0.
To install Word on Windows, run Start/Settings/Control Panel. Then select Add/Remove Programs in the Control Panel, insert the CD into the drive and click the Install button. During the installation process, the screen z"is the instructions that you must follow. Installation options differ in additional features, and therefore the programs that implement these features.
> Microsoft Word Editor Windows
To start Word, you need to execute the command Start / Programs / Microsoft Word, after which the editor window will appear on the screen.
The Word editor window has several standard elements. Some of them are constantly present on the screen, others can be called at the request of the user. Consider the purpose of these elements.
Title bar. The top line of the screen is the standard Windows title bar. It shows the name of the program (Microsoft Word) and four buttons: one on the left and three on the right. The left button is the button for calling the control menu. The guide menu is typical for any Windows windows. The first of the right buttons - Minimize - minimizes the window to an icon on the Taskbar, the second - Restore - restores the normal size of the window, the third - Close - closes the window.
Menu bar. Below the title bar in the window is a menu bar containing the following items:
File - provides for working with document files;
Editing - editing documents;
View - view documents;
Insert - allows you to make pagination, insert pictures, diagrams, current dates and times, formulas, links, footnotes and other objects into the document;
Format - provides for formatting documents (setting fonts, parameters, paragraph indents, creating a drop cap);
Service - service functions (spell checking, setting Wordy settings,
Table - for working with tables;
Window - for working with document windows;
Mandrel - Help information about Word.
Each menu item has a corresponding submenu. Press Alt or F10 to open the menu. After that, one of the menu items will be highlighted in an inverse way. To select the desired menu item, use the horizontal cursor keys. To open the highlighted item, press the Enter key. At the same time, it is more convenient to do all these operations with the mouse, by placing the cursor on the desired menu item and pressing the left button.
In the submenu, the desired item can also be selected in two ways: either with the mouse (to do this, place the mouse cursor on the desired item and press the left button), or with the keyboard (select the desired item with the vertical cursor keys and press the Enter key).
There is an underlined letter e in the names of menu items. This allows you to immediately select the desired menu item by pressing the combination Alt keys+ underlined menu letter. Near some submenu items, to the right of the name, there are symbols of key combinations with which you can select the corresponding submenu item.
The names of some submenu items are greyed out. This means they are on this moment are not available (for example, you cannot edit a table if it has not yet been created).
Word text editor has another way to call commands. Right-clicking on a selected text or word will display a context menu that contains commands that can be applied to the selected object. The user has the ability to undo the action of the last entered command by performing the Edit / Undo Input function.
Toolbars. Under the menu bar are usually placed toolbars, that is, a series of buttons that, when pressed, perform a certain action. To click a button, you need to click on it with the left mouse button. While fixing the cursor on the button, ITS name appears under it. The buttons duplicate the corresponding menu commands, but the buttons on this panel are much faster and more convenient to use.
Word has created several toolbars for the user. To select the required one, use the View/Toolbars command. At the same time, a dialog box will appear on the screen, you can select the necessary panels from the list. By default, Word displays the Standard and Formatting toolbars. Some panels appear on the screen automatically when certain actions are performed (for example, the Drawing panel is displayed for drawing drawings). The panel screen can be moved to a typical environment word way- using the mouse.
Dialog window. Some commands require additional information to be entered. For example, to execute the File/Open command, you must specify the drive or directory and the file name. To enter such information, dialog boxes are used that contain a number of elements: buttons, lists, checkboxes, switches, input lines, which are placed in thematic groups and are called fields.
Topic groups have headings that end with a colon. Moving from group to group is done either with the mouse or by pressing the Tab key. The group name can be highlighted by pressing the key combination (Alt + underlined letter in the field name). Moving within the group is carried out using the cursor movement keys. In the case of entering auxiliary information in the dialog box, check boxes and switches are set, items are selected from the lists, and text is entered and edited in the input fields.
Checkboxes are small boxes in which a checkmark appears after being enabled. They turn on independently of each other.
Switches (displayed as circles) are used when it is necessary to select one of several options (parameters). The selected switch differs from the others by a dark dot inside the circle.
Lists are used to select one of several options (for example, a font). As long as the marker is inside this list, the list can be scrolled by moving the cursor. The list item is selected by pressing the left mouse button or the Enter key.
A special form of a list is single-line lists, in which only the first element is shown. Such lists have a downward arrow on the right. To view such a list, you need to place the mouse cursor on the arrow and press the left mouse button or the key combination Alt + cursor right arrow. After opening the list and selecting an item, the list closes again. Some one-line lists where the elements are numbers have two arrows on the right, pointing up and down. Clicking on the down arrow decreases the item's value, while clicking on the up arrow increases it.
In the right part or at the bottom of the window there are buttons for managing the dialog box.
The OK button (Enter key) closes the dialog box and pressing it confirms all the changes entered, after which Word executes the command.
Cancel button (Esc key cancels all changes entered; the dialog box closes, but the corresponding command is not executed.
In addition to the OK and Cancel buttons in the dialog box, depending on its specific purpose, there may be other control buttons.
Many dialog boxes cannot be displayed at the same time. In this case, tabbed pages are used. Each tab has a name at the top. To open a tab, place the cursor on the name and press the left mouse button. Dialog boxes also have fields whose names end with a three-dot. When you select such a field, another window opens, in which you can also set certain parameters.